ChevyParts
My Garage
My Account
Cart
OEM 2000 Chevrolet Venture A/C Expansion Valve
Air Conditioning Expansion Valve- Select Vehicle by Model
- Select Vehicle by VIN
Select Vehicle by Model
orMake
Model
Year
Select Vehicle by VIN
For the most accurate results, select vehicle by your VIN (Vehicle Identification Number).
1 A/C Expansion Valve found

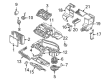
2000 Chevrolet Venture Expansion Valve Part Number: 10436282
Product Specifications- Other Name: Valve, Air Conditioner Expansion Refrigerant; A/C Expansion Valve; Valve, A/C Expansion Refrigerant
- Replaces: 10279826
- Item Weight: 1.00 Pounds
- Item Dimensions: 8.9 x 4.7 x 2.9 inches
- Condition: New
- Fitment Type: Direct Replacement
- SKU: 10436282
- Warranty: This genuine part is guaranteed by GM's factory warranty.
2000 Chevrolet Venture A/C Expansion Valve
With a comprehensive array of OEM 2000 Chevrolet Venture A/C Expansion Valve, from fuel pumps to door handles, our website is a one-stop-shop for your needs. All our genuine 2000 Chevrolet Venture A/C Expansion Valve are backed by the manufacturer's warranty and are offered at competitive prices in the market. Rest assured, you can shop with complete confidence.
2000 Chevrolet Venture A/C Expansion Valve Parts Questions & Experts Answers
- Q: How to replace the A/C Expansion Valve on 2000 Chevrolet Venture?A: Start the thermal expansion valve replacement by recovering refrigerant then raising the vehicle. Remove the bolt from the a/c line block fittings while immediately applying caps or tape on open a/c refrigerant lines. The procedure requires a separation of the line block fitting before throwing away the o-ring seal while using caps or tape to secure the a/c line from contamination. Start the procedure by dropping the vehicle and taking out the trim from the left rear quarter area. Beginning at the thermal expansion valve remove its line block fitting nut before gradually pulling up the a/c lines through the vehicle floor and apply caps or tape to the open lines. The o-ring seals should be discarded before using caps or tape to secure the lines against contamination. After removing the bolts from the exposed thermal expansion valve the technician should pull out the valve from its position on the evaporator core lines while re-applying caps or tape to the open lines. Before installing the evaporator lines users must remove their protective caps or tape then wipe the intended seal surfaces with a lint-free material. The new o-ring seal must receive a thin coating of mineral base 525 viscosity refrigerant oil before installation on the a/c line so the oil completely remains within the designated area. The thermal expansion valve should be installed onto the evaporator core lines before tightening bolts through the thermal expansion valve until they reach 5 n.m (44 lb in). Recover the tape or cap from the a/c lines before cleaning each sealing surface so you can complete the o-ring seal coating process and reinstallation. After carefully inserting the a/c lines through the vehicle floor they should reach the thermal expansion valve position. Then install the retaining nut to the line block fitting and secure it with 5 n.m (44 lb in) torque. Remove the left rear quarter trim after raising the vehicle and follow by removing the tape or cap from the a/c lines. Secure the a/c line by mounting the new o-ring seal that received refrigerant oil onto the sealing surface until it takes proper position. Keep the oil inside the marked area while sealing the joint. Position the a/c line block fitting followed by its bolt before torquing it to 20 n.m (15 lb ft). After the vehicle lowers down you should evacuate the system followed by charging it before performing a leak test.
Related 2000 Chevrolet Venture Parts
 2000 Chevrolet Venture Cabin Air Filter
 2000 Chevrolet Venture Heater Core
 2000 Chevrolet Venture A/C Accumulator
 2000 Chevrolet Venture A/C Compressor Cut-Out Switches
 2000 Chevrolet Venture A/C Hose
 2000 Chevrolet Venture A/C Idler Pulley
 2000 Chevrolet Venture A/C System Valve Core
 2000 Chevrolet Venture Ambient Temperature Sensor
 2000 Chevrolet Venture Blend Door Actuator
 2000 Chevrolet Venture Blower Motor Resistor
 2000 Chevrolet Venture Evaporator
 2000 Chevrolet Venture HVAC Pressure Switch