ChevyParts
My Garage
My Account
Cart
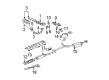
OEM 2001 Cadillac Seville Exhaust Manifold
Engine Exhaust Manifold- Select Vehicle by Model
- Select Vehicle by VIN
Select Vehicle by Model
orMake
Model
Year
Select Vehicle by VIN
For the most accurate results, select vehicle by your VIN (Vehicle Identification Number).
4 Exhaust Manifolds found

2001 Cadillac Seville Exhaust Manifold, Driver Side Part Number: 12564185
$28.32 MSRP: $421.39You Save: $393.07 (94%)Ships in 1-2 Business DaysProduct Specifications- Other Name: Manifold, Engine Exhaust Manifold; Manifold
- Position: Driver Side
- Item Weight: 9.30 Pounds
- Item Dimensions: 15.2 x 13.7 x 5.6 inches
- Condition: New
- Fitment Type: Direct Replacement
- SKU: 12564185
- Warranty: This genuine part is guaranteed by GM's factory warranty.
- Product Specifications
- Other Name: Manifold, Engine Exhaust Manifold; Manifold
- Position: Driver Side
- Item Weight: 9.80 Pounds
- Item Dimensions: 14.2 x 11.0 x 2.3 inches
- Condition: New
- SKU: 12559225
- Warranty: This genuine part is guaranteed by GM's factory warranty.
 Product Specifications
- Other Name: Manifold, Engine Exhaust Manifold; Manifold
- Position: Passenger Side
- Item Weight: 9.00 Pounds
- Item Dimensions: 14.9 x 8.3 x 3.8 inches
- Condition: New
- Fitment Type: Direct Replacement
- SKU: 12558512
- Warranty: This genuine part is guaranteed by GM's factory warranty.
- Product Specifications
- Other Name: Manifold, Engine Exhaust Manifold; Manifold
- Position: Passenger Side
- Item Weight: 9.00 Pounds
- Item Dimensions: 15.8 x 8.5 x 6.7 inches
- Condition: New
- Fitment Type: Direct Replacement
- SKU: 12557767
- Warranty: This genuine part is guaranteed by GM's factory warranty.
2001 Cadillac Seville Exhaust Manifold
With a comprehensive array of OEM 2001 Cadillac Seville Exhaust Manifold, from fuel pumps to door handles, our website is a one-stop-shop for your needs. All our genuine 2001 Cadillac Seville Exhaust Manifold are backed by the manufacturer's warranty and are offered at competitive prices in the market. Rest assured, you can shop with complete confidence.
2001 Cadillac Seville Exhaust Manifold Parts and Q&A
- Q: How to replace the left exhaust manifold on 2001 Cadillac Seville?A: Safety must be established by observing hot exhaust system and exhaust parts removal precautions before starting the left Exhaust Manifold replacement. Two nuts securing the secondary air tube must be taken out of the Exhaust Manifold before removing this tube and its gasket for disposal. The next step requires you to take off the front Engine Mount Bracket before you lift the vehicle. You should remove the Oxygen Sensor in case it is required. Unscrew the two bolts which fix the left Exhaust Manifold to the front Exhaust Manifold pipe before eliminating the left Exhaust Manifold retaining bolts. Pull out the left Exhaust Manifold and its gasket from the engine carefully before disposal of the gasket material. Move on to remove the front Exhaust Manifold pipe seal from the left Exhaust Manifold before continuing to take off the Exhaust Manifold flange seal retainer. Perform a cleaning process together with an inspection of the left Exhaust Manifold after cleaning. After positioning a new front Exhaust Manifold pipe seal with its retainer over the left Exhaust Manifold the assembly must be fitted with a new Exhaust Manifold gasket between that manifold and the left Cylinder Head. The left Exhaust Manifold must be inserted into the front Exhaust Manifold pipe until it reaches the left Cylinder Head position while installing new left Exhaust Manifold bolts with torque set to 25 nm (18 ft. Lbs.). Then fasten the Exhaust Manifold bolts which join the left Exhaust Manifold to the front Exhaust Manifold pipe before tightening them to 25 nm (18 ft. Lbs.). Reinstall the Oxygen Sensor together with the front Engine Mount Bracket followed by lowering the vehicle. Place a new gasket on the secondary air tube before securing it by tightening the two nuts which mount the secondary air tube to the Exhaust Manifold to 12 nm (106 inch lbs.).
Related 2001 Cadillac Seville Parts
 2001 Cadillac Seville Catalytic Converter
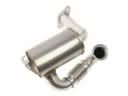 2001 Cadillac Seville EGR Filter
 2001 Cadillac Seville EGR Tube
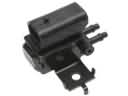 2001 Cadillac Seville EGR Vacuum Solenoid
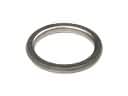 2001 Cadillac Seville Exhaust Flange Gasket
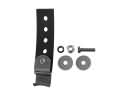 2001 Cadillac Seville Exhaust Hanger
 2001 Cadillac Seville Exhaust Manifold Gasket
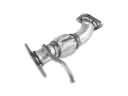 2001 Cadillac Seville Exhaust Pipe
 2001 Cadillac Seville Muffler
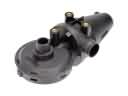 2001 Cadillac Seville PCV Valve
 2001 Cadillac Seville Tail Pipe
 2001 Cadillac Seville Vapor Canister