ChevyParts
My Garage
My Account
Cart
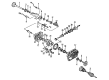
OEM 2001 GMC Safari Universal Joint
U-Joint- Select Vehicle by Model
- Select Vehicle by VIN
Select Vehicle by Model
orMake
Model
Year
Select Vehicle by VIN
For the most accurate results, select vehicle by your VIN (Vehicle Identification Number).
2 Universal Joints found


2001 GMC Safari Universal Joints Part Number: 89059111
$163.83 MSRP: $273.43You Save: $109.60 (41%)Ships in 1-2 Business DaysProduct Specifications- Other Name: Joint Kit, Front Axle Propeller Shaft Universal *Outside Snap; Slip Yoke; Joint Kit, Propeller Shaft Universal Joint
- Position: Front
- Replaces: 12472409, 12476231, 12471503, 12522048, 26049843, 88982758, 88964507, 94772179, 12476230
- Item Weight: 1.90 Pounds
- Item Dimensions: 4.1 x 4.1 x 1.6 inches
- Condition: New
- Fitment Type: Direct Replacement
- SKU: 89059111
- Warranty: This genuine part is guaranteed by GM's factory warranty.


2001 GMC Safari Universal Joints Part Number: 23104840
$36.45 MSRP: $88.98You Save: $52.53 (60%)Product Specifications- Other Name: Joint Kit, Propeller Shaft Universal Joint; U Joint
- Position: Front
- Replaces: 12471502, 12479126, 26042371
- Item Weight: 1.80 Pounds
- Item Dimensions: 5.9 x 5.4 x 2.9 inches
- Condition: New
- Fitment Type: Direct Replacement
- SKU: 23104840
- Warranty: This genuine part is guaranteed by GM's factory warranty.
2001 GMC Safari Universal Joint
With a comprehensive array of OEM 2001 GMC Safari Universal Joint, from fuel pumps to door handles, our website is a one-stop-shop for your needs. All our genuine 2001 GMC Safari Universal Joint are backed by the manufacturer's warranty and are offered at competitive prices in the market. Rest assured, you can shop with complete confidence.
2001 GMC Safari Universal Joint Parts Questions & Experts Answers
- Q: What tools are required to service and repair the universal joint with a nylon injected ring on 2001 GMC Safari?A: Performing a Universal Joint service with nylon injected ring requires two specific tools: u joint bearing separator (J 9522-3) and u joint bearing spacer remover (J 9522-5). First put the propeller shaft on a press device and set it horizontally. Choose one end of the propeller shaft as the transfer point to the transmission or transfer case and the other end for connection to rear or front axle. Support the lower Universal Joint ear on the yoke with a 30 mm (1/1/8 inch) socket. To remove the lower bearing cup from its yoke ear use the j 9522-3 u joint bearing separator on opened horizontal cup bearings and press outward with the bearing spacer remover j 9522-5. Insert the u joint bearing spacer remover (J 9522-5) between seal and bearing cup and press them until cup separates from its position. Rely on the propeller shaft rotation to push the opposite bearing cup from yoke while disassembling cross and Universal Joint elements. When replacing the front Universal Joint of the rear axle you need to take out its bearing cups from the Slip Yoke as well. Verify both retaining ring grooves inside the yoke show no plastic debris and no nicks exist within the bearing cup bores. Remove sheared plastic from ring grooves before installing fresh bearings. To install the new parts apply a small amount of chassis grease onto the needle bearings before installing them into the bearing cups of the Universal Joint journals. Put one bearing cup into one side of the yoke then rotate it downward until you can insert the cross that helps the trunnion move through the bearing cup. Push the bearing cup into the yoke ear surface before placing the other bearing cup half way in from the opposite yoke ear ensuring trunnion parts align. Leave off pressure when misalignment appears in the bearings. Fold the opposite bearing cup onto the yoke ear while verifying that the trunnions move easily in their locations. Apply pressure until the bearing retainer groove fits over the yoke inner surface and install the bearing retainer into the groove. Use a gentle press while adding chassis grease when possible. Strike the yoke gently with a dead blow hammer to position the retainer seat when the retainer fails to fit properly.
Related 2001 GMC Safari Parts
 2001 GMC Safari Differential
 2001 GMC Safari Differential Bearing
 2001 GMC Safari Differential Cover
 2001 GMC Safari Differential Seal
 2001 GMC Safari Drive Shaft
 2001 GMC Safari Driveshaft Yokes
 2001 GMC Safari Pinion Bearing
 2001 GMC Safari Pinion Washer
 2001 GMC Safari Slip Yoke
 2001 GMC Safari Wheel Seal