ChevyParts
My Garage
My Account
Cart
OEM 2002 Chevrolet Monte Carlo Motor And Transmission Mount
Motor and Trans Mount- Select Vehicle by Model
- Select Vehicle by VIN
Select Vehicle by Model
orMake
Model
Year
Select Vehicle by VIN
For the most accurate results, select vehicle by your VIN (Vehicle Identification Number).
2 Motor And Transmission Mounts found


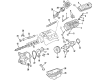
2002 Chevrolet Monte Carlo Motor Mount Part Number: 10448575
$69.62 MSRP: $118.53You Save: $48.91 (42%)Ships in 1-3 Business DaysProduct Specifications- Other Name: Mount, Engine Mount Dampening; Engine Mount Torque Strut; Engine Mount Bracket; Spring Insulator; Lower Mount; Mount Insulator; Mount; Mount, Engine Mounting; Engine Mount
- Replaces: 17998813, 22113282, 22178657, 22146018, 22175206, 10340740, 10448574, 10448576, 22146466
- Item Weight: 4.20 Pounds
- Item Dimensions: 11.6 x 5.1 x 5.2 inches
- Condition: New
- Fitment Type: Direct Replacement
- SKU: 10448575
- Warranty: This genuine part is guaranteed by GM's factory warranty.

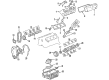
2002 Chevrolet Monte Carlo Transmission Mount, Orange Part Number: 22146834
$102.92 MSRP: $175.23You Save: $72.31 (42%)Ships in 1-2 Business DaysProduct Specifications- Other Name: Mount Assembly-Transmission *Orange; Transfer Case Mount; Mount, Transmission Mounting
- Replaces: 22178939, 22173073
- Item Weight: 2.30 Pounds
- Item Dimensions: 7.1 x 6.4 x 4.0 inches
- Condition: New
- Fitment Type: Direct Replacement
- SKU: 22146834
- Warranty: This genuine part is guaranteed by GM's factory warranty.
2002 Chevrolet Monte Carlo Motor And Transmission Mount
With a comprehensive array of OEM 2002 Chevrolet Monte Carlo Motor And Transmission Mount, from fuel pumps to door handles, our website is a one-stop-shop for your needs. All our genuine 2002 Chevrolet Monte Carlo Motor And Transmission Mount are backed by the manufacturer's warranty and are offered at competitive prices in the market. Rest assured, you can shop with complete confidence.
2002 Chevrolet Monte Carlo Motor And Transmission Mount Parts and Q&A
- Q: How to replace the automatic Motor and Transmission Mount on 2002 Chevrolet Monte Carlo?A: To replace the automatic transmission mount, first lift and hold the vehicle, second, take off the left tire and wheel assembly, as well as the left inner splash shield. Place a transmission jack in contact with the transaxle and use a wrench to remove the transaxle mount upper nuts from the transaxle bracket. Gently lift the transaxle assembly and remove to nuts in the mount lower nuts in the frame and take off the transaxle mount from the frame. In the installation, place the transaxle mount to the frame and install the transaxle mount lower nuts, tightening them to 63 n m (46 ft. Lbs.). Lower the transaxle so the transaxle mount studs go into the transaxle bracket then install the transaxle mount upper nuts tightening to 47 nm ( 35 ft. Lbs.). Lastly, take off the transmission jack, install the left inner splash shield, reinstall the left wheel and tire assembly, and lower the vehicle.
Related 2002 Chevrolet Monte Carlo Parts
 2002 Chevrolet Monte Carlo Crankshaft Seal
 2002 Chevrolet Monte Carlo Cylinder Head
 2002 Chevrolet Monte Carlo Dipstick
 2002 Chevrolet Monte Carlo Engine Mount
 2002 Chevrolet Monte Carlo Intake Valve
 2002 Chevrolet Monte Carlo Oil Filler Cap
 2002 Chevrolet Monte Carlo Oil Filter
 2002 Chevrolet Monte Carlo Oil Pan Gasket
 2002 Chevrolet Monte Carlo Rocker Arm
 2002 Chevrolet Monte Carlo Rocker Shaft Spring Kit
 2002 Chevrolet Monte Carlo Timing Cover
 2002 Chevrolet Monte Carlo Variable Timing Sprocket