ChevyParts
My Garage
My Account
Cart
OEM 2004 Cadillac DeVille Shock Absorber
Suspension Shock Absorber- Select Vehicle by Model
- Select Vehicle by VIN
Select Vehicle by Model
orMake
Model
Year
Select Vehicle by VIN
For the most accurate results, select vehicle by your VIN (Vehicle Identification Number).
6 Shock Absorbers found


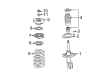
2004 Cadillac DeVille Strut, Front Passenger Side Part Number: 22064783
$355.56 MSRP: $667.73You Save: $312.17 (47%)Ships in 1-2 Business DaysProduct Specifications- Other Name: Strut, Front Suspension; Air Spring to Coil Spring Conversion Kit; Complete Suspension Assembly.; Strut, Front And Rear Suspension
- Position: Front Passenger Side
- Item Weight: 13.40 Pounds
- Item Dimensions: 18.4 x 10.1 x 10.1 inches
- Condition: New
- Fitment Type: Direct Replacement
- SKU: 22064783
- Warranty: This genuine part is guaranteed by GM's factory warranty.

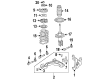
2004 Cadillac DeVille Strut, Front Part Number: 22064781
$202.08 MSRP: $395.64You Save: $193.56 (49%)Ships in 1 Business DayProduct Specifications- Other Name: Strut Assembly, Front Suspension; Air Spring to Coil Spring Conversion Kit; Complete Shock Absorber.; Strut, Front And Rear Suspension
- Position: Front
- Item Weight: 13.90 Pounds
- Item Dimensions: 19.0 x 10.0 x 10.2 inches
- Condition: New
- Fitment Type: Direct Replacement
- Require Quantity: 2
- SKU: 22064781
- Warranty: This genuine part is guaranteed by GM's factory warranty.


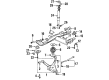
2004 Cadillac DeVille Shock Absorber, Rear Part Number: 19299843
Product Specifications- Other Name: Absorber Assembly, Rear Leveling Shock; Shock; Strut
- Position: Rear
- Replaces: 19180220, 22064671, 22064869, 19177314, 88955457, 88955461, 22064672, 22064809, 22064810, 22064808, 19207418, 22064664, 88955460, 19257784, 88955458, 22064665
- Item Weight: 14.30 Pounds
- Item Dimensions: 20.3 x 6.6 x 4.2 inches
- Condition: New
- SKU: 19299843
- Warranty: This genuine part is guaranteed by GM's factory warranty.


 Product Specifications
- Other Name: Absorber, Rear Leveling Shock; Air Spring to Coil Spring Conversion Kit; Suspension Strut Assembly.; Shock; Absorber, Shock Absorber Air Lift
- Position: Rear Passenger Side
- Replaces: 22064842
- Item Weight: 12.10 Pounds
- Item Dimensions: 25.0 x 8.4 x 8.5 inches
- Condition: New
- Fitment Type: Direct Replacement
- SKU: 22064873
- Warranty: This genuine part is guaranteed by GM's factory warranty.


 Product Specifications
- Other Name: Absorber, Rear Leveling Shock; Air Spring to Coil Spring Conversion Kit; Suspension Strut Assembly.; Shock; Absorber, Shock Absorber Air Lift
- Position: Rear Driver Side
- Replaces: 22064843
- Item Weight: 13.70 Pounds
- Item Dimensions: 25.7 x 8.2 x 8.1 inches
- Condition: New
- Fitment Type: Direct Replacement
- SKU: 22064872
- Warranty: This genuine part is guaranteed by GM's factory warranty.


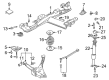
2004 Cadillac DeVille Strut, Front Driver Side Part Number: 22064782
$416.72 MSRP: $1066.60You Save: $649.88 (61%)Product Specifications- Other Name: Strut, Front Suspension; Air Spring to Coil Spring Conversion Kit; Complete Suspension Assembly.; Strut, Front And Rear Suspension
- Position: Front Driver Side
- Item Weight: 13.30 Pounds
- Item Dimensions: 18.4 x 10.4 x 10.4 inches
- Condition: New
- Fitment Type: Direct Replacement
- SKU: 22064782
- Warranty: This genuine part is guaranteed by GM's factory warranty.
2004 Cadillac DeVille Shock Absorber
With a comprehensive array of OEM 2004 Cadillac DeVille Shock Absorber, from fuel pumps to door handles, our website is a one-stop-shop for your needs. All our genuine 2004 Cadillac DeVille Shock Absorber are backed by the manufacturer's warranty and are offered at competitive prices in the market. Rest assured, you can shop with complete confidence.
2004 Cadillac DeVille Shock Absorber Parts and Q&A
- Q: How should one safely drain oil from gas charged shock absorbers on 2004 Cadillac DeVille?A: The snap ring inside the shock absorber tube must not be removed because high-pressure gas within it poses serious injury risks through explosive expansion. Wear safety glasses during centerpunching and drilling of shock absorbers while ensuring the tube remains unharmed. Start the procedure by punching a 10 mm (0.4 inch) indentation from the bottom edge of the tube with the provided centerpunch. Set the shock absorber inside a vise with the extended rod position at the top of the device. Drill a hole at the centerpunch by using a 5 mm (3/16 inch) drill bit which will release gas or gas/oil mixture through the opening; shop towels should be placed below to catch the escaping oil. The middle of the tube receives an indentation with a centerpunch before a second hole gets drilled there at 5 mm (3/16 inch) using the same drill bit while shop towels cover the escaping oil. Holding the shock absorber horizontally over a drain pan while keeping the holes facing down you should move the rod in and out of the tube to accomplish complete oil drainage from the shock absorber.
Related 2004 Cadillac DeVille Parts
 2004 Cadillac DeVille Body Mount Hole Plug
 2004 Cadillac DeVille Coil Spring Insulator
 2004 Cadillac DeVille Control Arm Bracket
 2004 Cadillac DeVille Crossmember Bushing
 2004 Cadillac DeVille Lateral Arm
 2004 Cadillac DeVille Lateral Link
 2004 Cadillac DeVille Shock And Strut Mount
 2004 Cadillac DeVille Steering Knuckle
 2004 Cadillac DeVille Sway Bar Kit
 2004 Cadillac DeVille Trailing Arm
 2004 Cadillac DeVille Wheel Bearing
 2004 Cadillac DeVille Wheel Hub