ChevyParts
My Garage
My Account
Cart
OEM 2004 Chevrolet Corvette Intake Manifold
Engine Intake Manifold- Select Vehicle by Model
- Select Vehicle by VIN
Select Vehicle by Model
orMake
Model
Year
Select Vehicle by VIN
For the most accurate results, select vehicle by your VIN (Vehicle Identification Number).
1 Intake Manifold found

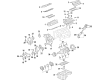
2004 Chevrolet Corvette Intake Manifold Part Number: 88894339
Product Specifications- Other Name: Manifold Assembly, Intake (Service); Manifold; Manifold, Engine Fuel Intake Manifold
- Replaces: 88890523
- Item Weight: 9.20 Pounds
- Item Dimensions: 25.9 x 16.9 x 9.9 inches
- Condition: New
- Fitment Type: Direct Replacement
- SKU: 88894339
- Warranty: This genuine part is guaranteed by GM's factory warranty.
2004 Chevrolet Corvette Intake Manifold
With a comprehensive array of OEM 2004 Chevrolet Corvette Intake Manifold, from fuel pumps to door handles, our website is a one-stop-shop for your needs. All our genuine 2004 Chevrolet Corvette Intake Manifold are backed by the manufacturer's warranty and are offered at competitive prices in the market. Rest assured, you can shop with complete confidence.
2004 Chevrolet Corvette Intake Manifold Parts and Q&A
- Q: How to replace the intake manifold on 2004 Chevrolet Corvette?A: A cooling system drain is required prior to Intake Manifold replacement. Start by draining the cooling system before moving on to the Throttle Body removal and Fuel Injector extraction when replacing the Intake Manifold. First remove the right and left fuel rail covers, the fuel feed hose and disconnect the evaporative emission (EVAP) canister purge tube from both the Intake Manifold and the evap canister purge solenoid valve. Then remove the tube. Start the procedure by disconnecting the throttle position (TP) sensor electrical connector then moving on to disconnect the coolant air bleed hose and reposition the Throttle Body heater outlet hose clamp before finally removing the Throttle Body heater outlet hose. Detach the electrical connectors from all fuel injectors together with the evap canister purge solenoid valve electrical connection point and the electronic throttle control (ETC) electrical connector . Start by removing the evap canister purge solenoid valve from its bracket then remove harness clips at the fuel rails while repositioning the Intake Manifold wiring harness branches. Climbing under the right-hand side of the engine compartment disconnect the hose connecting the power brake booster and remove the harness clip from the fuel rail stop bracket and the tp sensor harness from the positive crankcase ventilation (PCV) tube. Pull out the pcv tube from the right rocker arm cover and Throttle Body and detach the pcv valve pipe from its location on the left rocker arm cover and strap nut. Remove the pcv valve pipe from the right rocker arm cover and Intake Manifold while also removing the PCV Valve Hose from both the valley cover and Intake Manifold in vehicles equipped with the rpo ls6 engine. You must begin by detaching the manifold absolute pressure (MAP) sensor vacuum hose with its electrical connector while moving the Intake Manifold forward then proceed to discard and remove the gaskets and the Intake Manifold together with its fuel rail stop bracket and Intake Manifold bolts. Use new Intake Manifold gaskets before installing the Intake Manifold and connecting both the map sensor vacuum hose and electrical connector. Use threadlocking compound gm U.S. P/N 12345382, canada P/N 1095,3489, or equivalent to secure the Intake Manifold bolts prior to installing the fuel rail stop bracket and bolts. Tighten the Intake Manifold bolts in sequence to 5 nm (44 inch lbs.) for the first pass and 10 nm (89 inch lbs.) for the final pass. If equipped with the rpo ls6 engine, install the PCV Valve Hose to the valley cover and Intake Manifold; if equipped with the rpo ls1 engine, install the pcv valve pipe to the right rocker rocker arm cover and Intake Manifold, followed by the pcv pipe strap nut tightened to 12 nm (106 inch lbs.)finally install the pcv valve pipe to the left rocker arm cover before finishing the installation. Fasten the pcv tube onto the right rocker arm cover before installing the tp sensor harness clip onto the pcv tube and the knock sensor wire harness onto the fuel rail stop bracket. Connect the power Brake Booster Vacuum Hose and install the Intake Manifold branches of the wiring harness while securing harness clips at the fuel rails. Install the evap canister purge solenoid valve before connecting etc electrical connector with evap canister purge solenoid valve electrical connector and all Fuel Injector electrical connectors. Install the Throttle Body heater outlet hose followed by clamping it down while you also install the coolant air bleed hose with connections made to the tp sensor electrical connector and the evap canister purge tube which leads to the fuel feed pipe and evap canister purge solenoid valve and Intake Manifold. You must first install the fuel feed hose and afterward fit both fuel rail covers and if you changed the Intake Manifold then complete Throttle Body and Fuel Injector installation before proceeding to fill the cooling system.
Related 2004 Chevrolet Corvette Parts
 2004 Chevrolet Corvette Air Charge Temperature Sensor
 2004 Chevrolet Corvette Air Filter
 2004 Chevrolet Corvette Air Filter Box
 2004 Chevrolet Corvette Air Hose
 2004 Chevrolet Corvette Air Intake Coupling
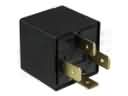 2004 Chevrolet Corvette Daytime Running Light Relay
 2004 Chevrolet Corvette Fuel Injector
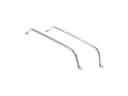 2004 Chevrolet Corvette Fuel Tank Strap
 2004 Chevrolet Corvette Intake Manifold Gasket
 2004 Chevrolet Corvette Mass Air Flow Sensor
 2004 Chevrolet Corvette Throttle Body
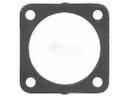 2004 Chevrolet Corvette Throttle Body Gasket