ChevyParts
My Garage
My Account
Cart
OEM 2005 Chevrolet Uplander Steering Knuckle
Front Steering Knuckle- Select Vehicle by Model
- Select Vehicle by VIN
Select Vehicle by Model
orMake
Model
Year
Select Vehicle by VIN
For the most accurate results, select vehicle by your VIN (Vehicle Identification Number).
4 Steering Knuckles found


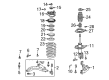
2005 Chevrolet Uplander Knuckle, Driver Side Part Number: 23127629
$268.88 MSRP: $442.93You Save: $174.05 (40%)Ships in 1-2 Business DaysProduct Specifications- Other Name: Knuckle, Steering (Machining); Knuckle, Steering
- Position: Driver Side
- Replaces: 18060638, 18060652, 88955418, 10434254, 18060680, 20899802, 25816684, 22990752
- Item Weight: 5.10 Pounds
- Item Dimensions: 5.9 x 12.9 x 12.5 inches
- Condition: New
- Fitment Type: Direct Replacement
- SKU: 23127629
- Warranty: This genuine part is guaranteed by GM's factory warranty.
2005 Chevrolet Uplander Knuckle, Passenger Side Part Number: 22990753
$265.66 MSRP: $421.79You Save: $156.13 (38%)Ships in 1-2 Business DaysProduct Specifications- Other Name: Knuckle, Steering (Machining)
- Position: Passenger Side
- Replaced by: 23127630
- Item Weight: 5.20 Pounds
- Item Dimensions: 5.4 x 13.1 x 12.6 inches
- Condition: New
- SKU: 22990753
- Warranty: This genuine part is guaranteed by GM's factory warranty.


 Product Specifications
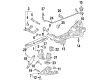
- Other Name: Knuckle, Rear Wheel
- Position: Rear Driver Side
- Item Weight: 5.30 Pounds
- Item Dimensions: 11.8 x 11.2 x 6.0 inches
- Condition: New
- Fitment Type: Direct Replacement
- SKU: 18060684
- Warranty: This genuine part is guaranteed by GM's factory warranty.

 Product Specifications
- Other Name: Knuckle, Rear Wheel
- Position: Rear Passenger Side
- Item Weight: 5.50 Pounds
- Item Dimensions: 11.4 x 11.7 x 6.1 inches
- Condition: New
- Fitment Type: Direct Replacement
- SKU: 18060685
- Warranty: This genuine part is guaranteed by GM's factory warranty.
2005 Chevrolet Uplander Steering Knuckle
With a comprehensive array of OEM 2005 Chevrolet Uplander Steering Knuckle, from fuel pumps to door handles, our website is a one-stop-shop for your needs. All our genuine 2005 Chevrolet Uplander Steering Knuckle are backed by the manufacturer's warranty and are offered at competitive prices in the market. Rest assured, you can shop with complete confidence.
2005 Chevrolet Uplander Steering Knuckle Parts and Q&A
- Q: How to replace the steering knuckle in the rear suspension on 2005 Chevrolet Uplander?A: Start your repair of the Steering Knuckle in the rear suspension by raising and supporting the vehicle in position. Start by taking off the rear wheel followed by caliper disconnection that preserves the brake hose before moving to Brake Caliper Bracket removal and brake rotor uninstallation. The first task is to remove the Tie Rod from the knuckle followed by disconnection of the stabilizer shaft link from the lower Control Arm and separation of the drive axle from the wheel bearing/hub. Remove first the wheel bearing and backing plate after setting aside the park brake cable and its bracket. Position the lower Control Arm on a utility stand while you disconnect the height sensor link and shock absorber from this arm then take off the upper Control Arm from the knuckle. Workers should use the Ball Joint/stud separator tool (J 41820) to separate the lower Ball Joint from the knuckle before removing the knuckle along with its attached wheel speed sensor connector bracket. First attach the wheel speed sensor connector bracket onto the knuckle while using the appropriate bolt to secure it with a nut torque to 12 nm (106 inch lbs.). Draw the knuckle into position before fastening the Ball Joint to it. Secure the Ball Joint nut at 60 nm (44 ft. Lbs.). Install the upper Control Arm and shock absorber and height sensor link onto the lower Control Arm. First install the backing plate and wheel bearing followed by reconnecting the drive axle to the wheel bearing/hub. Finish by installing the stabilizer shaft link and Tie Rod to the knuckle. After completing brake rotor installation move forward to install Brake Caliper Bracket and caliper and wheel before you lower the vehicle.
Related 2005 Chevrolet Uplander Parts
 2005 Chevrolet Uplander Air Suspension Compressor
 2005 Chevrolet Uplander Alignment Bolt
 2005 Chevrolet Uplander Axle Beam Mount
 2005 Chevrolet Uplander Axle Shaft
 2005 Chevrolet Uplander Ball Joint
 2005 Chevrolet Uplander Coil Springs
 2005 Chevrolet Uplander Lateral Link
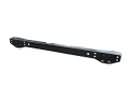 2005 Chevrolet Uplander Rear Crossmember
 2005 Chevrolet Uplander Shock Absorber
 2005 Chevrolet Uplander Sway Bar Bracket
 2005 Chevrolet Uplander Sway Bar Kit
 2005 Chevrolet Uplander Trailing Arm Bushing