ChevyParts
My Garage
My Account
Cart
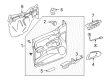
OEM 2006 Buick Rainier Window Regulator
Electric Power Window Regulator- Select Vehicle by Model
- Select Vehicle by VIN
Select Vehicle by Model
orMake
Model
Year
Select Vehicle by VIN
For the most accurate results, select vehicle by your VIN (Vehicle Identification Number).
4 Window Regulators found


2006 Buick Rainier Window Regulator, Rear Driver Side Part Number: 19331462
$200.60 MSRP: $363.07You Save: $162.47 (45%)Ships in 1-2 Business DaysProduct Specifications- Other Name: Regulator Assembly, Rear Side Door Window (W/O Motor) (Left-Hand); Regulator, Door And End Gate Window
- Position: Rear Driver Side
- Replaces: 15095069, 15076798, 15893782, 19301971, 10356992, 15205952
- Item Weight: 4.90 Pounds
- Item Dimensions: 25.1 x 16.4 x 5.6 inches
- Condition: New
- Fitment Type: Direct Replacement
- SKU: 19331462
- Warranty: This genuine part is guaranteed by GM's factory warranty.

2006 Buick Rainier Window Regulator, Front Driver Side Part Number: 19331466
$132.31 MSRP: $259.05You Save: $126.74 (49%)Ships in 1-2 Business DaysProduct Specifications- Other Name: Regulator Assembly, Front Side Door Window (W/O Motor) (Left-Hand); Regulator, Door And End Gate Window; Regulator, Door Inner Control
- Position: Front Driver Side
- Replaces: 10357004, 15095067, 15205950, 15944000, 15893784, 25824839, 10360625, 15155113, 20930663, 19301968
- Item Weight: 6.00 Pounds
- Item Dimensions: 30.3 x 17.0 x 6.2 inches
- Condition: New
- Fitment Type: Direct Replacement
- SKU: 19331466
- Warranty: This genuine part is guaranteed by GM's factory warranty.
2006 Buick Rainier Window Regulator, Front Passenger Side Part Number: 19331461
$134.95 MSRP: $264.25You Save: $129.30 (49%)Ships in 1-3 Business DaysProduct Specifications- Other Name: Regulator Assembly, Front Side Door Window (W/O Motor) (Right-Hand); Power Window Motor and Regulator Assembly; Regulator, Door And End Gate Window; Regulator, Door Inner Control
- Position: Front Passenger Side
- Replaces: 15205951, 20930664, 25824840, 10357005, 10360626, 15095068, 15893785, 19301969, 15155114, 15944001
- Item Weight: 6.20 Pounds
- Item Dimensions: 29.4 x 17.7 x 6.4 inches
- Condition: New
- Fitment Type: Direct Replacement
- SKU: 19331461
- Warranty: This genuine part is guaranteed by GM's factory warranty.
- Product Specifications
- Other Name: Regulator, Rear Door Window Regulator; Power Window Motor and Regulator Assembly; Regulator, Door And End Gate Window
- Position: Rear Passenger Side
- Replaces: 15076799, 15095070, 10356993, 15893783, 19301970, 15205953
- Item Weight: 5.20 Pounds
- Item Dimensions: 8.2 x 25.0 x 16.5 inches
- Condition: New
- Fitment Type: Direct Replacement
- SKU: 19331463
- Warranty: This genuine part is guaranteed by GM's factory warranty.
2006 Buick Rainier Window Regulator
With a comprehensive array of OEM 2006 Buick Rainier Window Regulator, from fuel pumps to door handles, our website is a one-stop-shop for your needs. All our genuine 2006 Buick Rainier Window Regulator are backed by the manufacturer's warranty and are offered at competitive prices in the market. Rest assured, you can shop with complete confidence.
2006 Buick Rainier Window Regulator Parts Questions & Experts Answers
- Q: How to replace the front door window regulator on 2006 Buick Rainier?A: The process of changing a front door Window Regulator requires beginning by removing the door trim panel, speaker and water deflector. The window must be lifted while you loosen its regulator carrier bolts. Disconnect the power connector from the regulator motor while simultaneously starting to loosen the door-retaining upper 2 bolts for the regulator assembly. After loosening remaining 3 bolts that keep the Window Regulator unit in place your next step should be to raise the regulator assembly until it releases those upper 2 bolts before rotating the assembly forward. Position the regulator assembly on a prepared surface by extracting it first from the door opening starting from the base section. Move on by taking out the upper pair of bolts which secure the regulator assembly. To install the regulator assembly place the upper bolts loosely before you put the assembly in the door opening at a semi-horizontal angle. Make sure the assembly reaches its forward position in the cavity then rotate it vertically before lowering and hanging it with the upper bolts into the door sheet metal. Lower and position the regulator assembly onto the door sheet metal by using the upper 2 bolts. Fasten the door bolt to the motor and tighten it to 9 n.m before installing all remaining bolts securing the regulator assembly. Tighten these bolts to 10 n.m. The electrical connector should be joined to the regulator motor while methods for window support removal are used to slowly place the window on the regulator window carrier. The first step involves tightening the regulator window carrier bolts gently before running the window to its maximum up position and securing this position in the channels followed by a final bolt tightening to 10 n.m (88 lb in). Install the water deflector followed by the speaker before putting on the door trim panel.
Related 2006 Buick Rainier Parts
 2006 Buick Rainier Center Console Base
 2006 Buick Rainier Door Armrest
 2006 Buick Rainier Door Latch Assembly
 2006 Buick Rainier Door Lock
 2006 Buick Rainier Door Lock Actuator
 2006 Buick Rainier Door Lock Cylinder
 2006 Buick Rainier Door Seal
 2006 Buick Rainier Tailgate Lock
 2006 Buick Rainier Trunk Latch
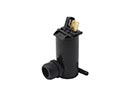 2006 Buick Rainier Washer Pump
 2006 Buick Rainier Weather Strip
 2006 Buick Rainier Window Motor