ChevyParts
My Garage
My Account
Cart
OEM 2006 Buick Rendezvous Evaporator
A/C Evaporator Core- Select Vehicle by Model
- Select Vehicle by VIN
Select Vehicle by Model
orMake
Model
Year
Select Vehicle by VIN
For the most accurate results, select vehicle by your VIN (Vehicle Identification Number).
1 Evaporator found

2006 Buick Rendezvous Evaporator Core Part Number: 10318580
$170.51 MSRP: $320.20You Save: $149.69 (47%)Ships in 1-2 Business DaysProduct Specifications- Other Name: Evaporator Kit-A/C; A/C Evaporator Core Repair Kit; A/C Evaporator Core; A/C Evaporator; Evaporator Assembly; Evaporator, A/C Evaporator; Evaporator
- Item Weight: 4.80 Pounds
- Item Dimensions: 19.4 x 12.9 x 5.4 inches
- Condition: New
- Fitment Type: Direct Replacement
- SKU: 10318580
- Warranty: This genuine part is guaranteed by GM's factory warranty.
2006 Buick Rendezvous Evaporator
With a comprehensive array of OEM 2006 Buick Rendezvous Evaporator, from fuel pumps to door handles, our website is a one-stop-shop for your needs. All our genuine 2006 Buick Rendezvous Evaporator are backed by the manufacturer's warranty and are offered at competitive prices in the market. Rest assured, you can shop with complete confidence.
2006 Buick Rendezvous Evaporator Parts and Q&A
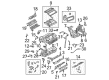
- Q: How to replace the evaporator core on 2006 Buick Rendezvous?A: The Evaporator core replacement procedure begins with hvac module assembly removal, then you should uninstall air inlet housing screws and housing itself before continuing. The next step involves removing screws from the right side hvac module assembly mounting bracket followed by its bracket and then removing the hvac module upper retaining screw which lies beneath the right side mounting bracket. First remove the heater outlet duct screws before pulling out the duct. After that detach the sound barrier seal from the dash panel. Following the removal of the Heater Core cover screws you must take out the cover before proceeding with Heater Core pipe retaining screw removal and Heater Core extraction. The technician must start by removing the lower hvac module assembly retaining screw underneath the Heater Core before continuing to discard the other lower hvac module assembly retaining screws in order to split the upper and lower hvac module assembly halves. The upper hvac module case half requires Evaporator core extraction followed by the Evaporator temperature sensor and txv mounting screw removal to detach the txv from the core. Add pag oil according to specification into the new Evaporator core before attaching the txv and securing it with txv mounting screws that reach a torque of 3.2 n.m (28 lb in). New sealing washers need installation onto the Evaporator line before the operation. Secure the Evaporator temperature sensor where it will measure in a 3.5 cm (1.4 in) range from the side and 5.0 cm (2.0 in) distance from the bottom corner of the Evaporator core at the same position as the original core setup before installing the unit. The Evaporator core installation requires alignment of temperature sensor wires to enter the opening in the upper hvac module case to prevent wire damage while installation continues. The lower hvac module assembly needs to be fastened using two retaining screws which require torque to 0.9 n.m (8 lb in). Connect the lower hvac module assembly retaining screw with the same torque. After installing the Heater Core and its retaining pipe screw to 0.9 n.m torque setting, proceed to add the Heater Core cover screws which require the same torque value. Install the heater outlet duct followed by attaching screws then put the hvac module assembly onto the dash panel sound barrier seal and the hvac module upper retaining screw with tightness of 0.9 n.m (8 lb in). Finish the hvac module assembly task by securing the right side mounting bracket with 1.8 n.m (16 lb in) torque while installing screws then attaining the air inlet housing with 0.9 n.m (8 lb in) torque screws for final installation of the assembly.
Related 2006 Buick Rendezvous Parts
 2006 Buick Rendezvous Heater Core
 2006 Buick Rendezvous A/C Accumulator
 2006 Buick Rendezvous A/C Compressor
 2006 Buick Rendezvous A/C Condenser
 2006 Buick Rendezvous A/C Expansion Valve
 2006 Buick Rendezvous A/C Hose
 2006 Buick Rendezvous A/C Service Cap
 2006 Buick Rendezvous Air Temperature Sensor
 2006 Buick Rendezvous Ambient Temperature Sensor
 2006 Buick Rendezvous Blend Door Actuator
 2006 Buick Rendezvous Blower Control Switches
 2006 Buick Rendezvous HVAC Pressure Switch