ChevyParts
My Garage
My Account
Cart
OEM 2006 Buick Rendezvous Oil Pan
Oil Drain Pan- Select Vehicle by Model
- Select Vehicle by VIN
Select Vehicle by Model
orMake
Model
Year
Select Vehicle by VIN
For the most accurate results, select vehicle by your VIN (Vehicle Identification Number).
2 Oil Pans found

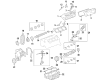
2006 Buick Rendezvous Oil Pan Part Number: 12593455
$140.49 MSRP: $220.95You Save: $80.46 (37%)Ships in 1-3 Business DaysProduct Specifications- Other Name: Pan, Engine Oil; Engine Oil Pan
- Replaces: 12581555
- Item Weight: 15.30 Pounds
- Item Dimensions: 18.7 x 11.1 x 10.1 inches
- Condition: New
- Fitment Type: Direct Replacement
- SKU: 12593455
- Warranty: This genuine part is guaranteed by GM's factory warranty.

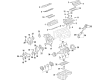
2006 Buick Rendezvous Oil Pan Part Number: 12613020
Product Specifications- Other Name: Pan, Engine Oil
- Replaces: 12566869
- Item Weight: 16.30 Pounds
- Item Dimensions: 21.4 x 12.2 x 9.2 inches
- Condition: New
- Fitment Type: Direct Replacement
- SKU: 12613020
- Warranty: This genuine part is guaranteed by GM's factory warranty.
2006 Buick Rendezvous Oil Pan
With a comprehensive array of OEM 2006 Buick Rendezvous Oil Pan, from fuel pumps to door handles, our website is a one-stop-shop for your needs. All our genuine 2006 Buick Rendezvous Oil Pan are backed by the manufacturer's warranty and are offered at competitive prices in the market. Rest assured, you can shop with complete confidence.
2006 Buick Rendezvous Oil Pan Parts Questions & Experts Answers
- Q: How to replace the oil pan on 2006 Buick Rendezvous?A: In order to replace the Oil Pan with a new one, first install the engine support fixture (J40623-B) and remove the right side Engine Mount. Drain crankcase and remove Oil Filter, right front tire and wheel, and right front engine splash shield. Shake off clips of engine harness for the Wheel Speed Sensor from the lower Control Arm of the right while removing cotter pin from the ball-stud and wound ball-stud nut without removing. Let the j41820 ball stud/joint separator (J41820) help separate the pac ball stud from the Steering Knuckle by rotating the pac ball study nut counter clockwise. Next, you remove the A/C Compressor bolts and put the A/C Compressor to one side, then the transaxle brace bolts in the cases where you had a regular production option (RPO) m76 and then pull the transaxle brace. Repeat the procedure on the transaxle brace bolts with the rpo m15. Remove the Starter, disconnect the engine harness electrical connecter from the oil pressure sensor, remove retainers securing the Brake Line to frame. Support the cradle with suitable adjustable jack, and loosen the left side cradle bolts, and remove your right front and rear cradle bolts. Remove the Oil Pan side bolts and the Oil Pan bolts and remove the Oil Pan and gasket, cleaning the surfaces sealing with it. Install a new Oil Pan Gasket and apply sealer gm p/n 12378521 (Canadian P/N 88901148) to both sides of the crankshaft rear main bearing cap in the event you are reinstalling the rear main bearing cap. Install Oil Pan followed by Oil Pan bolts, which are to be tighten up to 25 nm (18 ft. Lbs.); Oil Pan side bolts are to be installed front and to be tighten up to 50 nm (37 ft. Lbs.). Reinstall the right-side cradle bolts on the front and back and tighten the left side bolts on the cradle and take out the adjustable jack. Secure the Brake Line retainers, reconnect the engine harness electricity connector to the oil pressure sensor and hook up the Starter. If provided with rpo m15, cinch on the transaxle brace and bolts, tighten to 43 nm (32 ft.lbs.) and do again for rpo m76. Mount the A/C Compressor and tighten its bolts to 50 nm (37 ft. Lbs.). Lining up the ball stud cotter pin hole parallel with the knuckle, the ball stud is installed into the knuckle and the ball stud nut is tightened to 55 nm (40 ft. Lbs.). If needed, adjust the ball stud nut to align the slot with the cotter pin hole, in such a way, that the cotter pin ends do not interact with the abs sensor connector or drive axle. Install a new cotter pin and bend the ends of it and reinstall the engine harness clips for the Wheel Speed Sensor to the right lower Control Arm. Finally, replace the right front splash shield, tire and wheel, oil filter, right side Engine Mount and remove engine support fixture (J40623-B).
Related 2006 Buick Rendezvous Parts
 2006 Buick Rendezvous Camshaft Bearing
 2006 Buick Rendezvous Crankshaft Seal
 2006 Buick Rendezvous Dipstick
 2006 Buick Rendezvous Dipstick Tube
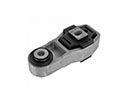 2006 Buick Rendezvous Engine Mount Torque Strut
 2006 Buick Rendezvous Piston
 2006 Buick Rendezvous Rocker Shaft Spring Kit
 2006 Buick Rendezvous Timing Chain Guide
 2006 Buick Rendezvous Timing Chain Tensioner
 2006 Buick Rendezvous Timing Cover
 2006 Buick Rendezvous Timing Cover Gasket
 2006 Buick Rendezvous Valve Stem Oil Seal