ChevyParts
My Garage
My Account
Cart
OEM 2006 Chevrolet Malibu Emblem
Badge- Select Vehicle by Model
- Select Vehicle by VIN
Select Vehicle by Model
orMake
Model
Year
Select Vehicle by VIN
For the most accurate results, select vehicle by your VIN (Vehicle Identification Number).
7 Emblems found


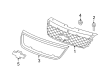
2006 Chevrolet Malibu Emblem, Front Part Number: 10382588
$57.67 MSRP: $85.83You Save: $28.16 (33%)Ships in 1-3 Business DaysProduct Specifications- Other Name: Emblem, Radiator Grille And Front End Ornamentation
- Position: Front
- Item Weight: 0.30 Pounds
- Item Dimensions: 8.0 x 3.4 x 0.4 inches
- Condition: New
- Fitment Type: Direct Replacement
- SKU: 10382588
- Warranty: This genuine part is guaranteed by GM's factory warranty.


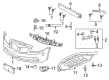
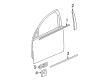
2006 Chevrolet Malibu Emblem, Front Upper Passenger Side Part Number: 25927029
$31.66 MSRP: $47.13You Save: $15.47 (33%)Ships in 1-2 Business DaysProduct Specifications- Other Name: Emblem-Front End Upper Tie Bar; Decal; Nameplate; Emblem for Radiator Grille and Front End Ornamentation.
- Position: Front Upper Passenger Side
- Replaces: 25769543
- Item Weight: 0.30 Pounds
- Item Dimensions: 4.0 x 1.1 x 0.2 inches
- Condition: New
- Fitment Type: Direct Replacement
- SKU: 25927029
- Warranty: This genuine part is guaranteed by GM's factory warranty.


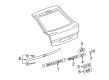
2006 Chevrolet Malibu Nameplate, Rear Part Number: 10336980
$24.53 MSRP: $36.51You Save: $11.98 (33%)Ships in 1-3 Business DaysProduct Specifications- Other Name: Plate, Rear End Panel And Tailgate; Plate, End Gate and Rear Door Decoration; Emblem, Rear End Panel; Plate Assembly, Front Side Door.
- Position: Rear
- Item Weight: 0.30 Pounds
- Item Dimensions: 5.5 x 2.1 x 0.4 inches
- Condition: New
- Fitment Type: Direct Replacement
- SKU: 10336980
- Warranty: This genuine part is guaranteed by GM's factory warranty.

2006 Chevrolet Malibu Emblem Part Number: 84689784
$11.42 MSRP: $17.00You Save: $5.58 (33%)Ships in 1-3 Business DaysProduct Specifications- Other Name: Emblem, Front Side Door; Decal; Nameplate; Emblem, Cab, Load Carrier, Rear End, Door, Quarter Panel, Fender, Rocker Panel, Side Step.
- Replaces: 15223483, 15223484
- Condition: New
- Fitment Type: Direct Replacement
- SKU: 84689784
- Warranty: This genuine part is guaranteed by GM's factory warranty.

2006 Chevrolet Malibu Nameplate, Rear Part Number: 15275998
Product Specifications- Other Name: Plate Assembly-Rear Compartment Lid Name; Plate,Rear End Panel And Tailgate
- Position: Rear
- Item Weight: 0.30 Pounds
- Item Dimensions: 4.4 x 1.5 x 0.3 inches
- Condition: New
- Fitment Type: Direct Replacement
- SKU: 15275998
- Warranty: This genuine part is guaranteed by GM's factory warranty.

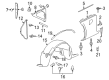
2006 Chevrolet Malibu Nameplate, Outer Part Number: 15223262
Product Specifications- Other Name: Emblem, Cab And Load Carrier Outer Side Decoration; Emblem, Rear Quarter Panel
- Position: Outer
- Item Weight: 0.30 Pounds
- Item Dimensions: 6.8 x 2.4 x 0.3 inches
- Condition: New
- Fitment Type: Direct Replacement
- Require Quantity: 2
- SKU: 15223262
- Warranty: This genuine part is guaranteed by GM's factory warranty.

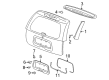
2006 Chevrolet Malibu Emblem, Rear Part Number: 10382590
Product Specifications- Other Name: Emblem, Rear End Panel And Tailgate; Emblem,Rear End Panel And Tailgate
- Position: Rear
- Item Weight: 0.30 Pounds
- Item Dimensions: 5.4 x 2.3 x 0.5 inches
- Condition: New
- Fitment Type: Direct Replacement
- SKU: 10382590
- Warranty: This genuine part is guaranteed by GM's factory warranty.
2006 Chevrolet Malibu Emblem
With a comprehensive array of OEM 2006 Chevrolet Malibu Emblem, from fuel pumps to door handles, our website is a one-stop-shop for your needs. All our genuine 2006 Chevrolet Malibu Emblem are backed by the manufacturer's warranty and are offered at competitive prices in the market. Rest assured, you can shop with complete confidence.
2006 Chevrolet Malibu Emblem Parts Questions & Experts Answers
- Q: How to replace the rear compartment lid emblem/nameplate on a sedan on 2006 Chevrolet Malibu?A: To upgrade the sedan's rear compartment lid you should tape the mounting area before using labels to identify the emblem's replacement position. Apply heat from a gun in circular motions at 152 mm for 30 seconds to let the emblem/nameplate separate from the designated surface. Wipe the old glue off plastic parts with a cloth dipping into VMP Naphtha or a 50% mix of isopropyl alcohol and water. Clean body panels by passing an adhesive remover disk 3M(TM) P/N 07501 of 3M Scotch Brite across their surface. Wipe the installation zone with the same cleaning fluid before letting it air dry completely. When installing on an unmarked vehicle place the nameplate 76 mm left from the compartment lid applique and 97.6 mm below its bottom feature line for sedans. For coupes position it 22 mm up and 38 mm in at the lid's edge and 125 mm out from deck lid at 29-32 Celsius. On a mounting area set to 27-41°C (80-105°F) apply the emblem/nameplate when it measures 29-32°C (85-90°F) without touching the adhesive layer. Place the emblem/nameplate on the marked spot without its protective film and push it firmly onto the surface using regular and balanced pressure. Take off the protective tape from the installing area.
Related 2006 Chevrolet Malibu Parts
 2006 Chevrolet Malibu Door Handle
 2006 Chevrolet Malibu Door Lock Actuator
 2006 Chevrolet Malibu Body Mount Hole Plug
 2006 Chevrolet Malibu Door Hinge
 2006 Chevrolet Malibu Door Latch Assembly
 2006 Chevrolet Malibu Door Moldings
 2006 Chevrolet Malibu Lift Support
 2006 Chevrolet Malibu Liftgate Hinge
 2006 Chevrolet Malibu Tailgate Latch
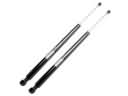 2006 Chevrolet Malibu Tailgate Lift Support
 2006 Chevrolet Malibu Tailgate Lock
 2006 Chevrolet Malibu Weather Strip