ChevyParts
My Garage
My Account
Cart
OEM 2006 Chevrolet Monte Carlo Engine Mount
Engine Motor Mount- Select Vehicle by Model
- Select Vehicle by VIN
Select Vehicle by Model
orMake
Model
Year
Select Vehicle by VIN
For the most accurate results, select vehicle by your VIN (Vehicle Identification Number).
10 Engine Mounts found


2006 Chevrolet Monte Carlo Front Mount Part Number: 10348601
$101.25 MSRP: $172.39You Save: $71.14 (42%)Ships in 1-2 Business DaysProduct Specifications- Other Name: Mount, Engine Mount Dampening; Engine Mount Bracket; Motor Mount; Mount, Engine Mounting; Engine Mount
- Position: Front
- Replaces: 22188109
- Item Weight: 3.40 Pounds
- Item Dimensions: 8.1 x 5.6 x 5.4 inches
- Condition: New
- Fitment Type: Direct Replacement
- SKU: 10348601
- Warranty: This genuine part is guaranteed by GM's factory warranty.


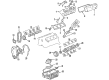
2006 Chevrolet Monte Carlo Strut Part Number: 10345905
$79.45 MSRP: $135.26You Save: $55.81 (42%)Ships in 1-2 Business DaysProduct Specifications- Other Name: Strut, Engine Mount Dampening; Engine Mount Torque Strut; Engine Mount Bracket; Engine Torque Strut; Motor Mount; Strut, Engine Mounting
- Item Weight: 1.40 Pounds
- Item Dimensions: 10.4 x 5.6 x 4.3 inches
- Condition: New
- Fitment Type: Direct Replacement
- SKU: 10345905
- Warranty: This genuine part is guaranteed by GM's factory warranty.


2006 Chevrolet Monte Carlo Motor Mount Part Number: 10448575
$69.62 MSRP: $118.53You Save: $48.91 (42%)Ships in 1-3 Business DaysProduct Specifications- Other Name: Mount, Engine Mount Dampening; Engine Mount Torque Strut; Engine Mount Bracket; Spring Insulator; Lower Mount; Mount Insulator; Mount; Mount, Engine Mounting; Engine Mount
- Replaces: 17998813, 22113282, 22178657, 22146018, 22175206, 10340740, 10448574, 10448576, 22146466
- Item Weight: 4.20 Pounds
- Item Dimensions: 11.6 x 5.1 x 5.2 inches
- Condition: New
- Fitment Type: Direct Replacement
- SKU: 10448575
- Warranty: This genuine part is guaranteed by GM's factory warranty.


2006 Chevrolet Monte Carlo Mount Bracket Part Number: 12594433
$30.60 MSRP: $61.44You Save: $30.84 (51%)Product Specifications- Other Name: Bracket-Engine Mount Strut & Engine Lift; Engine Mount Bracket; Transmission Mount; Motor Mount; Strut Bracket; Lift Bracket; Rear Brace; Engine Mounting Bracket; Engine Lift Bracket
- Replaces: 10154776, 12570320
- Item Weight: 4.80 Pounds
- Item Dimensions: 4.3 x 4.4 x 15.6 inches
- Condition: New
- Fitment Type: Direct Replacement
- SKU: 12594433
- Warranty: This genuine part is guaranteed by GM's factory warranty.


2006 Chevrolet Monte Carlo Strut Bracket, Passenger Side Part Number: 12577766
$24.60 MSRP: $40.55You Save: $15.95 (40%)Ships in 1-2 Business DaysProduct Specifications- Other Name: Bracket, Engine Mounting; Engine Mount Bracket; Motor Mount; Strut Rear Bracket; Bracket, A/C Compressor Mounting
- Position: Passenger Side
- Item Weight: 1.90 Pounds
- Item Dimensions: 4.4 x 4.3 x 15.6 inches
- Condition: New
- Fitment Type: Direct Replacement
- SKU: 12577766
- Warranty: This genuine part is guaranteed by GM's factory warranty.


2006 Chevrolet Monte Carlo Strut Mount Part Number: 10345904
$129.22 MSRP: $176.94You Save: $47.72 (27%)Product Specifications- Other Name: Bracket, Engine Mounting; Engine Mount Torque Strut; Engine Torque Strut Mount; Engine Mount Bracket; Motor Mount
- Item Weight: 2.40 Pounds
- Item Dimensions: 7.4 x 3.9 x 3.4 inches
- Condition: New
- Fitment Type: Direct Replacement
- SKU: 10345904
- Warranty: This genuine part is guaranteed by GM's factory warranty.

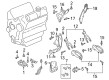
2006 Chevrolet Monte Carlo Rear Mount Part Number: 10447321
$105.54 MSRP: $182.86You Save: $77.32 (43%)Ships in 1-2 Business DaysProduct Specifications- Other Name: Mount Assembly-Engine Rear; Engine Mount Bracket; Motor Mount; Mount, Engine Mount Dampening; Mount, Engine Mounting
- Position: Rear
- Replaces: 10420010
- Item Weight: 2.30 Pounds
- Item Dimensions: 6.1 x 6.2 x 4.1 inches
- Condition: New
- Fitment Type: Direct Replacement
- SKU: 10447321
- Warranty: This genuine part is guaranteed by GM's factory warranty.

2006 Chevrolet Monte Carlo Front Mount Bracket Part Number: 10345832
$59.56 MSRP: $93.31You Save: $33.75 (37%)Ships in 1-3 Business DaysProduct Specifications- Other Name: Bracket, Engine Mounting
- Position: Front
- Item Weight: 2.40 Pounds
- Item Dimensions: 6.0 x 5.7 x 4.0 inches
- Condition: New
- Fitment Type: Direct Replacement
- SKU: 10345832
- Warranty: This genuine part is guaranteed by GM's factory warranty.

2006 Chevrolet Monte Carlo Strut Bracket Part Number: 10306033
$53.33 MSRP: $89.95You Save: $36.62 (41%)Ships in 1-2 Business DaysProduct Specifications- Other Name: Bracket, Engine Mounting; Motor Mount
- Item Weight: 2.30 Pounds
- Item Dimensions: 9.4 x 7.2 x 3.5 inches
- Condition: New
- Fitment Type: Direct Replacement
- SKU: 10306033
- Warranty: This genuine part is guaranteed by GM's factory warranty.


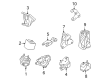
2006 Chevrolet Monte Carlo Mount Bracket Part Number: 10216970
Product Specifications- Other Name: Bracket, Engine Mounting; Engine Mount Bracket; Transmission Mount; Motor Mount; Engine Bracket; Lower Bracket; Bracket
- Item Weight: 1.20 Pounds
- Item Dimensions: 9.2 x 3.5 x 1.8 inches
- Condition: New
- Fitment Type: Direct Replacement
- SKU: 10216970
- Warranty: This genuine part is guaranteed by GM's factory warranty.
2006 Chevrolet Monte Carlo Engine Mount
With a comprehensive array of OEM 2006 Chevrolet Monte Carlo Engine Mount, from fuel pumps to door handles, our website is a one-stop-shop for your needs. All our genuine 2006 Chevrolet Monte Carlo Engine Mount are backed by the manufacturer's warranty and are offered at competitive prices in the market. Rest assured, you can shop with complete confidence.
2006 Chevrolet Monte Carlo Engine Mount Parts Questions & Experts Answers
- Q: How to replace the left engine mount on 2006 Chevrolet Monte Carlo?A: The repair process for a left Engine Mount starts with taking out the Engine Mount strut followed by removing the left Exhaust Manifold before you detach the upper Engine Mount nuts. The engine support fixture must be installed before the engine is raised using it. After disconnecting the Engine Mount bracket bolts it is necessary to take out both the Engine Mount bracket and the Engine Mount bracket. Before beginning raise the vehicle along with support. After this remove the lower Engine Mount nuts and take away both the Engine Mount and Engine Mount heat shield (if required). Start your installation by putting back the Engine Mount heat shield if you took it off before you attach the Engine Mount to its engine position. Follow installation order by placing the lower Engine Mount nuts before tightening them to 50 nm (37 ft. Lbs.). When ready install the Engine Mount bracket while lowering the vehicle then fasten all bracket bolts to 50 nm (37 ft. Lbs.). The engine support fixture permits lowering the engine before removing the fixture. Begin by attaching the left Exhaust Manifold followed by installing the Engine Mount strut then proceed to tighten the upper Engine Mount nuts to 50 nm (37 ft. Lbs.).
Related 2006 Chevrolet Monte Carlo Parts
 2006 Chevrolet Monte Carlo Crankshaft Gear
 2006 Chevrolet Monte Carlo Cylinder Head
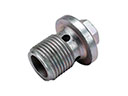 2006 Chevrolet Monte Carlo Drain Plug
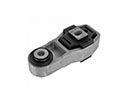 2006 Chevrolet Monte Carlo Engine Mount Torque Strut
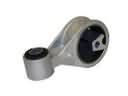 2006 Chevrolet Monte Carlo Engine Torque Strut Mount
 2006 Chevrolet Monte Carlo Lash Adjuster
 2006 Chevrolet Monte Carlo Oil Pan Baffle
 2006 Chevrolet Monte Carlo Piston
 2006 Chevrolet Monte Carlo Piston Ring
 2006 Chevrolet Monte Carlo Timing Belt Tensioner
 2006 Chevrolet Monte Carlo Valve Cover Grommet
 2006 Chevrolet Monte Carlo Valve Stem Oil Seal