ChevyParts
My Garage
My Account
Cart
OEM 2006 GMC Sierra 1500 Brake Pad
Disc Brake Pad Set- Select Vehicle by Model
- Select Vehicle by VIN
Select Vehicle by Model
orMake
Model
Year
Select Vehicle by VIN
For the most accurate results, select vehicle by your VIN (Vehicle Identification Number).
5 Brake Pads found

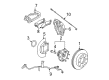
2006 GMC Sierra 1500 Brake Pads, Front Part Number: 19432941
$131.12 MSRP: $271.71You Save: $140.59 (52%)Product Specifications- Other Name: Pad Kit, Front Disc Brake; Front Pads; Pad Kit, Brake
- Position: Front
- Replaces: 15886468, 18048600, 18044594, 88950732, 18026219, 19210706, 25924485, 88964201, 84292732
- Item Weight: 15.20 Pounds
- Condition: New
- SKU: 19432941
- Warranty: This genuine part is guaranteed by GM's factory warranty.


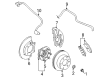
2006 GMC Sierra 1500 Brake Pads, Front Part Number: 18048101
Product Specifications- Other Name: Pad Kit, Front Disc Brake; Disc Brake Hardware Kit; Rear Pads; Front Pads; Pad Kit, Brake
- Position: Front
- Item Weight: 5.90 Pounds
- Item Dimensions: 9.1 x 4.8 x 3.7 inches
- Condition: New
- Fitment Type: Direct Replacement
- SKU: 18048101
- Warranty: This genuine part is guaranteed by GM's factory warranty.


2006 GMC Sierra 1500 Brake Pads, Front Part Number: 25852957
Product Specifications- Other Name: Pad Kit, Front Disc Brake; Disc Brake Hardware Kit; Front Pads
- Position: Front
- Replaces: 89059119
- Item Weight: 6.00 Pounds
- Item Dimensions: 11.7 x 6.9 x 3.8 inches
- Condition: New
- SKU: 25852957
- Warranty: This genuine part is guaranteed by GM's factory warranty.


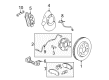
2006 GMC Sierra 1500 Brake Pads Part Number: 19210705
Product Specifications- Other Name: Pad Kit, Brake; Disc Brake Hardware Kit; Rear Pads; Front Pads
- Position: Rear
- Replaces: 18041762, 18026217
- Item Weight: 6.10 Pounds
- Item Dimensions: 10.1 x 4.9 x 3.5 inches
- Condition: New
- Fitment Type: Direct Replacement
- SKU: 19210705
- Warranty: This genuine part is guaranteed by GM's factory warranty.

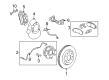
2006 GMC Sierra 1500 Brake Pads Part Number: 18048083
Product Specifications- Other Name: Pad Kit, Brake; Disc Brake Hardware Kit; Rear Pads
- Position: Rear
- Item Weight: 4.70 Pounds
- Item Dimensions: 10.1 x 4.9 x 3.4 inches
- Condition: New
- Fitment Type: Direct Replacement
- SKU: 18048083
- Warranty: This genuine part is guaranteed by GM's factory warranty.
2006 GMC Sierra 1500 Brake Pad
With a comprehensive array of OEM 2006 GMC Sierra 1500 Brake Pad, from fuel pumps to door handles, our website is a one-stop-shop for your needs. All our genuine 2006 GMC Sierra 1500 Brake Pad are backed by the manufacturer's warranty and are offered at competitive prices in the market. Rest assured, you can shop with complete confidence.
2006 GMC Sierra 1500 Brake Pad Parts Questions & Experts Answers
- Q: How to replace the front brake pads on the 1500 Series on 2006 GMC Sierra 1500?A: Begin front Brake Pad replacement on the 1500 series by examining the brake master cylinder reservoir fluid level. Fluid removal is unnecessary when the master cylinder reservoir fluid sits at the midpoint between its fill and safety range but fluid needs to be removed to that midpoint if it exceeds this range. Put two large c-clamps above the caliper housing to compress pistons by squeezing them against rear pad until full bore penetration occurs then remove clamps. It is important to stop pressing the Brake Pedal when brake rotors/calipers or brake drums are removed because brake system damage can lead to harm to the vehicle or endanger those working on it. Use a screwdriver to remove the lower Brake Caliper Bolt while you rotate the caliper upward to extract the brake pads from their bracket position. Dispose of the anti-rattle clips during this process then thoroughly examine the caliper along with the caliper bracket. After installing new anti-rattle clips on the caliper bracket and placing brake pads correctly (with one wear indicator on the inner pad and none on the outer pad) you should rotate the caliper back down for final assembly. Insert the lower Brake Caliper Bolt before tightening it to 100 nm (74 ft. Lbs.) torques.the procedure requires you to replace the tire and wheel assembly and then remove safety stands while lowering the vehicle. Use the Brake Pedal at three-quarters of its range then slowly reduce pressure until you reach a firm pedal, completing this procedure multiple times until the Brake Caliper Piston pads assume the correct seated position. Fill the brake master cylinder reservoir with clean brake fluid when needed until it reaches the correct level. After this, engage in pad and rotor burnishing.
Related 2006 GMC Sierra 1500 Parts
 2006 GMC Sierra 1500 Wheel Bearing
 2006 GMC Sierra 1500 Wheel Hub
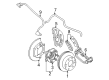
 2006 GMC Sierra 1500 ABS Sensor
 2006 GMC Sierra 1500 Brake Caliper Bracket
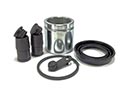 2006 GMC Sierra 1500 Brake Caliper Repair Kit
 2006 GMC Sierra 1500 Brake Calipers
 2006 GMC Sierra 1500 Brake Dust Shields
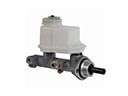 2006 GMC Sierra 1500 Brake Master Cylinder
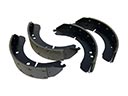 2006 GMC Sierra 1500 Brake Shoe
 2006 GMC Sierra 1500 Parking Brake Shoe
 2006 GMC Sierra 1500 Wheel Cylinder
 2006 GMC Sierra 1500 Wheel Speed Sensor