ChevyParts
My Garage
My Account
Cart
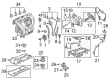
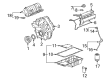
OEM 2009 Buick Lucerne Intake Manifold
Engine Intake Manifold- Select Vehicle by Model
- Select Vehicle by VIN
Select Vehicle by Model
orMake
Model
Year
Select Vehicle by VIN
For the most accurate results, select vehicle by your VIN (Vehicle Identification Number).
3 Intake Manifolds found

2009 Buick Lucerne Intake Manifold Part Number: 12611485
$1265.71 MSRP: $1628.97You Save: $363.26 (23%)Ships in 1-3 Business DaysProduct Specifications- Other Name: Manifold, Engine Fuel Intake Manifold; Intake Plenum
- Position: Upper
- Replaces: 12626550
- Item Weight: 12.20 Pounds
- Item Dimensions: 20.1 x 14.7 x 10.1 inches
- Condition: New
- Fitment Type: Direct Replacement
- SKU: 12611485
- Warranty: This genuine part is guaranteed by GM's factory warranty.

2009 Buick Lucerne Intake Manifold Part Number: 19330172
$606.14 MSRP: $1031.91You Save: $425.77 (42%)Ships in 1-2 Business DaysProduct Specifications- Other Name: Manifold; Manifold, Engine Fuel Intake Manifold
- Replaces: 19303933, 12588847, 12564771
- Item Weight: 8.80 Pounds
- Item Dimensions: 25.3 x 15.5 x 12.7 inches
- Condition: New
- Fitment Type: Direct Replacement
- SKU: 19330172
- Warranty: This genuine part is guaranteed by GM's factory warranty.


2009 Buick Lucerne Intake Manifold Part Number: 89017809
Product Specifications- Other Name: Manifold, Engine Fuel Intake Manifold; Intake Plenum
- Position: Lower
- Item Weight: 10.30 Pounds
- Item Dimensions: 21.2 x 14.6 x 9.2 inches
- Condition: New
- Fitment Type: Direct Replacement
- SKU: 89017809
- Warranty: This genuine part is guaranteed by GM's factory warranty.
2009 Buick Lucerne Intake Manifold
With a comprehensive array of OEM 2009 Buick Lucerne Intake Manifold, from fuel pumps to door handles, our website is a one-stop-shop for your needs. All our genuine 2009 Buick Lucerne Intake Manifold are backed by the manufacturer's warranty and are offered at competitive prices in the market. Rest assured, you can shop with complete confidence.
2009 Buick Lucerne Intake Manifold Parts and Q&A
- Q: How to replace the lower intake manifold on 2009 Buick Lucerne?A: A technician must begin by cutting off the negative Battery Cable when replacing the lower Intake Manifold. Start the repair by removing the upper Intake Manifold and then taking off the left and right valve Rocker Arm covers. You must disconnect both the fuel feed line from the Fuel Rail and the fuel injector inline connector. The first step involves removing the fuel injector harness connector bracket retainer together with the engine coolant temperature (ECT) electrical connector and the camshaft position (CMP) sensor electrical connector. Remove the two lifter oil manifold assembly (LOMA) electrical connector bolts from the lower Intake Manifold and unfasten the fuel injector rail bolts and the Power Steering Pump. Begin by uninstalling the Fuel Rail and loma along with lower Intake Manifold bolts and finally lower Intake Manifold removal. Begin by loosening the valve Rocker Arm bolts while preparing a platform to store the valve train components that will be used for reinstallation. Note that intake push rods measure 147.51 mm (5.81 in) and exhaust push rods measure 154.87 mm (6.1 in) before you remove valve rocker arms and push rods. Clean the gasket and seal surfaces on the cylinder heads and engine block together with the lower Intake Manifold using degreaser to remove all loose room temperature vulcanizing (RTV) sealer. Place the new lower Intake Manifold gaskets while you prepare the push rod ends with prelube and reattach them to their original spots. Prelube each Rocker Arm friction surface and reinstall the valve rocker arms to their correct locations before applying 34 nm (25 lb ft) of torque to their bolts. Leave small drops of rtv sealer at the four corner points where the Intake Manifold meets the engine block. For optimal gasket performance install the lower Intake Manifold by using new fasteners or treating old fasteners with thread-locking chemicals. Apply sealer to the lower Intake Manifold bolt threads, install the lower Intake Manifold bolts, and tighten them in the specified sequence: tighten the lower Intake Manifold bolts to 20 nm (15 lb ft) followed by an additional tightening to 25 nm (18 lb ft). Check the Fuel Rail along with fuel injectors and their o-rings for damage then substitute any needed parts and treat the o-rings with engine oil for lubrication. The lower Intake Manifold injector bores require installation of injector nozzles that must be followed by loma installation and the application of full force to the injector rail until it reaches full seating position. Fasten fuel injector rail bolts at 10 nm (89 lb in) torque. Position the fuel injector harness connector bracket onto the Intake Manifold and bolt it into place using a torque of 8 nm (71 lb in). Connect the two lower Intake Manifold loma electrical connector bolts with 10 nm (89 lb in) torque and join the fuel injector inline connector. After replacing the fuel feed line to the Fuel Rail, install both Rocker Arm covers and secure the upper Intake Manifold back into place before restoring the negative Battery Cable.
Related 2009 Buick Lucerne Parts
 2009 Buick Lucerne Air Filter
 2009 Buick Lucerne Fuel Pump
 2009 Buick Lucerne Air Filter Box
 2009 Buick Lucerne Air Intake Coupling
 2009 Buick Lucerne Fuel Injector
 2009 Buick Lucerne Fuel Pump Gasket
 2009 Buick Lucerne Fuel Pump Seal
 2009 Buick Lucerne Fuel Pump Wiring Harness
 2009 Buick Lucerne Fuel Tank
 2009 Buick Lucerne Intake Manifold Gasket
 2009 Buick Lucerne Throttle Body
 2009 Buick Lucerne Throttle Body Gasket