ChevyParts
My Garage
My Account
Cart
OEM 2009 Cadillac DTS CV Joint
CV Joint Axle- Select Vehicle by Model
- Select Vehicle by VIN
Select Vehicle by Model
orMake
Model
Year
Select Vehicle by VIN
For the most accurate results, select vehicle by your VIN (Vehicle Identification Number).
5 CV Joints found

2009 Cadillac DTS CV Joints, Front Part Number: 26075594
$469.89 MSRP: $742.67You Save: $272.78 (37%)Ships in 1-3 Business DaysProduct Specifications- Other Name: Joint Kit, Front Wheel Drive Axle; CV Joint; Inner CV Joint; Inner Joint Assembly
- Position: Front
- Item Weight: 7.20 Pounds
- Item Dimensions: 8.8 x 6.9 x 7.1 inches
- Condition: New
- SKU: 26075594
- Warranty: This genuine part is guaranteed by GM's factory warranty.


2009 Cadillac DTS CV Joints, Front Part Number: 26075588
$269.62 MSRP: $609.63You Save: $340.01 (56%)Ships in 1-2 Business DaysProduct Specifications- Other Name: Joint Kit, Front Wheel Drive Axle; CV Joint; Inner CV Joint; Inner Joint; Inner Joint Assembly
- Position: Front
- Item Weight: 6.00 Pounds
- Item Dimensions: 7.5 x 7.2 x 6.5 inches
- Condition: New
- Fitment Type: Direct Replacement
- SKU: 26075588
- Warranty: This genuine part is guaranteed by GM's factory warranty.


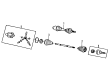
2009 Cadillac DTS Axle Assembly, Front Part Number: 20984613
Product Specifications- Other Name: Shaft Assembly-Front Wheel Drive; CV Axle Assembly; Axle Shaft; CV Joint; CV Axle; Outer CV Joint
- Position: Front
- Replaces: 15869612, 20859675, 26075603
- Item Weight: 16.50 Pounds
- Item Dimensions: 6.1 x 6.2 x 26.3 inches
- Condition: New
- Fitment Type: Direct Replacement
- SKU: 20984613
- Warranty: This genuine part is guaranteed by GM's factory warranty.

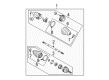
2009 Cadillac DTS Outer CV Joint Part Number: 25766430
Product Specifications- Other Name: Joint; CV Joint; Outer Joint Assembly
- Condition: New
- SKU: 25766430
- Warranty: This genuine part is guaranteed by GM's factory warranty.

2009 Cadillac DTS Outer CV Joint Part Number: 19149663
Product Specifications- Other Name: Joint Kit, Front Wheel Drive Axle; CV Joint
- Position: Outer
- Item Weight: 7.30 Pounds
- Item Dimensions: 12.6 x 6.7 x 7.1 inches
- Condition: New
- Fitment Type: Direct Replacement
- SKU: 19149663
- Warranty: This genuine part is guaranteed by GM's factory warranty.
2009 Cadillac DTS CV Joint
With a comprehensive array of OEM 2009 Cadillac DTS CV Joint, from fuel pumps to door handles, our website is a one-stop-shop for your needs. All our genuine 2009 Cadillac DTS CV Joint are backed by the manufacturer's warranty and are offered at competitive prices in the market. Rest assured, you can shop with complete confidence.
2009 Cadillac DTS CV Joint Parts Questions & Experts Answers
- Q: How to replace the Outer CV Boot and CV Joint (FE7) on 2009 Cadillac DTS?A: When replacing the wheel drive shaft outer joint and boot (FE7), initial steps involve using a side cutter to remove the large seal retaining clamp from the cv joint after which you must discard it without damaging the inboard or outboard boot which can cause premature wear to the sealing surface. First cut the swage ring with a hand grinder and eliminate the small eared clamp with a side cutter before discarding both components. Remove the large diameter radial force on the cv joint by separating the outboard halfshaft seal from its contact with the outer race and move the seal along the shaft bar. Spread j 8059 between the race retaining ring ears until ready to remove the cv joint assembly from its position on the halfshaft bar. Use a brass drift to tap and tilt the cv joint cage while gradually removing each of the six chrome alloy balls. After this, discard the old outboard seal. A thorough cleaning process with solvent will remove all old grease and contaminants from the cv joint cage as well as chrome alloy balls and inner and outer race assemblies. Follow by allowing all parts to dry completely. Examine the cv joint assembly while checking for abnormal wear marks and integrity problems before replacing faulty parts. Then clean rust from the outboard seal attachment points on the halfshaft bar with a wire brush. Follow installation steps by clamping the halfshaft inside a vise before attaching the outboard seal's new swage ring or clamp to the neck while avoiding crimping or swaging. Dual-purpose gear characteristics of the halfshaft bar require the outboard seal to be fitted into its designated groove on this component. The swage ring installation process requires assembly placement of the halfshaft end piece into dt-48267 followed by ring alignment and upper part placement of dt-48267 onto its lower section. Begin by tightening hand bolt installations on each lug until it becomes secure after which alternate fastening turns on 180-degree intervals until bottomed out through both ends. Seize the split in the dies to inspect the swaged ring for damages before redoing the swage process if needed. Finish the eared clamp crimping process with j 35910 and a torque wrench set to 136 nm (100 lb ft). Verify the separation distance before continuing to torque until the specification is met. With grease from the service kit lightly coat both ball grooves inside and out followed by inserting the 90-degree mounted inner race into its cage. The cage windows need to be positioned correctly against the outer race lands and then the cage assembly should enter the outer race. Start by inserting the first chrome ball afterward position the cage for the opposite ball insertion six times to fill all six ball positions. Apply grease from the service kit to the cv joint as you push the cv joint onto the halfshaft bar until the retaining ring begins seating fully and verify that the outboard seal maintains its proper form. First position the large outboard seal's diameter above the cv joint outer race using the large seal retaining clamp and align its lip into the race's groove. Use j 35910 to torque the seal retaining clamp to 174 nm (130 lb ft) while checking the clamp ear gap dimension before tightening to achieve a finished measurement of 1.9 mm (5/64 in).
Related 2009 Cadillac DTS Parts
 2009 Cadillac DTS Head Gasket
 2009 Cadillac DTS Oil Filter
 2009 Cadillac DTS Oil Pan Gasket
 2009 Cadillac DTS Axle Shaft
 2009 Cadillac DTS CV Boot
 2009 Cadillac DTS Drive Shaft
 2009 Cadillac DTS Lash Adjuster
 2009 Cadillac DTS Oil Filler Cap
 2009 Cadillac DTS Oil Pump
 2009 Cadillac DTS Rocker Shaft Spring Kit
 2009 Cadillac DTS Timing Chain
 2009 Cadillac DTS Variable Timing Sprocket