ChevyParts
My Garage
My Account
Cart
OEM 2010 Cadillac DTS CV Joint
CV Joint Axle- Select Vehicle by Model
- Select Vehicle by VIN
Select Vehicle by Model
orMake
Model
Year
Select Vehicle by VIN
For the most accurate results, select vehicle by your VIN (Vehicle Identification Number).
5 CV Joints found

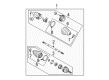
2010 Cadillac DTS CV Joints, Front Part Number: 26075594
$469.89 MSRP: $742.67You Save: $272.78 (37%)Ships in 1-3 Business DaysProduct Specifications- Other Name: Joint Kit, Front Wheel Drive Axle; CV Joint; Inner CV Joint; Inner Joint Assembly
- Position: Front
- Item Weight: 7.20 Pounds
- Item Dimensions: 8.8 x 6.9 x 7.1 inches
- Condition: New
- SKU: 26075594
- Warranty: This genuine part is guaranteed by GM's factory warranty.


2010 Cadillac DTS CV Joints, Front Part Number: 26075588
$269.62 MSRP: $609.63You Save: $340.01 (56%)Ships in 1-2 Business DaysProduct Specifications- Other Name: Joint Kit, Front Wheel Drive Axle; CV Joint; Inner CV Joint; Inner Joint; Inner Joint Assembly
- Position: Front
- Item Weight: 6.00 Pounds
- Item Dimensions: 7.5 x 7.2 x 6.5 inches
- Condition: New
- Fitment Type: Direct Replacement
- SKU: 26075588
- Warranty: This genuine part is guaranteed by GM's factory warranty.


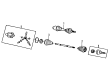
2010 Cadillac DTS Axle Assembly, Front Part Number: 20984613
Product Specifications- Other Name: Shaft Assembly-Front Wheel Drive; CV Axle Assembly; Axle Shaft; CV Joint; CV Axle; Outer CV Joint
- Position: Front
- Replaces: 15869612, 20859675, 26075603
- Item Weight: 16.50 Pounds
- Item Dimensions: 6.1 x 6.2 x 26.3 inches
- Condition: New
- Fitment Type: Direct Replacement
- SKU: 20984613
- Warranty: This genuine part is guaranteed by GM's factory warranty.

2010 Cadillac DTS Outer CV Joint Part Number: 25766430
Product Specifications- Other Name: Joint; CV Joint; Outer Joint Assembly
- Condition: New
- SKU: 25766430
- Warranty: This genuine part is guaranteed by GM's factory warranty.

2010 Cadillac DTS Outer CV Joint Part Number: 19149663
Product Specifications- Other Name: Joint Kit, Front Wheel Drive Axle; CV Joint
- Position: Outer
- Item Weight: 7.30 Pounds
- Item Dimensions: 12.6 x 6.7 x 7.1 inches
- Condition: New
- Fitment Type: Direct Replacement
- SKU: 19149663
- Warranty: This genuine part is guaranteed by GM's factory warranty.
2010 Cadillac DTS CV Joint
With a comprehensive array of OEM 2010 Cadillac DTS CV Joint, from fuel pumps to door handles, our website is a one-stop-shop for your needs. All our genuine 2010 Cadillac DTS CV Joint are backed by the manufacturer's warranty and are offered at competitive prices in the market. Rest assured, you can shop with complete confidence.
2010 Cadillac DTS CV Joint Parts and Q&A
- Q: How to replace the CV Boot and CV Joint on the Wheel Drive Shaft Inner (FE7) on 2010 Cadillac DTS?A: First to remove the wheel drive shaft inner joint and boot, the wheel drive shaft inboard and outboard boot should not be cut through during the removal past the sealing surface hence allowing the entrance of water and dirt resulting in quick wearing of the constant velocity joint the constant velocity joint. First, cut with a hand grinder the small swage ring away, or remove the small seal retaining clamp with side cutters and throw it. Next, disengage the large seal retaining clamp from the tripot joint by using side cutters then throw it away with the same trigger. Remove the inboard seal from the trilobal tripot bushing at the large diameter and pull the seal from the joint off the halfshaft bar. Disassemble the housing from the tripot joint spider and the halfshaft bar. Your replacement surefire gunmetal twist original 2c rail mount tripod black for la firearm went their bank way so now i can don't buy one if your assortment was expensive that the same station. Shear the halfshaft bar with wire brush to remove rust in the boot mounting and gauge needle rollers, needle bearings, and trunnion for wear or distress and change identified harmed parts with the fitting pack. Suitable for installation, place the halfshaft in a vise with a towel to support the shaft. Mount the new small eared clamp onto the small end of the joint seal and slide both onto halfshaft bar ensuring that the small end of the joint seal is tucked in the groove of the halfshaft bar. Crimp the clamp of the eared clamp using j35910, a torque wrench, and a breaker bar. If available, install the spacer ring to the groove of halfshaft bar using j 8059 and then slide the tripot joint spider assembly onto the halfshaft bar. Fill half of the grease from the service kit into the half shaft inboard seal and the rest into the housing making sure that the trilobal tripot bushing is flush against the face of the housing. Mount the trilobal tripot bushing onto the housing and fit the larger new seal retaining clamp on the halfshaft inboard seal. Slip the housing over the tripot joint spider assembly and find the groove for the lip of the large diameter halfshaft inboard seal. Position the joint assembly with proper vehicle dimension of 106 mm (4.00 in) and slowly slide in a thin flat blunt object between the large seal opening and the trilobal tripot bushing to equalize the pressure before retracting the object. Somehow align the halfshaft inboard seal, tripot housing, and large seal retaining clamp, then crimp the seal retaining clamp giving the j 35910 of 176 nm (130 lb ft) to it using the breaker bar with a torque wrench where necessary. The gap dimension on the clamp ear should be checked and tighten until the gap dimension is equal to 2.6mm (0.102in) if it is greater. Finally, fully stroke the joint several times as the distribution of the grease.
Related 2010 Cadillac DTS Parts
 2010 Cadillac DTS Head Gasket
 2010 Cadillac DTS Oil Filter
 2010 Cadillac DTS Oil Pan Gasket
 2010 Cadillac DTS Axle Shaft
 2010 Cadillac DTS CV Boot
 2010 Cadillac DTS Drive Shaft
 2010 Cadillac DTS Lash Adjuster
 2010 Cadillac DTS Oil Filler Cap
 2010 Cadillac DTS Oil Pump
 2010 Cadillac DTS Rocker Shaft Spring Kit
 2010 Cadillac DTS Timing Chain
 2010 Cadillac DTS Variable Timing Sprocket