ChevyParts
My Garage
My Account
Cart
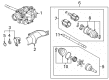
OEM 2009 Cadillac SRX CV Joint
CV Joint Axle- Select Vehicle by Model
- Select Vehicle by VIN
Select Vehicle by Model
orMake
Model
Year
Select Vehicle by VIN
For the most accurate results, select vehicle by your VIN (Vehicle Identification Number).
5 CV Joints found

2009 Cadillac SRX CV Joints Part Number: 88957231
$120.77 MSRP: $191.74You Save: $70.97 (38%)Ships in 1-2 Business DaysProduct Specifications- Other Name: Joint Kit, Front Wheel Drive Axle; CV Joint; Inner CV Joint; Inner Joint Assembly
- Position: Front
- Item Weight: 4.70 Pounds
- Item Dimensions: 25.8 x 5.8 x 5.8 inches
- Condition: New
- Fitment Type: Direct Replacement
- SKU: 88957231
- Warranty: This genuine part is guaranteed by GM's factory warranty.


2009 Cadillac SRX Outer CV Joint Part Number: 88957237
Product Specifications- Other Name: Joint Kit, Rear Axle Universal Joint; CV Joint; Inner Joint Assembly; Outer Joint Assembly
- Position: Rear Outer
- Item Weight: 0.90 Pounds
- Item Dimensions: 5.1 x 4.6 x 2.3 inches
- Condition: New
- SKU: 88957237
- Warranty: This genuine part is guaranteed by GM's factory warranty.
2009 Cadillac SRX Inner CV Joint Part Number: 88957236
Product Specifications- Other Name: Joint Kit, Rear Axle Universal Joint; CV Joint; Inner Joint Assembly; Outer Joint Assembly
- Position: Rear Inner
- Item Weight: 0.90 Pounds
- Item Dimensions: 5.1 x 4.5 x 2.4 inches
- Condition: New
- SKU: 88957236
- Warranty: This genuine part is guaranteed by GM's factory warranty.
2009 Cadillac SRX CV Joints Part Number: 88957232
Product Specifications- Other Name: Joint Kit, Front Wheel Drive Axle; CV Joint; Inner CV Joint; Inner Joint Assembly
- Position: Front
- Item Weight: 3.60 Pounds
- Item Dimensions: 25.1 x 5.8 x 6.0 inches
- Condition: New
- Fitment Type: Direct Replacement
- SKU: 88957232
- Warranty: This genuine part is guaranteed by GM's factory warranty.

2009 Cadillac SRX CV Joints Part Number: 88957233
Product Specifications- Other Name: Outer CV Joint; Outer Joint Assembly; Joint Kit, Front Wheel Drive Axle; CV Joint
- Position: Front
- Item Weight: 6.60 Pounds
- Item Dimensions: 25.1 x 5.8 x 5.8 inches
- Condition: New
- Fitment Type: Direct Replacement
- SKU: 88957233
- Warranty: This genuine part is guaranteed by GM's factory warranty.
2009 Cadillac SRX CV Joint
With a comprehensive array of OEM 2009 Cadillac SRX CV Joint, from fuel pumps to door handles, our website is a one-stop-shop for your needs. All our genuine 2009 Cadillac SRX CV Joint are backed by the manufacturer's warranty and are offered at competitive prices in the market. Rest assured, you can shop with complete confidence.
2009 Cadillac SRX CV Joint Parts Questions & Experts Answers
- Q: How to replace the rear outer CV Boot and CV Joint on 2009 Cadillac SRX?A: Begin rear wheel drive shaft outer joint and boot replacement by taking out the wheel drive shaft from the vehicle. A shop towel protects the Axle Shaft while the wheel drive shaft rests horizontally inside a bench vise. First remove large and small seal retaining clamps using a side cutter before sliding the outer joint seal away from the joint face after breaking it from the outer race at its large diameter end. The outer joint's removal from the Axle Shaft begins by aligning a brass drift on the inner race while maintaining the inner joint housing horizontally for striking with a hammer until the Axle Shaft retaining clip compresses. Lowering the retaining ring allows disposal of it before getting the seal off the Axle Shaft. Before beginning installation place the vertical outer race inside a bench vise while securing it with a shop towel wrapped around its splined shaft. Use a brass drift and hammer to press the first wheel drive shaft joint's inner cage balls out before fully removing all balls while maintaining a flat orientation of the cage and inner race. Using solvent to clean all parts until they become dry you must check for damage and wear. Assemble the large-radius corners of the cage up then insert the inner race horizontally making sure the splined groove faces upward. Place the outer race into the bench vise vertically as you wrap a shop towel around the joint outer race splined shaft. Then align the inner race ball tracks with the cage windows. Position the cage and inner race in alignment with the outer race while placing the inner race ring opening bottom-up. Proceed to install balls one-by-one by inspecting for proper ball-to-inner race ball track contact. The brush operation involves placing up to 60 percent of service kit grease into the outer joint and applying it evenly across ball tracks and balls and cage and inner race. Lay a shop towel around the Axle Shaft before installing the wheel drive shaft horizontally into a bench vise. The installation process requires new small seal retaining clamps and seals that need to be fitted onto the Axle Shaft followed by new retaining rings. Drill inner race splines through the Axle Shaft splines as you compress the Axle Shaft ring spacer and drive the inner joint onto the shaft with a wood block and hammer until it reaches full engagement. Use the j 42572 to crimp the small seal retaining clamp into the seal boot groove after filling the remaining grease. Maintain a 1 mm (0.039 in) gap from the base of the omega ohm shape. Crimp the large seal retaining clamp to the seal by using the j 42572 tool which should maintain a 1 mm gap while making sure the seal stays undamaged. Check the wheel drive shaft's outer joint operation by rotating it vertically several times before reinstallment.
Related 2009 Cadillac SRX Parts
 2009 Cadillac SRX Differential
 2009 Cadillac SRX Drive Shaft
 2009 Cadillac SRX CV Boot
 2009 Cadillac SRX Differential Cover
 2009 Cadillac SRX Differential Seal