ChevyParts
My Garage
My Account
Cart
OEM 2009 Chevrolet Express 3500 Brake Pad
Disc Brake Pad Set- Select Vehicle by Model
- Select Vehicle by VIN
Select Vehicle by Model
orMake
Model
Year
Select Vehicle by VIN
For the most accurate results, select vehicle by your VIN (Vehicle Identification Number).
6 Brake Pads found


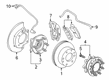
2009 Chevrolet Express 3500 Brake Pads Part Number: 84265875
$111.37 MSRP: $226.68You Save: $115.31 (51%)Ships in 1-2 Business DaysProduct Specifications- Other Name: Pad Kit, Brake; Disc Brake Hardware Kit; Rear Pads
- Position: Rear
- Replaces: 88983902
- Item Weight: 5.20 Pounds
- Item Dimensions: 9.1 x 4.2 x 4.2 inches
- Condition: New
- Fitment Type: Direct Replacement
- SKU: 84265875
- Warranty: This genuine part is guaranteed by GM's factory warranty.


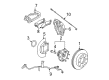
2009 Chevrolet Express 3500 Rear Pads Part Number: 84265862
$142.69 MSRP: $290.55You Save: $147.86 (51%)Product Specifications- Other Name: Pad Kit, Brake; Disc Brake Hardware Kit; Brake Pads
- Position: Rear
- Replaces: 20850250, 20777332
- Item Weight: 8.20 Pounds
- Item Dimensions: 9.1 x 4.8 x 3.9 inches
- Condition: New
- Fitment Type: Direct Replacement
- SKU: 84265862
- Warranty: This genuine part is guaranteed by GM's factory warranty.

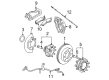
2009 Chevrolet Express 3500 Brake Pads, Front Part Number: 19432941
$131.12 MSRP: $271.71You Save: $140.59 (52%)Product Specifications- Other Name: Pad Kit, Front Disc Brake; Front Pads; Pad Kit, Brake
- Position: Front
- Replaces: 15886468, 18048600, 18044594, 88950732, 18026219, 19210706, 25924485, 88964201, 84292732
- Item Weight: 15.20 Pounds
- Condition: New
- SKU: 19432941
- Warranty: This genuine part is guaranteed by GM's factory warranty.


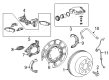
2009 Chevrolet Express 3500 Brake Pads Part Number: 84292733
Product Specifications- Other Name: Pad Kit, Brake; Disc Brake Hardware Kit; Front Pads
- Position: Front
- Replaces: 18048032, 19210708, 25926349, 15886469
- Item Weight: 8.60 Pounds
- Item Dimensions: 9.3 x 5.1 x 3.1 inches
- Condition: New
- Fitment Type: Direct Replacement
- SKU: 84292733
- Warranty: This genuine part is guaranteed by GM's factory warranty.


2009 Chevrolet Express 3500 Brake Pads Part Number: 22742382
Product Specifications- Other Name: Pad Kit, Brake; Disc Brake Hardware Kit; Front Pads
- Position: Front
- Replaces: 25918342
- Item Weight: 5.60 Pounds
- Item Dimensions: 8.7 x 4.1 x 3.7 inches
- Condition: New
- SKU: 22742382
- Warranty: This genuine part is guaranteed by GM's factory warranty.

2009 Chevrolet Express 3500 Rear Pads Part Number: 88982640
Product Specifications- Other Name: Pad Kit, Brake; Disc Brake Hardware Kit; Brake Pads
- Position: Rear
- Item Weight: 5.10 Pounds
- Item Dimensions: 9.6 x 5.2 x 3.4 inches
- Condition: New
- Fitment Type: Direct Replacement
- SKU: 88982640
- Warranty: This genuine part is guaranteed by GM's factory warranty.
2009 Chevrolet Express 3500 Brake Pad
With a comprehensive array of OEM 2009 Chevrolet Express 3500 Brake Pad, from fuel pumps to door handles, our website is a one-stop-shop for your needs. All our genuine 2009 Chevrolet Express 3500 Brake Pad are backed by the manufacturer's warranty and are offered at competitive prices in the market. Rest assured, you can shop with complete confidence.
2009 Chevrolet Express 3500 Brake Pad Parts and Q&A
- Q: How to replace the rear disc brake pads on a dual rear wheels on 2009 Chevrolet Express 3500?A: Inspection of the brake master cylinder reservoir fluid must occur before beginning work on any vehicle with dual rear wheels. Brake technicians should lower fluid to the midway point when fluid level exceeds this mark. Lift your car securely and take away the wheel assembly next to the tire. Place a large c-clamp over the brake caliper body and attach it to the Brake Pad backing plate to lower brake caliper pistons into their bores slowly. Leaving the brake caliper guide pins intact is necessary except in specific replacement situations. Fix the brake caliper to a safe position through heavy mechanic wire to shield the hydraulic flexible brake hose from damage. You need to uninstall the brake caliper assembly with bracket plus both brake pads and Brake Pad springs. Wipe the contact points on the brake caliper bracket surface until they remain clean. Replace the brake caliper guide pin caps if they show wear or if they are not present. Examine the caliper hardware before unhinging the guide pins from the brake caliper. Put the Brake Pad springs and install them with the outer and inner Brake Pad. After washing the bolt threads of brake caliper bracket and rear axle use gm p/n 89021297 (Canadian P/N 10953488) threadlocker on 2/3 thread section of bolts and leave it to cure for ten minutes. Set the brake caliper and bracket assembly onto the rear axle and mount the brake caliper bracket bolts. Tighten them to 300nm (221 lb ft). Put back the tire and wheel unit. Make sure the engine remains off while you use the Brake Pedal half way down its travel range followed by releasing it slowly. Apply the Brake Pedal slowly three times to make sure brake pistons and pads are well positioned at the caliper. Complete the brake system with hydraulic fluid before working to seat the brake pads on the rotors.
Related 2009 Chevrolet Express 3500 Parts
 2009 Chevrolet Express 3500 ABS Sensor
 2009 Chevrolet Express 3500 Brake Backing Plate
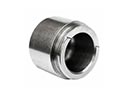 2009 Chevrolet Express 3500 Brake Caliper Piston
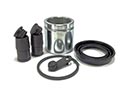 2009 Chevrolet Express 3500 Brake Caliper Repair Kit
 2009 Chevrolet Express 3500 Brake Calipers
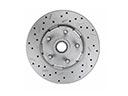 2009 Chevrolet Express 3500 Brake Disc
 2009 Chevrolet Express 3500 Brake Dust Shields
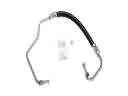 2009 Chevrolet Express 3500 Hydraulic Hose
 2009 Chevrolet Express 3500 Spindle Nut
 2009 Chevrolet Express 3500 Wheel Hub
 2009 Chevrolet Express 3500 Wheel Hub Bolt
 2009 Chevrolet Express 3500 Wheel Speed Sensor