ChevyParts
My Garage
My Account
Cart
OEM 2009 Chevrolet HHR Brake Booster
Brake Power Booster- Select Vehicle by Model
- Select Vehicle by VIN
Select Vehicle by Model
orMake
Model
Year
Select Vehicle by VIN
For the most accurate results, select vehicle by your VIN (Vehicle Identification Number).
2 Brake Boosters found


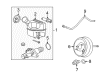
2009 Chevrolet HHR Brake Booster Part Number: 20812025
Product Specifications- Other Name: Booster, Hydraulic Power Brake Booster; Booster
- Replaces: 15831183
- Item Weight: 7.60 Pounds
- Item Dimensions: 9.6 x 6.5 x 5.1 inches
- Condition: New
- Fitment Type: Direct Replacement
- SKU: 20812025
- Warranty: This genuine part is guaranteed by GM's factory warranty.
2009 Chevrolet HHR Brake Booster Part Number: 25862275
Product Specifications- Other Name: Booster, Hydraulic Power Brake Booster; Booster
- Item Weight: 1.30 Pounds
- Item Dimensions: 18.0 x 12.2 x 12.2 inches
- Condition: New
- Fitment Type: Direct Replacement
- SKU: 25862275
- Warranty: This genuine part is guaranteed by GM's factory warranty.
2009 Chevrolet HHR Brake Booster
With a comprehensive array of OEM 2009 Chevrolet HHR Brake Booster, from fuel pumps to door handles, our website is a one-stop-shop for your needs. All our genuine 2009 Chevrolet HHR Brake Booster are backed by the manufacturer's warranty and are offered at competitive prices in the market. Rest assured, you can shop with complete confidence.
2009 Chevrolet HHR Brake Booster Parts Questions & Experts Answers
- Q: How to replace the power vacuum brake booster on 2009 Chevrolet HHR?A: The first step in replacing the power vacuum Brake Booster involves detaching the battery negative cable. Use small Brake Pedal presses to empty what remains in the Brake Booster vacuum storage. Remove the electrical connection of the vacuum power brake sensor if present while taking off the vacuum power Brake Booster check valve and hose from the Brake Booster grommet. Shift the electrical modules off the underhood bracket without disconnecting wires and take out the bracket. Detach the power brake fluid level indicator switch connector and take out its two master cylinder nuts. When the system is equipped you can detach the clutch hose from the master cylinder by plugging the outlet and sealing the inlet. Put aside the master cylinder after removing its fittings by keeping it in place with heavy mechanics wire. Take out the instrument panel insulator and remove the Brake Pedal pushrod nut together with washer and pushrod from the Brake Pedal pivot pin. Examine the power brake vacuum booster gasket and replace it if needed during the removal process of the vacuum Brake Booster nuts and power brake vacuum booster. Install the power brake vacuum booster first with its gasket and the power brake vacuum booster afterward. Use 22 nm torque to fasten the vacuum Brake Booster nuts onto their threads. Put high-temp grease p/n 12345996 onto the Brake Pedal pushrod pin before fitting it through the Brake Pedal pivot pin. Attach the Brake Pedal pushrod washer and nut and tighten the nut to 10 nm (89 lb in). Locate and connect the i/p insulator then check the master cylinder seal condition and placement within its groove on the master cylinder body. Connect the master cylinder to the vacuum booster and join the clutch hose quick connect if present. Place the master cylinder nuts and tighten them to 22 nm (16 lb ft). Use denatured alcohol to help you put the vacuum power Brake Booster check valve and hose assembly onto the Brake Booster grommet. Attach the electrical plugin to the power vacuum brake vacuum sensor if installed. Also join the brake fluid level indicator's power supply line. Place the powertrain and electrical control units on the underhood electrical center bracket before installing the bracket. Use the final step to join the black battery wire.
Related 2009 Chevrolet HHR Parts
 2009 Chevrolet HHR Brake Backing Plate
 2009 Chevrolet HHR Brake Caliper Bracket
 2009 Chevrolet HHR Brake Caliper Piston
 2009 Chevrolet HHR Brake Caliper Repair Kit
 2009 Chevrolet HHR Brake Calipers
 2009 Chevrolet HHR Brake Dust Shields
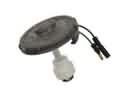 2009 Chevrolet HHR Brake Fluid Level Sensor
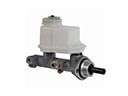 2009 Chevrolet HHR Brake Master Cylinder
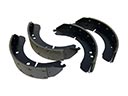 2009 Chevrolet HHR Brake Shoe
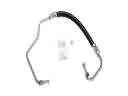 2009 Chevrolet HHR Hydraulic Hose
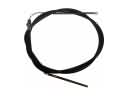 2009 Chevrolet HHR Parking Brake Cable
 2009 Chevrolet HHR Wheel Hub Bolt