ChevyParts
My Garage
My Account
Cart
OEM 2009 Chevrolet Trailblazer Pinion Bearing
Transmission Pinion Bearing- Select Vehicle by Model
- Select Vehicle by VIN
Select Vehicle by Model
orMake
Model
Year
Select Vehicle by VIN
For the most accurate results, select vehicle by your VIN (Vehicle Identification Number).
7 Pinion Bearings found


2009 Chevrolet Trailblazer Side Bearings Part Number: 11505123
$57.30 MSRP: $169.58You Save: $112.28 (67%)Ships in 1-2 Business DaysProduct Specifications- Other Name: Bearing, Differential Side Gear; Differential Pinion Bearing; Differential Bearing; Bearing
- Item Weight: 1.60 Pounds
- Item Dimensions: 4.9 x 1.4 x 5.1 inches
- Condition: New
- Fitment Type: Direct Replacement
- SKU: 11505123
- Warranty: This genuine part is guaranteed by GM's factory warranty.


2009 Chevrolet Trailblazer Pinion Bearings, Inner Part Number: 457108
$56.11 MSRP: $154.36You Save: $98.25 (64%)Ships in 1-2 Business DaysProduct Specifications- Other Name: Bearing, Differential Drive Pinion Gear Inner; Differential Pinion Bearing; Rear Pinion Bearing; Front Pinion Bearing; Inner Pinion Bearing; Differential Drive Pinion Bearings.
- Position: Inner
- Item Weight: 2.20 Pounds
- Item Dimensions: 4.9 x 1.5 x 5.0 inches
- Condition: New
- Fitment Type: Direct Replacement
- SKU: 457108
- Warranty: This genuine part is guaranteed by GM's factory warranty.


2009 Chevrolet Trailblazer Side Bearings Part Number: 25824250
$73.65 MSRP: $142.94You Save: $69.29 (49%)Ships in 1-2 Business DaysProduct Specifications- Other Name: Bearing, Differential Side Gear; Differential Pinion Bearing; Differential Bearing
- Replaces: 09418390, 9418390
- Item Weight: 1.20 Pounds
- Item Dimensions: 4.3 x 4.3 x 2.1 inches
- Condition: New
- Fitment Type: Direct Replacement
- SKU: 25824250
- Warranty: This genuine part is guaranteed by GM's factory warranty.


2009 Chevrolet Trailblazer Pinion Bearings Part Number: 23243839
$72.64 MSRP: $142.22You Save: $69.58 (49%)Ships in 1-2 Business DaysProduct Specifications- Other Name: Bearing, Differential Pinion; Differential Pinion Bearing; Rear Pinion Bearing; Front/Inner/Outer Pinion; Diff/Drive Axle; Pinion/Clutch/Rear Wheel
- Position: Front
- Replaces: 09418357, 26053758, 9418357, 15286375, 20997052, 22786621, 9418356, 09418356, 12479221
- Item Weight: 1.30 Pounds
- Item Dimensions: 4.2 x 4.2 x 2.1 inches
- Condition: New
- Fitment Type: Direct Replacement
- SKU: 23243839
- Warranty: This genuine part is guaranteed by GM's factory warranty.


2009 Chevrolet Trailblazer Side Bearings, Front Part Number: 26046759
$36.01 MSRP: $106.64You Save: $70.63 (67%)Ships in 1-2 Business DaysProduct Specifications- Other Name: Bearing, Front Differential; Bearing; Bearing, Differential Side Gear
- Position: Front
- Item Weight: 0.80 Pounds
- Item Dimensions: 3.0 x 3.0 x 1.2 inches
- Condition: New
- Fitment Type: Direct Replacement
- Require Quantity: 2
- SKU: 26046759
- Warranty: This genuine part is guaranteed by GM's factory warranty.

2009 Chevrolet Trailblazer Pinion Bearings Part Number: 9439879
$35.47 MSRP: $105.01You Save: $69.54 (67%)Product Specifications- Other Name: Bearingfrt Differential Drive Pinion Gear Inner; Differential Pinion Bearing; Axle Bearing; Output Shaft Bearing; Rear Pinion Bearing; Inner & Outer Pinion Bearings; Differential Drive Pinion Assembly.
- Position: Front Inner
- Item Weight: 1.30 Pounds
- Item Dimensions: 3.2 x 3.1 x 1.1 inches
- Condition: New
- Fitment Type: Direct Replacement
- SKU: 9439879
- Warranty: This genuine part is guaranteed by GM's factory warranty.

2009 Chevrolet Trailblazer Pinion Bearings Part Number: 9417784
$24.86 MSRP: $68.16You Save: $43.30 (64%)Ships in 1-2 Business DaysProduct Specifications- Other Name: Pinion Gear Front; Differential Pinion Bearing; Axle Bearing; Rear Pinion Bearing; Front Pinion Bearing; Outer Pinion Bearing; Differential Drive Pinion Bearing; Front Axle Bearing.
- Position: Outer
- Item Weight: 1.10 Pounds
- Item Dimensions: 3.0 x 3.0 x 1.2 inches
- Condition: New
- Fitment Type: Direct Replacement
- SKU: 9417784
- Warranty: This genuine part is guaranteed by GM's factory warranty.
2009 Chevrolet Trailblazer Pinion Bearing
With a comprehensive array of OEM 2009 Chevrolet Trailblazer Pinion Bearing, from fuel pumps to door handles, our website is a one-stop-shop for your needs. All our genuine 2009 Chevrolet Trailblazer Pinion Bearing are backed by the manufacturer's warranty and are offered at competitive prices in the market. Rest assured, you can shop with complete confidence.
2009 Chevrolet Trailblazer Pinion Bearing Parts Questions & Experts Answers
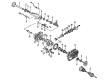
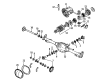
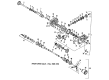
- Q: How to replace the drive pinion bearings on 2009 Chevrolet Trailblazer?A: Vehicle height should be increased before starting the replacement process. First place the Differential on top of a bench then extract both the drive pinion and axle from its assembly. The application of j 22912-b will press the bearing off the pinion shaft for the 8.0 inch axle. The 8.6 inch axle requires mounting the j 45871 around the Pinion Bearing while using the inverted j 22912-b around the j 45871 to press off the bearing with both tools. Step by step you should remove the shim and outer Pinion Bearing cup from the axle housing by using a hammer and brass drift. You should perform this method again for the inner Pinion Bearing cup. The appropriate installer should be used to install the outer Pinion Bearing cup: j 7817 for 8.0 inch axles, j 8611-01 for 8.6 inch axles and j 7818 for 9.5 ld inch axles. Installation should then be completed with j 8092 . Install the inner Pinion Bearing cup through the j 8608 for 8.0/8.6 inch axles and j 22306 for 9.5 ld inch axles. Place the chosen pinion selective shim between the shoulder on the gear and the inner Pinion Bearing. Both the j 24433 and j 36614 enable inner Pinion Bearing installation until the cup cone fully rests on the pinion shim. First install a new collapsible spacer followed by axle lubrication of pinion bearings before placing the pinion inside the axle housing. To move forward, install the outer Pinion Bearing onto the pinion with a new pinion oil seal while using j 22388 for the 9.5 ld inch axle. Use gm p/n 12346004 sealant (Canadian P/N 10953480) on the pinion yoke splines before mounting the yoke aligned to initial marks from removal and hammering it until a few threads become visible. Place the washer followed by the new pinion nut onto the yoke before using the j 8614-01 torque wrench. The pinion end play should just be taken up during tool tightening while you rotate the pinion for bearing seating. An inch-pound torque wrench should be used to measure rotating torque on bearings where used parts require measurements between 1.0-2.3 nm (10-20 lbin) and new parts require 1.7-3.4 nm (15-30 lbin). The torque check indicates insufficient tightening so the process requires increased small torques until the correct torque level is met. When the pinion reaches its mandatory torque continue rotating it multiple times to correctly seat the bearings then recheck the torque setting before making any necessary final adjustments. Reinstall the Differential after filling the axle with correct lubricating fluid followed by vehicle descent.
Related 2009 Chevrolet Trailblazer Parts
 2009 Chevrolet Trailblazer Differential
 2009 Chevrolet Trailblazer Differential Bearing
 2009 Chevrolet Trailblazer Differential Cover
 2009 Chevrolet Trailblazer Differential Seal
 2009 Chevrolet Trailblazer Driveshaft Yokes
 2009 Chevrolet Trailblazer Pinion Washer
 2009 Chevrolet Trailblazer Slip Yoke
 2009 Chevrolet Trailblazer Universal Joint
 2009 Chevrolet Trailblazer Wheel Seal