ChevyParts
My Garage
My Account
Cart
OEM 2010 Cadillac DTS Crankshaft Seal
- Select Vehicle by Model
- Select Vehicle by VIN
Select Vehicle by Model
orMake
Model
Year
Select Vehicle by VIN
For the most accurate results, select vehicle by your VIN (Vehicle Identification Number).
1 Crankshaft Seal found


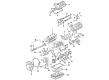
2010 Cadillac DTS Rear Main Seal Part Number: 12568025
$53.23 MSRP: $90.63You Save: $37.40 (42%)Ships in 1-3 Business DaysProduct Specifications- Other Name: Seal, Crankshaft Rear Main Bearing Cap; Crankshaft Seal; Seal, Engine Rear Main Bearing
- Position: Rear
- Replaces: 12556355, 12556107
- Item Weight: 0.40 Pounds
- Item Dimensions: 5.2 x 5.3 x 0.6 inches
- Condition: New
- Fitment Type: Direct Replacement
- SKU: 12568025
- Warranty: This genuine part is guaranteed by GM's factory warranty.
2010 Cadillac DTS Crankshaft Seal
With a comprehensive array of OEM 2010 Cadillac DTS Crankshaft Seal, from fuel pumps to door handles, our website is a one-stop-shop for your needs. All our genuine 2010 Cadillac DTS Crankshaft Seal are backed by the manufacturer's warranty and are offered at competitive prices in the market. Rest assured, you can shop with complete confidence.
2010 Cadillac DTS Crankshaft Seal Parts and Q&A
- Q: How to replace the rear crankshaft seal on 2010 Cadillac DTS?A: In order to replace the crankshaft rear oil seal, remove the transaxle and the Flywheel first. Mount the j 42841-a on the crankshaft and lock it using retaining bolts. Install, with the aid of a variable speed drill using a socket adapter, eight 1-inch self-drilling screws into the seal through the seal's guide hole specified by the remove tool, decreasing speed as the screws thread into the seal. After all screws are in the place, remove retaining bolts and join on the center screw to j42841-a, tightening enough to pull seal assembly off the crankshaft. Ensure there is also a deep bore on the engine block on which the seal is attached of about 15mm (0.5906 in) here for engines from march 1, 1996 later or a shallow bore of about 8mm (0.3150 in) here for engines within 1993 and up to 29th february 1996 which requires a lip style seals as well as the overseas j 38817-a to install. Check engine block bore including crankshaft flange for damage, clean the oil drain-back hole of debris. Clean the bore using cleaner solvent gm p/n 12378392 or 12346139 (Canadian P/N 88901247). Utilizing the right bolts from the j-45930-a: either an 8 mm bolt, or 11 mm, to place the en-48072 pilot base onto the crankshaft where it should turn right in place. Install the en-48072 applicator housing over the pilot base, bottom in the bore without closing the drain back hole. Apply the sealant gm p/n 12378521 (Canadian P/N 88901148) to the outer diameter of the bore so that it does not clog the drain hole, and apply it evenly without twisting the applicator housing. Replace the applicator housing and pilot base while making sure there is equal spread of the sealant, and also check the drain back hole. For engines from march 1 1996 to 2006, use the j 45930-a installation making sure that the correct bolt size is used. Turn the center nut of the j 45930-a until the center hub exits, about 15 mm (0.591 in) from the outer plate but never with lubricate on the seal. Mount the new cassette style crankshaft rear oil seal onto the center hub of the j 45930-a tight with mounting bolts. Tighten the nut of the j 45930-a until it bottoms against the crankcase, loosen the center nut and mounting bolts to remove the j 45930-a, make sure the new seal is installed properly by having the outer surface 0.500-0.800 mm ( 0.0197-0.0315 in ) from the engine block surface and the inner surface of the sleeve be 0.400-0.900 mm ( 0.0158-0.0354 in) below the outer surface of the seal and parallel line up with the block. Clean all tools free of sealant, insert the Flywheel, and transaxle.
Related 2010 Cadillac DTS Parts
 2010 Cadillac DTS Engine Mount
 2010 Cadillac DTS Camshaft
 2010 Cadillac DTS Dipstick Tube
 2010 Cadillac DTS Exhaust Valve
 2010 Cadillac DTS Intake Valve
 2010 Cadillac DTS Lash Adjuster
 2010 Cadillac DTS Motor And Transmission Mount
 2010 Cadillac DTS Oil Pump
 2010 Cadillac DTS Timing Chain
 2010 Cadillac DTS Valve Cover Grommet
 2010 Cadillac DTS Valve Stem Oil Seal
 2010 Cadillac DTS Variable Timing Sprocket