ChevyParts
My Garage
My Account
Cart
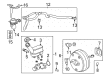
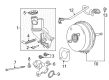
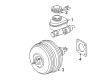
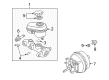
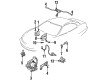
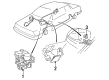
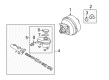
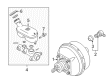
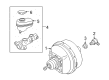
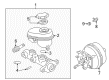
OEM Buick Brake Booster
Brake Power Booster- Select Vehicle by Model
- Select Vehicle by VIN
Select Vehicle by Model
orMake
Model
Year
Select Vehicle by VIN
For the most accurate results, select vehicle by your VIN (Vehicle Identification Number).
68 Brake Boosters found

Buick Brake Booster Part Number: 19418519
$493.40 MSRP: $966.02You Save: $472.62 (49%)Ships in 1-3 Business DaysProduct Specifications- Other Name: Booster, Hydraulic Power Brake Booster; Power Booster
- Replaced by: 19432799

Buick Brake Booster Part Number: 23489684
$104.72 MSRP: $196.65You Save: $91.93 (47%)Ships in 1-2 Business DaysProduct Specifications- Other Name: Booster, Vacuum Power Brake


Buick Brake Booster Part Number: 15267004
Product Specifications- Other Name: Booster, Power Brake; Booster Assembly; Booster, Hydraulic Power Brake Booster
- Replaces: 19208151


Buick Brake Booster Part Number: 88967269
Product Specifications- Other Name: Booster, Hydraulic Power Brake Booster; Power Booster


Buick Brake Booster Part Number: 18029975
Product Specifications- Other Name: Booster, Hydraulic Power Brake Booster; Booster Assembly


Buick Brake Booster Part Number: 13442086
Product Specifications- Other Name: Booster Kit-Power Brake (Vacuum); Booster; Booster Kit, Vacuum Power Brake

Buick Brake Booster Part Number: 18060120
Product Specifications- Other Name: Booster, Hydraulic Power Brake Booster
- Replaces: 18015936

Buick Brake Booster Part Number: 25511548
Product Specifications- Other Name: Booster; Booster, Hydraulic Power Brake Booster

Buick Brake Booster Part Number: 25956178
Product Specifications- Other Name: Booster, Hydraulic Power Brake Booster
Buick Brake Booster Part Number: 15267005
Product Specifications- Other Name: Booster, Hydraulic Power Brake Booster; Booster Assembly

Buick Brake Booster Part Number: 15234621
Product Specifications- Other Name: Booster, Hydraulic Power Brake Booster; Booster Assembly
- Replaces: 15189237


Buick Brake Booster Part Number: 19208172
Product Specifications- Other Name: Booster Assembly, Power Brake (Remanufacture); Booster, Vacuum Power Brake
Buick Brake Booster Part Number: 18015941
Product Specifications- Replaced by: 18060122
Buick Brake Booster Part Number: 18060109
Product Specifications- Other Name: Booster, Hydraulic Power Brake Booster

Buick Brake Booster Part Number: 15247618
Product Specifications- Other Name: Booster, Power Brake; Booster Assembly; Booster; Booster, Hydraulic Power Brake Booster
- Replaces: 18044444, 18047694

Buick Brake Booster Part Number: 15236237
Product Specifications- Other Name: Booster, Hydraulic Power Brake Booster; Power Booster
- Replaces: 18048230, 88967238
Buick Brake Booster Part Number: 18015980
Product Specifications- Other Name: Booster, Hydraulic Power Brake Booster
- Replaced by: 18060125

Buick Brake Booster Part Number: 18060125
Product Specifications- Other Name: Booster, Hydraulic Power Brake Booster
- Replaces: 18015980

Buick Brake Booster Part Number: 18017215
Product Specifications- Other Name: Booster, Hydraulic Power Brake Booster; Power Actuator

Buick Brake Booster Part Number: 18029988
Product Specifications- Other Name: Booster, Power Brake; Power Actuator; Booster, Hydraulic Power Brake Booster
| Page 1 of 4 |Next >
1-20 of 68 Results
Buick Brake Booster
Want to cut long-term maintenance and repair costs? Choose OEM Brake Booster. Those parts deliver top durability you can trust. On our site, you'll find a huge catalog of genuine Buick parts. Prices are unbeatable, so you can keep more in your pocket. Every OEM Buick Brake Booster includes a manufacturer's warranty. You can also get an easy return policy that keeps buying risk free. Fast delivery, get your car on the road quickly. It's simple to search, compare, and order. Stop guessing about quality or fit. Order today and save with parts that last.
Buick Brake Booster Parts Questions & Experts Answers
- Q: How to Ensure Proper Installation of the Brake Booster on Buick LaCrosse?A:Begin the ly7 booster replacement by collecting a power Brake Booster holder j 22805-b tool. Start the task by detaching the negative battery terminal and removing the plastic panel on the left. Pull down the brake apply sensor (BAS) and its retaining clip so you can disconnect the Brake Booster pushrod from the Brake Pedal. Take out both the exhaust crossover system pipe and disconnect the brake fluid sensor power cable. Take out the fasteners from the left front fender abs module bracket and then remove the bracket from its position. Unscrew the master cylinder nuts before lifting it from the vacuum Brake Booster yet keeping brake hydraulic pipes intact. Detach the vacuum Brake Booster check valve and place its connected hose assembly to the side. Remove all coolant from the system before removing the heat pipes connected to the engine. Use the master cylinder retaining nuts to secure the power Brake Booster holder j 22805-b to the booster unit before rotating the booster counterclockwise to remove it. Set the new vacuum Brake Booster onto the cowl and fit it in place by turning it clockwise using a ratchet attached to the power Brake Booster holder (J 22805-B). Keep away from using a flat screwdriver during this process. When you see the locking tab secured properly you may unfasten the power Brake Booster holder (J 22805-B) and reattach the coolant heater tubes. Secure the vacuum hose and check valve to the booster and carefully fit the master cylinder onto it before tightening its retaining nuts to 33 nm. Install the abs module bracket on its fasteners while keeping torque at 10 nm (7 ft. Lbs.) before joining the Brake Fluid Level Sensor wires and putting back the exhaust system crossover. Connect the Brake Booster pushrod to the Brake Pedal while putting back the retaining clip. Reinstall the bas component and its bolt at 2.5 nm torque before installing the left instrument panel insulation and reattaching the battery cable.
- Q: How to Service and Repair the Brake Booster on Buick LeSabre?A:Start your replacement by removing the fuel injector sight shield before taking out the accelerator control cable with its bracket and placing them safely away. First disconnect the electrical connections from the EGR Valve and Cruise Control Module then detach relevant engine harness clips. Set aside the wiring harness and remove the brake fluid level sensor wire connection. Set the brake master cylinder on a protected surface after loosening its connecting nuts then taking the unit off the car. To lower the column you should first remove parts on the left side including the insulator panel and knee bolster bracket followed by steering support mounts which can then let you place the column on mechanical wire supports. Detach the Brake Pedal sensors from their electrical connections at the switch points. Take away the Brake Booster Pushrod retainer clip and foam spacer from the Brake Pedal along with the Pushrod. Extract the vacuum Brake Booster attaching nuts and lift out the vacuum Brake Booster from the car along with its mounting gasket when required. Put back the booster gasket when it was removed before placing the vacuum Brake Booster in its vehicle position. Secure the vacuum Brake Booster Pushrod to Brake Pedal clevis pin first then add the foam spacer and retainer clip. Thread the booster nuts at 23 n.m (17 lb ft) and tighten them securely. Add back the tcc/cruise control release switch and the stop lamp/abs/shift lock switch to their positions on the Brake Pedal assembly. Install first the master cylinder on top of the booster then put on Steering Column left knee bolster bracket and left insulator panel. Reconnect the vacuum booster check valve and wire in the brake fluid level sensor and Cruise Control Module. Attach the accelerator control cable hardware while connecting the power connectors to the EGR Valve and engine harness.
- Q: How to Ensure Proper Installation of a Brake Booster on Buick Regal?A:The power Brake Booster holder j22805-b should be your first tool to gather. Take off the left side instrument panel insulator and detach the stoplamp switch electrical connector. First take off the pushrod retainer and separate the Brake Booster pushrod from the brake pedal. Then remove the cross vehicle brace and fuel injector sight shield. Unplug the Brake Fluid Level Sensor using proper tools but keep brake pipes attached to the master cylinder. Unthread the two retaining nuts and properly place the master cylinder away. Unplug the vacuum Brake Booster check valve assembly and keep it together with the vacuum hose as you disconnect it. Unplug the throttle and cruise control wires from the Throttle Body before taking out the throttle bracket together with throttle and cruise control cables. Move the motor to its ideal position before pulling apart the EGR Valve wiring harness shield and its associated components. Take off the transmission fluid filler tube bracket retainer and secure the filler tube during work. Place the j 22805-b holder over the Brake Booster then affix it with master cylinder locking nuts. Gently unlock the booster from the cowl front and turn the booster counterclockwise with a flat-bladed tool while rotating the power Brake Booster holder (J 22805-B). Remove the vacuum Brake Booster. To install the new vacuum Brake Booster, place it on the cowl with locking flanges engaged and turn clockwise using a ratchet on the power Brake Booster holder (J 22805-B) without using any flat-bladed tools. After installing the power Brake Booster holder (J 22805-B) you can take it out of place. Place back the transmission fluid filler tube bracket keeper then adjust the filler tube and heat shield of EGR Valve wires. Secure the heat shield bolt and nut to 10 nm torque. Lower the engine back to its factory position and attach both engine mount struts on their left and right sides. After placing the throttle assembly in its correct position you can install the cables to the Throttle Body. Reattach the vacuum hose and check valve to the booster unit then place the master cylinder on top before tightening its retaining nuts to 25 nm force. Connect the brake fluid sensor power wire while also placing the fuel sight shield and cross vehicle frame support before joining the brake pushrod to the pedal with its clip. Complete the process by connecting the stoplamp switch and putting back the instrument panel cover.


Related Buick Parts
 Buick ABS Sensor
 Buick Brake Backing Plate
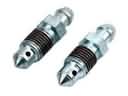 Buick Brake Bleeder Screw
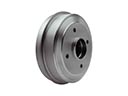 Buick Brake Drum
 Buick Brake Dust Shields
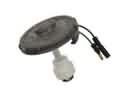 Buick Brake Fluid Level Sensor
 Buick Brake Line
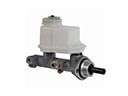 Buick Brake Master Cylinder
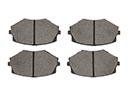 Buick Brake Pad
 Buick Brake Proportioning Valve
 Buick Brake Shoe
 Buick Wheel Hub