ChevyParts
My Garage
My Account
Cart
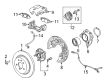
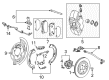
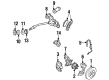
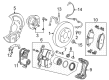
OEM Buick Brake Pad
Disc Brake Pad Set- Select Vehicle by Model
- Select Vehicle by VIN
Select Vehicle by Model
orMake
Model
Year
Select Vehicle by VIN
For the most accurate results, select vehicle by your VIN (Vehicle Identification Number).
67 Brake Pads found


Buick Brake Pads Part Number: 84233325
$81.23 MSRP: $159.04You Save: $77.81 (49%)Product Specifications- Other Name: Pad Kit, Brake; Disc Brake Hardware Kit; Front Pads
- Position: Front
- Replaces: 23316342, 20963796


Buick Brake Pads Part Number: 13404405
$70.68 MSRP: $137.17You Save: $66.49 (49%)Ships in 1-2 Business DaysProduct Specifications- Other Name: Pad Kit, Brake; Disc Brake Hardware Kit; Rear Pads
- Position: Rear
- Replaces: 13319293


Buick Brake Pads Part Number: 22846360
$81.31 MSRP: $157.80You Save: $76.49 (49%)Ships in 1-2 Business DaysProduct Specifications- Other Name: Pad Kit, Brake
- Position: Rear


Buick Brake Pads Part Number: 89027184
$80.65 MSRP: $151.46You Save: $70.81 (47%)Ships in 1-2 Business DaysProduct Specifications- Other Name: Pad Kit, Brake; Disc Brake Hardware Kit; Rear Pads
- Position: Rear
- Replaces: 88935809, 88983915


Buick Brake Pads, Front Part Number: 19152705
$48.00 MSRP: $131.96You Save: $83.96 (64%)Ships in 1-2 Business DaysProduct Specifications- Other Name: Pad Kit, Front Disc Brake; Disc Brake Hardware Kit; Front Pads; Pads; Pad Kit, Brake
- Position: Front
- Replaces: 88957253, 18024932

Buick Brake Pads Part Number: 13237753
$141.04 MSRP: $255.28You Save: $114.24 (45%)Ships in 1-2 Business DaysProduct Specifications- Other Name: Pad Kit, Brake; Disc Brake Hardware Kit; Front Pads
- Position: Front

Buick Brake Pads Part Number: 85143526
$84.19 MSRP: $163.41You Save: $79.22 (49%)Ships in 1-2 Business DaysProduct Specifications- Other Name: Pad Kit, Brake; Rear Pads
- Position: Rear
- Replaces: 20965713, 22846359

Buick Brake Pads Part Number: 23145352
$116.73 MSRP: $219.22You Save: $102.49 (47%)Ships in 1-2 Business DaysProduct Specifications- Other Name: Pad Kit, Brake; Disc Brake Hardware Kit; Rear Pads
- Position: Rear
- Replaced by: 86528946

Buick Brake Pads Part Number: 84856474
$59.39 MSRP: $163.24You Save: $103.85 (64%)Ships in 1-2 Business DaysProduct Specifications- Other Name: Pad Kit, Brake; Disc Brake Hardware Kit; Rear Pads
- Position: Rear
- Replaced by: 85143240
- Replaces: 84637108

Buick Rear Pads Part Number: 42518441
$91.58 MSRP: $171.99You Save: $80.41 (47%)Ships in 1-2 Business DaysProduct Specifications- Other Name: Pad Kit, Brake; Disc Brake Hardware Kit; Brake Pads
- Position: Rear

Buick Brake Pads Part Number: 42712384
$253.50 MSRP: $454.70You Save: $201.20 (45%)Ships in 1-3 Business DaysProduct Specifications- Other Name: Pad Kit, Brake; Disc Brake Hardware Kit; Front Pads
- Position: Front
- Replaced by: 42788406
Buick Brake Pads Part Number: 85143254
$186.19 MSRP: $333.98You Save: $147.79 (45%)Ships in 1-3 Business DaysProduct Specifications- Other Name: Pad Kit, Brake; Rear Pads

Buick Brake Pads Part Number: 85138423
$168.91 MSRP: $498.13You Save: $329.22 (67%)Product Specifications- Other Name: Pad Kit, Brake; Disc Brake Hardware Kit; Rear Pads; Front Pads
- Position: Front
- Replaced by: 85819231
- Replaces: 13329562, 84051821, 84233021

Buick Brake Pads, Front Part Number: 19428022
$52.17 MSRP: $93.16You Save: $40.99 (44%)Ships in 1-3 Business DaysProduct Specifications- Other Name: Pad Kit, Front Disc Brake
- Position: Front
- Replaces: 19287113, 88909661

Buick Brake Pads Part Number: 42788125
$92.27 MSRP: $254.69You Save: $162.42 (64%)Ships in 1-2 Business DaysProduct Specifications- Other Name: Pad Kit, Brake; Front Pads
- Replaced by: 42881020
- Replaces: 42733166, 42747910

Buick Brake Pads Part Number: 19428021
$51.91 MSRP: $92.71You Save: $40.80 (45%)Ships in 1-3 Business DaysProduct Specifications- Other Name: Pad Kit, Brake; Disc Brake Hardware Kit
- Replaces: 19286309, 88909660, 18038870
Buick Brake Pads Part Number: 85154807
$137.79 MSRP: $247.19You Save: $109.40 (45%)Ships in 1-3 Business DaysProduct Specifications- Other Name: Pad Kit, Brake; Rear Pads
- Replaced by: 86528945

Buick Brake Pads Part Number: 23301397
$78.32 MSRP: $215.25You Save: $136.93 (64%)Ships in 1-2 Business DaysProduct Specifications- Other Name: Pad Kit, Brake; Disc Brake Hardware Kit; Front Pads
- Position: Front

Buick Brake Pads Part Number: 13517693
$47.09 MSRP: $88.45You Save: $41.36 (47%)Ships in 1-2 Business DaysProduct Specifications- Other Name: Pad Kit, Brake; Disc Brake Hardware Kit
- Position: Rear


Buick Brake Pads Part Number: 85520396
$118.99 MSRP: $230.94You Save: $111.95 (49%)Ships in 1-3 Business DaysProduct Specifications- Other Name: Pad Kit, Brake; Disc Brake Hardware Kit; Front Pads
- Position: Front
- Replaced by: 85619135
| Page 1 of 4 |Next >
1-20 of 67 Results
Buick Brake Pad
Choose OEM Brake Pad, you're making the optimal decision for superior quality and perfect performance. You can feel confident because each component goes through stringent quality checks. Every part is carefully built to comply with Buick's factory specifications. You'll enjoy a smooth, worry-free installation that fits just right. At ChevyPartsGiant.com, you'll find it easy to get top-quality OEM Buick Brake Pad. You can shop at highly competitive prices and protect your budget. All our genuine Buick parts include a dependable manufacturer's warranty. You'll also appreciate our straightforward return policy and swift delivery services for extra convenience.
Buick Brake Pad Parts and Q&A
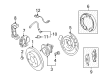
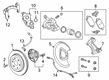
- Q: Why is burnishing the brake pads and brake disc essential after servicing the brake system on Buick LaCrosse?A:Regular brake pad and brake disc burnishing is crucial to ready the braking surfaces after disc brake maintenance especially when you replace the brake pads. Head to a steady open highway with minimal cars to conduct this operation by making the vehicle hit 48 km/h (30 mph). SetBranch speed slowly while taking precaution not to heat up the brakes. Press the brakes evenly until the vehicle stops while avoiding brake lock up. Follow the acceleration-braking routine up to 20 stops while allowing enough downtime to properly process the brake lining and brake discs.
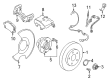
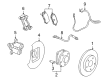
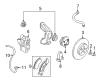
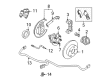
- Q: How to replace the front brake pads on Buick Regal?A:Start by checking the brake master cylinder reservoir for fluid level. Drain fluids when needed until you reach the correct position between minimum and maximum marks. Lift the vehicle and put safety stands under it. Remove the tire and wheel units. Apply two hand-tight wheel nuts to hold the rotor while using a large c-clamp to slowly push the front caliper piston against the back of the outboard pad until the piston can be removed from the bore. Position the roof caliper above the wheel for protection and untighten both components before disassembling. Take the caliper pads off from their mounting position and detach the retainer slides from the caliper bracket. Check the disc brake mounting parts as well as the caliper dust boot for damage and replace faulty components. Replace the caliper bolts with new parts because corrosion makes them unsafe. Insert a wooden block on top of the piston and install it in the caliper bore using a c-clamp while ensuring not to harm the piston or boot. Place the two retainers onto the caliper bracket with attention to the wear sensor position at the leading edge of outside pads when the wheel turns forward. Fasten the pads to the caliper anchor bracket first, then move the caliper back over the front pads. Smear grease on the bolt threads before inserting and screwing the lower caliper bolt into position with a torque of 95 nm (70 ft. Lbs.). Install wheel assembly on tire and lower the car then remove wheel lug nuts holding rotor to the hub. While keeping the engine turned off press Brake Pedal to two-thirds of its length and release it slow. Press and release the Brake Pedal 15 times but stop when you achieve a solid Brake Pedal sensation that helps put brake pads and pistons in the correct position. Complete brake system restoration by loosening the Brake Pad master cylinder reservoir to its right position before burning in both pads and rotors.


Related Buick Parts
 Buick Wheel Speed Sensor
 Buick ABS Control Module
 Buick ABS Sensor
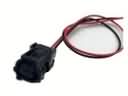 Buick ABS Wheel Speed Sensor Connector
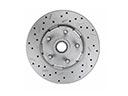 Buick Brake Disc
 Buick Brake Dust Shields
 Buick Brake Fluid Level Sensor
 Buick Brake Line
 Buick Differential Cover
 Buick Hydraulic Hose
 Buick Parking Brake Shoe
 Buick Wheel Hub