ChevyParts
My Garage
My Account
Cart
OEM Buick Rainier A/C Accumulator
Accumulator- Select Vehicle by Model
- Select Vehicle by VIN
Select Vehicle by Model
orMake
Model
Year
Select Vehicle by VIN
For the most accurate results, select vehicle by your VIN (Vehicle Identification Number).
1 A/C Accumulator found


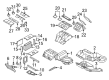
Buick Rainier Drier Part Number: 15883410
$52.05 MSRP: $97.14You Save: $45.09 (47%)Ships in 1-2 Business Days
Buick Rainier A/C Accumulator
Want to cut long-term maintenance and repair costs? Choose OEM A/C Accumulator. Those parts deliver top durability you can trust. On our site, you'll find a huge catalog of genuine Buick Rainier parts. Prices are unbeatable, so you can keep more in your pocket. Every OEM Buick Rainier A/C Accumulator includes a manufacturer's warranty. You can also get an easy return policy that keeps buying risk free. Fast delivery, get your car on the road quickly. It's simple to search, compare, and order. Stop guessing about quality or fit. Order today and save with parts that last.
The Buick Rainier A/C Accumulator plays a huge role with regards to the efficiency and durability of the air conditioning system used in Buick Rainier cars. Located between the evaporator and the compressor, the A/C Accumulator plays the role of filtering out moisture, oil and any unwanted debris as it cools and works as efficiently as it should. As this is the environment in which occupants spend most of their time when inside the cabin body, this reliability is paramount in sustaining the ideal climatic condition no matter the weather. This particular Buick Rainier A/C Accumulator can be used with a variety of Rainier models in the market manufactured from 2004 to 2007 thereby supporting the claim of its significance in the architecture of the popular automobiles. Despite being relatively small and compact in size, it has a very sturdy construction and helps to reinforce this Rainier's image of good results, and backed up by a strong choices of engines, 4.2L Vortec I6 and 5.3L Small-block V8. For example, the A/C Accumulator is also critical for improving safety since the smooth functioning of the air conditioning is vital when driving long distances to avoid fogging up of the windows and the interior of the car becoming hot. Prominent features of the Buick Rainier A/C Accumulator are it being able to handle high pressure and high temperatures a very unique element in the automotive industry. In sum, the Buick Rainier A/C Accumulator can be considered as the example of the strategy of Buick as the company that makes vehicles with high quality, reliability and performance for mid-size luxury SUV segment which prioritizes temperature control for both driver and passenger.
Buick Rainier A/C Accumulator Parts and Q&A
- Q: How to replace the A/C Accumulator on Buick Rainier?A:The first step before installing a new accumulator requires recovery of the refrigerant. Start by disconnecting the electrical connector from the a-c pressure switch followed by removing the a-c low pressure switch. Start by removing the accumulator clamp's nut before unclipping the accumulator from the Evaporator and separating the compressor suction hose assembly from the accumulator's body. The accumulator must be thoroughly cleaned of its o-ring seals so you can remove it from the vehicle along with its clamp nut. During installation apply refrigerant oil to the new accumulator unit. Secure the accumulator within the accumulator clamp before hexing the accumulator clamp nut to 10 n.m (88 lb in). Start by installing the a-c low pressure switch then tighten it to 5 n.m (44 lb in). New o-ring seals should be installed afterward. Fasten the accumulator to the Evaporator using its retaining nut while torqueing it to 28 n.m (21 lb ft). Secure the suction hose to the accumulator before tightening the hose nut so it reaches 48 n.m (35 lb ft). The final task includes circuit connections to the a-c low pressure switch then performs system evaporation while. Verification occurs with j39400-a.

Related Buick Rainier Parts
 Buick Rainier A/C Compressor
 Buick Rainier A/C Compressor Cut-Out Switches
 Buick Rainier A/C Condenser
 Buick Rainier A/C Hose
 Buick Rainier A/C System Valve Core
 Buick Rainier Blend Door Actuator
 Buick Rainier Blower Motor
 Buick Rainier Blower Motor Resistor
 Buick Rainier Evaporator
 Buick Rainier HVAC Control Module
 Buick Rainier HVAC Pressure Switch
 Buick Rainier Heater Core