ChevyParts
My Garage
My Account
Cart
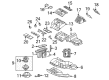
OEM Buick Rainier HVAC Control Module
Heater Control Assembly- Select Vehicle by Model
- Select Vehicle by VIN
Select Vehicle by Model
orMake
Model
Year
Select Vehicle by VIN
For the most accurate results, select vehicle by your VIN (Vehicle Identification Number).
2 HVAC Control Modules found


Buick Rainier Control Module Part Number: 19260762
$79.78 MSRP: $163.98You Save: $84.20 (52%)Ships in 1-3 Business Days


Buick Rainier Control Module Part Number: 88892976
Buick Rainier HVAC Control Module
Our website offers an extensive catalog of genuine Buick Rainier HVAC Control Module at unbeatable prices. Every OEM Buick Rainier HVAC Control Module comes with a manufacturer's warranty, an easy return policy, and rapid delivery service. Don't miss out on this great opportunity!
Buick Rainier HVAC Control Module Parts Questions & Experts Answers
- Q: How to replace the HVAC control module on Buick Rainier?A: Beginning HVAC control module replacement requires removal of the I/P accessory trim plate along with the screws that fix the HVAC control module into place. While removing the HVAC control module from the I/P use a finger to push down the three tabs. Disconnect the electrical connectors from the control module. The installation process starts with connector attachment to the HVAC control module while tabs demonstrate secure integration before placing the HVAC control module inside the I/P. Fasteners need to use their designated locations because replacing them demands fasteners which precisely match the application's part numbers. Service documentation identifies the fasteners along with thread locking requirements and sealing needs. The application of paints, lubricants or corrosion inhibitors to fasteners or their joint surfaces should be avoided because these substances can compromise both torque values and clamping force and ultimately degrade the fastener. Always use the specified torque sequence together with the recommended specifications to protect the system from damage when installing new fasteners. Secure the screws on the HVAC control module at 1.9 Nm torque (17 in. lbs.) before reinstalling the I/P accessory trim plate.

Related Buick Rainier Parts
 Buick Rainier A/C Accumulator
 Buick Rainier A/C Compressor
 Buick Rainier A/C Compressor Cut-Out Switches
 Buick Rainier A/C Condenser
 Buick Rainier A/C Hose
 Buick Rainier A/C System Valve Core
 Buick Rainier Blend Door Actuator
 Buick Rainier Blower Motor
 Buick Rainier Blower Motor Resistor
 Buick Rainier Evaporator
 Buick Rainier HVAC Pressure Switch
 Buick Rainier Heater Core