ChevyParts
My Garage
My Account
Cart
OEM Buick Rainier A/C Condenser
Air Conditioning Condenser- Select Vehicle by Model
- Select Vehicle by VIN
Select Vehicle by Model
orMake
Model
Year
Select Vehicle by VIN
For the most accurate results, select vehicle by your VIN (Vehicle Identification Number).
2 A/C Condensers found


Buick Rainier Condenser Part Number: 89019255
$127.77 MSRP: $191.00You Save: $63.23 (34%)Ships in 1-2 Business Days
Buick Rainier Condenser Part Number: 89019256
$142.17 MSRP: $212.52You Save: $70.35 (34%)Ships in 1-3 Business Days
Buick Rainier A/C Condenser
Want to cut long-term maintenance and repair costs? Choose OEM A/C Condenser. Those parts deliver top durability you can trust. On our site, you'll find a huge catalog of genuine Buick Rainier parts. Prices are unbeatable, so you can keep more in your pocket. Every OEM Buick Rainier A/C Condenser includes a manufacturer's warranty. You can also get an easy return policy that keeps buying risk free. Fast delivery, get your car on the road quickly. It's simple to search, compare, and order. Stop guessing about quality or fit. Order today and save with parts that last.
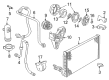
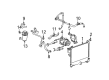
Quite a number of intelligent scientists manufactured the Buick Rainier A/C Condenser, making the Rainier lineup, manufactured between 2004 and 2007, to display reliability and performance. As an A/C Condenser, this pars contains a vital heat exchange mechanism that effectively changes gaseous refrigerant into its liquid state and boosts the cooling performance of the vehicle's air conditioner. Mounted conspicuously on the front part of the car above the radiator, the Buick Rainier A/C Condenser has a complex arrangement of tubes that helps in channeling air in the right direction towards achieving its very purpose of cooling the automobile's air conditioner or heater. It is compatible with almost all Rainier models to allow the drivers to benefit from high performance, regardless of the model they are using. Buick Rainier is appreciated for its powerful engines such as 4.2L Vortec I6 and 5.3L Small-block V8; besides, the automobile offers the maximum safety and comfort as well. The A/C Condenser contributes to the management of the degree of heat in the cabin, which affects the safety of the driver and the passengers. Furthermore, the Buick Rainier A/C Condenser has distinguishable attributes in enhancing the automotive markets because of its hardness and strength that sees it withstand operation through the day. Thanks to the comfort features such as dual-zone automatic climate control and a premium in-car entertainment system, the Buick Rainier with a very helpful A/C Condenser does not leave the car's owner indifferent to driving. In summary, the Buick Rainier A/C Condenser is a clear example of attention and concern that this car manufacturing company pays to its products' quality and their performance and therefore can be considered as irreplaceable addition for this mid-size luxury SUV.
Buick Rainier A/C Condenser Parts Questions & Experts Answers
- Q: How to replace the A/C Condenser in a system on Buick Rainier?A:Frigenrnt recovery begins before installing a new condenser. The compressor discharge hose connection requires removal at both ends from the condenser by untightening the nut and hose. After removing the evaporator tube nut installed on the condenser extract the evaporator tube from the condenser . The replacement process starts with Hood Latch removal and condenser retaining screws before removing the condenser from its radiator placement. When replacing the condenser install it back onto the radiator while adding new refrigerant oil. Fasten the condenser into position with the retaining screws until they are torqued to 5 n.m (44 lb in). Put the Hood Latch back into place while linking the evaporator tube to the condenser . Install the retaining nut to the evaporator tube at the condenser before tightening it to 28 n.m (21 lb ft). Connect the compressor discharge hose to the condenser while installing its retaining nut before tightening both to 28 n.m (21 lb ft). Complete system evacuation and recharging follows a leak examination of fittings through utilization of the halogen leak detector (J 39400-A).

Related Buick Rainier Parts
 Buick Rainier A/C Accumulator
 Buick Rainier A/C Compressor
 Buick Rainier A/C Compressor Cut-Out Switches
 Buick Rainier A/C Hose
 Buick Rainier A/C System Valve Core
 Buick Rainier Blend Door Actuator
 Buick Rainier Blower Motor
 Buick Rainier Blower Motor Resistor
 Buick Rainier Evaporator
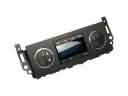 Buick Rainier HVAC Control Module
 Buick Rainier HVAC Pressure Switch
 Buick Rainier Heater Core