ChevyParts
My Garage
My Account
Cart
OEM Buick Rainier Exhaust Hanger
Exhaust Tail Pipe Hanger- Select Vehicle by Model
- Select Vehicle by VIN
Select Vehicle by Model
orMake
Model
Year
Select Vehicle by VIN
For the most accurate results, select vehicle by your VIN (Vehicle Identification Number).
2 Exhaust Hangers found


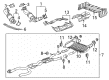
Buick Rainier Converter & Pipe Insulator Part Number: 15120136
$18.52 MSRP: $27.58You Save: $9.06 (33%)Ships in 1-3 Business Days

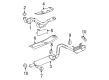
Buick Rainier Insulator Part Number: 15120137
Buick Rainier Exhaust Hanger
Want to cut long-term maintenance and repair costs? Choose OEM Exhaust Hanger. Those parts deliver top durability you can trust. On our site, you'll find a huge catalog of genuine Buick Rainier parts. Prices are unbeatable, so you can keep more in your pocket. Every OEM Buick Rainier Exhaust Hanger includes a manufacturer's warranty. You can also get an easy return policy that keeps buying risk free. Fast delivery, get your car on the road quickly. It's simple to search, compare, and order. Stop guessing about quality or fit. Order today and save with parts that last.
The Buick Rainier Exhaust Hanger is one of these parts that symbolizes stability and power of the Buick Rainier- the mid-size luxury SUV that was manufactured between 2004 and 2007. Urchined to hold and protect the exhaust system, the Exhaust Hanger also minimizes direct connection between other automotive components, and hence, make the cabin fairly free from noise and vibration. This is especially true in an endeavor of preserving the reputation of a quiet car that Buick Rainier is associated with. Typically though, these hangers get worn out with time and some of the problems associated with them include loud exhaust noises and strong mountains. They are important tools for students to be able to make their own assessment and, at the same time, regularly question and analyze what emerges in the context of education. It is therefore very important that the Buick Rainier Exhaust Hanger is checked often so that the car gives its optimal performance and so that every one will be safe in the roads. Applicable to multiple models of Rainier, this Exhaust Hanger raises the performance of the whole exhaust system and corresponds to the full-bodied powertrain available for this SUV such as 5.3L Small-block V8. In particular, the Buick Rainier has numerous advantages in the sphere of performance as well as safety- the all-disc antilock brakes and GM's StabiliTrak. Thus, Buick Rainier Exhaust Hanger provides a significant contribution to the reliability of the vehicle and, thus, to the safety of passengers. As an essential component of vehicle Construction and probably a major contributor to the Rainier's reliability, the Buick Rainier Exhaust Hanger proves that the SUV is not a design deficient car; it reasserts the firm's reputation on dependability and responsiveness.
Buick Rainier Exhaust Hanger Parts Questions & Experts Answers
- Q: How to replace the Exhaust Hanger and Insulator from the converter to the transmission on Buick Rainier?A:Replacing the exhaust system insulator, hanger, and bracket from the converter to the transmission requires first raising the vehicle. First remove the heated Oxygen Sensor electrical connection before removing the nuts from the Catalytic Converter pipe-to-Exhaust Manifold connection and discard both the old exhaust seal and nuts. Start by removing the nuts which connect the Catalytic Converter pipe to the Muffler followed by the bolt anchoring the Exhaust Hanger to the transmission mount before taking out the transmission mount. The installation process begins by removing both the Catalytic Converter and Exhaust Hanger assembly before dissembling the Exhaust Hanger from the Catalytic Converter. First position the Catalytic Converter into the vehicle while installing the Exhaust Hanger to it then reinstall the assembly combined with the Catalytic Converter and Exhaust Hanger. Attach the transmission mount with a 30 nm (22 ft. Lbs.) bolt securing the Catalytic Converter pipe hanger right before reinstalling the transmission mount. Secure the Catalytic Converter pipe to the Exhaust Manifold with a new exhaust seal before evenly threading the nuts by hand against the exhaust flange until secure then tighten them to 50 nm (37 ft. Lbs.). Reconnect the h2os electrical connector after lowering the vehicle.

Related Buick Rainier Parts
 Buick Rainier Air Inject Check Valve
 Buick Rainier Canister Purge Valves
 Buick Rainier Catalytic Converter
 Buick Rainier EGR Valve
 Buick Rainier Exhaust Flange Gasket
 Buick Rainier Exhaust Heat Shield
 Buick Rainier Exhaust Manifold Gasket
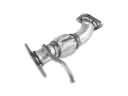 Buick Rainier Exhaust Pipe
 Buick Rainier Muffler
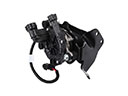 Buick Rainier Secondary Air Injection Pump
 Buick Rainier Tail Pipe
 Buick Rainier Vapor Pressure Sensor