ChevyParts
My Garage
My Account
Cart
OEM Buick Rainier Oil Pan
Oil Drain Pan- Select Vehicle by Model
- Select Vehicle by VIN
Select Vehicle by Model
orMake
Model
Year
Select Vehicle by VIN
For the most accurate results, select vehicle by your VIN (Vehicle Identification Number).
2 Oil Pans found

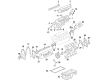
Buick Rainier Oil Pan Part Number: 12613437
$332.93 MSRP: $523.85You Save: $190.92 (37%)Ships in 1-3 Business Days
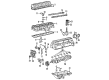
Buick Rainier Oil Pan Part Number: 12584321
$221.43 MSRP: $348.26You Save: $126.83 (37%)
Buick Rainier Oil Pan
Want to cut long-term maintenance and repair costs? Choose OEM Oil Pan. Those parts deliver top durability you can trust. On our site, you'll find a huge catalog of genuine Buick Rainier parts. Prices are unbeatable, so you can keep more in your pocket. Every OEM Buick Rainier Oil Pan includes a manufacturer's warranty. You can also get an easy return policy that keeps buying risk free. Fast delivery, get your car on the road quickly. It's simple to search, compare, and order. Stop guessing about quality or fit. Order today and save with parts that last.
The Buick Rainier Oil Pan is one of the key components of the oiling system that is probably central to the efficient functioning of the car's engine. Strictly for the Buick Rainier car, this component is an oil pan which holds the engine oil after it has been collected from the engine car with the aim of achieving a reserve tank in a bid to control leakage and supply constant levels of oil as required. The majority of Buick Rainier models employs a wet sump system: the oil pump sucks the oil in through a pickup tube in the oil pan and baths the engine's working surfaces with the required amount of oil before allowing the dirty oil to return to the pan. The contemporary Buick Rainier Oil Pan is typically made of robust cast aluminum thereby standing taller on the reliability and performance as compared to the stamped steel pan kind. Many Rainier models can use this oil pan so that all vehicles will experience the increase in health of their engines. The Buick Rainier Oil Pan plays a rather important role not only in the functionality of the car but also in the safety; it is responsible for the proper supply of oil, which is extremely important for avoiding difficult scenarios with the engine. Secondly, the oil pan design occupies a certain position in claiming that the Rainier model is sturdily built to handle daily use. Thus, the Buick Rainier Oil Pan has impressive parameters in terms of both durability and performance characteristics, as well as safety, which makes the Buick Rainier a solid mid-size luxury SUV on the automotive market.
Buick Rainier Oil Pan Parts and Q&A
- Q: How to replace the oil pan on Buick Rainier?A:To pull out the Oil Pan, the whole operation that has to be done is first jump off the negative Battery Cable. Unscrew the a/c bottom bolts and only partially release the top bolts (2, 3). Remove the oil level indicator and tube, as well as the stabilizer shaft. Remove the front Differential, attach it to the frame and take off the front drive axle intermediate shaft bearing assembly. Drain the engine oil and unbolt transmission cooler lines from the engine block. Take off the 4 transmission bell housing bolts that are attached to the Oil Pan and then remove the remaining bolts in the Oil Pan. Install 2 Oil Pan bolts into the jack screws on the Oil Pan and tighten them equally to loosen off the Oil Pan of the engine. Clean and check the Oil Pan and apply sealer of 3 mm (0.12 in) over the block. Mount the Oil Pan by making sure that it would clear the Oil Pump and screen assembly before installing the Oil Pan bolts. Check the alignment of the Oil Pan with the help of a straight edge at the back of the block and Oil Pan transmission with the mounting surface and tighten the Oil Pan side bolts to 25 n.m (18 lb ft) and the end bolts to 10 n.m (89 lb.in). Reinstall the 4 bell housing bolts of the 4transmission tightening to 47 n.m (35 lb ft) and with it clip back the transmission cooler lines to the engine block. Mount the front drive axle intermediate shaft bearing assembly, oil drain plug, and filter. Clamp on the front Differential, then stabilize with the shaft. Right replacement, the A/C Compressor bottom bolts and tighten all four bolts (2, 3, 4) to a 50 n.m (37 lb ft). Lastly, re-install the oil level indicator and tube, reattach the negative Battery Cable, check the engine for oil leakage, and top up the oil in the engine.

Related Buick Rainier Parts
 Buick Rainier Camshaft
 Buick Rainier Camshaft Bearing
 Buick Rainier Coolant Filter
 Buick Rainier Crankshaft Thrust Washer Set
 Buick Rainier Harmonic Balancer
 Buick Rainier Lash Adjuster
 Buick Rainier Piston Ring
 Buick Rainier Pushrod
 Buick Rainier Rocker Arm
 Buick Rainier Timing Chain
 Buick Rainier Timing Chain Tensioner
 Buick Rainier Valve Stem Oil Seal