Make sure this part fits

GM 12613437
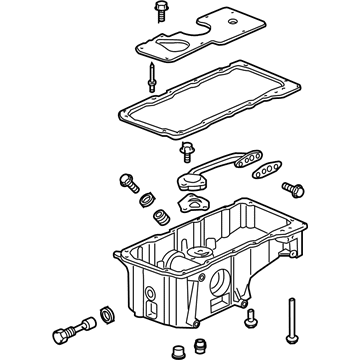
Oil Pan

2003-2009 GM

Customer Questions & Expert Answers (9)
GM 12613437 Oil Pan
  • Part Description
    Pan, Engine Oil
  • Replaces
    12579723, 12624620
  • Manufacturer
    General Motors
Make sure this part fits
$332.93 MSRP: $523.85
You Save: $190.92 (37%)
Ships in 1-3 Business Days
1
ADD TO CART
  • Vehicle Fitment

    Year Make Model Trim Engine
    2004-2007 Buick RainierCXL, CXL Plus8 Cyl 5.3 L GAS
    2003-2006 Chevrolet SSRBase8 Cyl 5.3 L GAS, 8 Cyl 6.0 L GAS
    2006-2009 Chevrolet TrailblazerBase, LS, LT, SS8 Cyl 5.3 L GAS, 8 Cyl 6.0 L GAS
    2003-2006 Chevrolet Trailblazer EXTLS, LT, North Face8 Cyl 5.3 L GAS
    2005-2009 GMC EnvoyDenali8 Cyl 5.3 L GAS
    2003-2006 GMC Envoy XLDenali, SLE, SLT8 Cyl 5.3 L GAS
    2004-2005 GMC Envoy XUVSLE, SLT8 Cyl 5.3 L GAS
    Warning: California's Proposition 65
  • Customer Questions & Expert Answers

    Q:
    Is this 12613437 designed for my car? Posted by ChevyPartsGiant Specialist
    A:
    Please Select Your Vehicle model to see if part number 12613437 is suitable before ordering.
    Posted by ChevyPartsGiant Specialist
    Q:
    How to replace the oil pan on Buick Rainier? Posted by Customer
    A:
    To pull out the Oil Pan, the whole operation that has to be done is first jump off the negative Battery Cable. Unscrew the a/c bottom bolts and only partially release the top bolts (2, 3). Remove the oil level indicator and tube, as well as the stabilizer shaft. Remove the front Differential, attach it to the frame and take off the front drive axle intermediate shaft bearing assembly. Drain the engine oil and unbolt transmission cooler lines from the engine block. Take off the 4 transmission bell housing bolts that are attached to the Oil Pan and then remove the remaining bolts in the Oil Pan. Install 2 Oil Pan bolts into the jack screws on the Oil Pan and tighten them equally to loosen off the Oil Pan of the engine. Clean and check the Oil Pan and apply sealer of 3 mm (0.12 in) over the block. Mount the Oil Pan by making sure that it would clear the Oil Pump and screen assembly before installing the Oil Pan bolts. Check the alignment of the Oil Pan with the help of a straight edge at the back of the block and Oil Pan transmission with the mounting surface and tighten the Oil Pan side bolts to 25 n.m (18 lb ft) and the end bolts to 10 n.m (89 lb.in). Reinstall the 4 bell housing bolts of the 4transmission tightening to 47 n.m (35 lb ft) and with it clip back the transmission cooler lines to the engine block. Mount the front drive axle intermediate shaft bearing assembly, oil drain plug, and filter. Clamp on the front Differential, then stabilize with the shaft. Right replacement, the A/C Compressor bottom bolts and tighten all four bolts (2, 3, 4) to a 50 n.m (37 lb ft). Lastly, re-install the oil level indicator and tube, reattach the negative Battery Cable, check the engine for oil leakage, and top up the oil in the engine.
    Posted by ChevyPartsGiant Specialist
    Q:
    How to replace the oil pan on Chevrolet SSR? Posted by Customer
    A:
    Start by taking off the Starter motor and crossmember brace and transmission cover bolt and cover. Drain the engine oil while taking out the engine Oil Filter before tightening the Drain Plug and Oil Filter securely. To replace the Oil Pan of a vehicle equipped with the 4l60-e transmission first remove its right-side transmission bolting components then take off the left-side bottom bolt. Disconnect the oil level sensor electrical connector at its mounting point then take away the engine harness from in front of the Oil Pan. Start by removing all Oil Pan bolts and Oil Pan from the engine but make sure foreign objects stay out of oil pathways. Cover the openings as needed. Use drills to remove all retaining rivets from the Oil Pan gasket before disposing of the gasket and rivets alongside each other. Check the engine Oil Pan for damage during a formal inspection before you put it back together. Deposits of gm U.S. P/N 12378190 or equivalent sealant with 5 mm (0.20 inch) bead size should be applied along the front and rear cover gaskets tab sections that protrude from the Oil Pan surface. The bead length will be 20 mm (0.80 inch). The installation process requires alignment of oil galleries through the gasket material followed by a gasket-pan assembly before installing pan and gasket components into the engine block requiring bolt torques at 25 nm (18 ft. Lbs.). Tighten the Oil Pan bolts to their normal operating point but do not exceed recommended torque specifications. For vehicles with 4l60-e automatic transmission, start by installing right-side bolts and studs until they become snug before tightening left-side bottom bolts. Fasten the Oil Pan bolts to specification of 25 nm (18 ft. Lbs.), the Oil Pan-to-rear cover bolts to 12 nm (106 inch lbs.) and the bellhousing, converter cover, and transmission bolts/stud to 50 nm (37 ft. Lbs.). Reinstall the engine harness at the Oil Pan front side before connecting the oil level sensor electrical connector. Install the transmission cover followed by its bolt while tightening the transmission cover bolt to 12 nm (106 inch lbs.). Finish by installing the crossbar and tightening the crossbar bolts to 100 nm (74 ft. Lbs.). The installation process finishes with putting back the Starter motor while adding fresh engine oil and a new Oil Filter.
    Posted by ChevyPartsGiant Specialist
    Q:
    How to replace the oil pan on Chevrolet Trailblazer? Posted by Customer
    A:
    The replacement of an Oil Pan begins by disconnecting the negative Battery Cable. Begin by unscrewing the bottom bolts of the A/C Compressor while you slowly loosen the top bolts (2, 3). Remove the stabilizer shaft after taking out the oil level indicator and tube. Begin by removing the front Differential from its position before fastening it to the frame structure then finish by taking out the front drive axle intermediate shaft bearing assembly. Drain all engine oil while unfastening both transmission cooler lines from the engine block surface. You should first remove the Oil Pan's 4 bolts connecting to the transmission bell housing before removing all other Oil Pan bolts. Put two Oil Pan bolts into the jack screws on the pan before tightening them carefully to detach it from the engine block. Clean the Oil Pan before applying a 3 mm (0.12 in) bead of sealer to the block surface. Install the Oil Pan while checking that it has adequate clearance from the Oil Pump and screen assembly and torque the side bolts to 25 nm (18 lb ft) while tightening end bolts to 10 nm (89 lb in). Refasten the 4 transmission bell housing bolts while tightening them to 47 nm (35 lb ft). After that, reconnect the transmission cooler lines to their positions on the engine block. The service technician should install the front drive axle intermediate shaft bearing assembly together with the oil drain plug and filter. Squeeze bolt 2, 3 and 4 of the front Differential stabilizer shaft and bottom A/C Compressor together using a torque wrench at 50 nm (37 lb ft) pre-set. Reposition the oil level indicator and tube and rejoin the negative Battery Cable followed by checking for engine oil leaks, and then restore oil to the engine's required level.
    Posted by ChevyPartsGiant Specialist
    Q:
    What components need to be taken out next for the 2006 Buick Rainier? Posted by Customer
    A:
    Take out the oil level indicator and tube, followed by the stabilizer shaft.
    Posted by ChevyPartsGiant Specialist
    See expert answers on similar Oil Pan
    Q:
    How should the oil gallery passages be aligned for the 2005 Chevrolet SSR? Posted by Customer
    A:
    Ensure proper alignment of the oil gallery passages in the oil pan and engine block with the oil pan gasket.
    Posted by ChevyPartsGiant Specialist
    See expert answers on similar Oil Pan
    Q:
    What should be ensured regarding the oil gallery passages for the 2003 Chevrolet SSR? Posted by Customer
    A:
    Ensure proper alignment of the oil gallery passages with the oil pan gasket.
    Posted by ChevyPartsGiant Specialist
    See expert answers on similar Oil Pan
    Q:
    How do you remove the oil pan for the 2006 Chevrolet SSR? Posted by Customer
    A:
    Remove the oil pan bolts and the oil pan itself, ensuring no foreign material enters the oil passages by capping or covering the openings.
    Posted by ChevyPartsGiant Specialist
    See expert answers on similar Oil Pan
    Q:
    What components need to be installed after the transmission cooler lines for the 2008 GMC Envoy? Posted by Customer
    A:
    Install the front drive axle intermediate shaft bearing assembly, oil drain plug, and filter.
    Posted by ChevyPartsGiant Specialist
    See expert answers on similar Oil Pan
    If you have any questions about this product, please don't hesitate to ask us. We will be happy to help you!

OEM GM Oil Pan 12613437 Designed for Proper Fit and Performance

Original OEM GM parts deliver superior quality and meet all performance standards needed for optimal automotive operation. The authentic part identified by 12613437 Oil Pan is available in the market under the name GM Oil Pan. This genuine product has a full warranty coverage from the manufacturer available at all authorized GM dealers throughout the United States. This part 12613437 Oil Pan fits certain Chevrolet SSR, Trailblazer, Trailblazer EXT models, as well as GMC Envoy, Envoy XL, Envoy XUV. Additionally, it is compatible with Buick Rainier models.
The original GM component designated by manufacturer part number 12613437 maintains top performance when functioning as the Pan, Engine Oil unit. The component 12613437 is constructed from durable material and its dimensions span 26.6 x 12.6 x 13.0 inches while weighing 23.10 Pounds. The Direct Replacement component is ready in New condition to ensure full compatibility with your vehicle system. The part 12613437 has available replacement options 12579723, 12624620. GM manufacturer provides a warranty that ensures reliable operation of this product. The Shipping Policy and Return Policy pages outline complete details regarding shipping procedures and return processes.
If you want to save money in the long run on maintenance and repairs, you should choose OEM products because they're of the top level of durability. Are you on the quest of finding GM parts, our site is worth a visit. We stock an endless selection of high-quality GM components including things like ignition coils all the way through to fan shrouds and all at prices that can not be matched. You have nothing to worry about because all our OEM parts are covered with a manufacturer warranty, which guarantees superior quality and value.