ChevyParts
My Garage
My Account
Cart
OEM Buick Regal Control Arm Bushing
Suspension Arm Bushing- Select Vehicle by Model
- Select Vehicle by VIN
Select Vehicle by Model
orMake
Model
Year
Select Vehicle by VIN
For the most accurate results, select vehicle by your VIN (Vehicle Identification Number).
17 Control Arm Bushings found


Buick Regal Lower Control Arm Rear Bushing Part Number: 84008847
$43.13 MSRP: $74.07You Save: $30.94 (42%)Ships in 1-2 Business Days

Buick Regal Rear Bushings, Lower Part Number: 13239619
$131.90 MSRP: $217.28You Save: $85.38 (40%)
Buick Regal Suspension Crossmember Front Bushing, Rear Part Number: 13306736
$48.98 MSRP: $67.10You Save: $18.12 (27%)Ships in 1-2 Business Days
Buick Regal Lower Control Arm Bushing, Front Part Number: 10260991
$15.09 MSRP: $24.69You Save: $9.60 (39%)
Buick Regal Control Arm Bushing, Rear Part Number: 22927294
$17.82 MSRP: $29.34You Save: $11.52 (40%)
Buick Regal Control Arm Bushing, Upper Part Number: 15980176
$7.61 MSRP: $12.10You Save: $4.49 (38%)Ships in 1-3 Business Days
Buick Regal Rear Bushings Part Number: 13318343
$40.63 MSRP: $63.65You Save: $23.02 (37%)Ships in 1-3 Business Days
Buick Regal Suspension Crossmember Rear Bushing Part Number: 13306735
$45.00 MSRP: $74.13You Save: $29.13 (40%)Ships in 1-2 Business Days

Buick Regal Lower Control Arm Rear Bushing Part Number: 13280216
$54.98 MSRP: $87.30You Save: $32.32 (38%)Ships in 1-2 Business Days
Buick Regal Front Bushings, Rear Part Number: 13219170
$14.71 MSRP: $23.04You Save: $8.33 (37%)Ships in 1-3 Business Days
Buick Regal Control Arm Bushing, Rear Part Number: 13219169
$20.34 MSRP: $33.50You Save: $13.16 (40%)
Buick Regal Lower Control Arm Bushing, Front Part Number: 10403698
$18.15 MSRP: $29.88You Save: $11.73 (40%)Ships in 1-2 Business Days

Buick Regal Front Bushings, Rear Part Number: 20921465


Buick Regal Outer Bushing, Rear Part Number: 13239621

Buick Regal Control Arm Bushing, Front Lower Part Number: 15980178

Buick Regal Control Arm Bushing, Front Lower Part Number: 14039483


Buick Regal Control Arm, Rear Part Number: 10000068
Buick Regal Control Arm Bushing
Want to cut long-term maintenance and repair costs? Choose OEM Control Arm Bushing. Those parts deliver top durability you can trust. On our site, you'll find a huge catalog of genuine Buick Regal parts. Prices are unbeatable, so you can keep more in your pocket. Every OEM Buick Regal Control Arm Bushing includes a manufacturer's warranty. You can also get an easy return policy that keeps buying risk free. Fast delivery, get your car on the road quickly. It's simple to search, compare, and order. Stop guessing about quality or fit. Order today and save with parts that last.
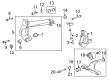
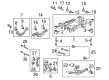
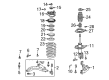
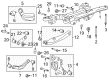
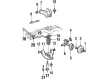
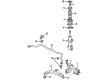
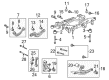
The Buick Regal Control Arm Bushing is the critical apparatus in the suspension system and is well-known for its trustworthiness and effectiveness in virtually all makes and models of Buick Regals. Located between the control arms and the vehicle structure, the Control Arm Bushings can be viewed as the soft links whose main function is to dampening, isolating, and reduce friction between the arms and the vehicle when the car is responding to road information and the driver lowering or turning the wheels. This serves a purpose of ensuring that the Buick Regal rides efficiently and safely since worn or damaged bushing affects the suspension of the car and its wheel alignment. Featuring the type of rubber, steel, aluminum, polyurethane and synthetic elastomer, the Control Arm Bushing are suitable for users in the different categorization so as to get the favorable durability and performance of the Buick car in the certain driving condition. Buick Regal comes from 1973 and one of the key attributes that today's Buick Regal has been delivering to the market is the intelligent features that improve driving experience and the element of Control Arm Bushing contributes to it. That is why it is considered to be one of the key models in the Buick line, as well as its availability in connection with other Regal models, such as the liftback sedan and TourX station wagon. The Buick Regal Control Arm Bushing therefore cuts out in the automotive market dealing with handling and ride enhancements hence being a perfect example of the company's focus on quality and advanced engineering.
Buick Regal Control Arm Bushing Parts Questions & Experts Answers
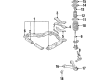
- Q: How to replace the lower control arm bushings vertically on Buick Regal?A:To perform vertical lower Control Arm Bushing replacement one requires these tools: Control Arm Bushing set (J 21474-01), 1/2 inch puller bolt thrust bearing (J 21474-271), bushing installer remover (J 21474-2), nut (J 21474-4), Control Arm Bushing installer (J 21474-13) and high pressure lubricant (J 23444-A) and driven sprocket support bearing installer (J 34126) and front knuckle support (J 35379). The tools required for vertical lower Control Arm Bushing replacement include Control Arm Bushing set (J 21474-01), 1/2 inch puller bolt thrust bearing (J 21474-271), bushing installer remover (J 21474-2), nut (J 21474-4), Control Arm Bushing installer (J 21474-13), high pressure lubricant (J 23444-A), driven sprocket support bearing installer (J 34126), and front knuckle support (J 35379). First secure the lower Control Arm into a vice before proceeding. Draw a mark on the lower Control Arm right along its bushing flange flat surface. Steadily apply j 23444-a or equivalent to the threads of j 21474-27. Assemble the bushing removal tools: the installer assembles tools in the sequence of j 21474-27, j 21474-13, j 34126, j 35379, j 21474-2, and j 21474-4 before tightening j 21474-4 to separate the tools. When installing the lower Control Arm vertical bushing verify its placement which preserves the vehicle's original ride performance alongside handling characteristics and natural road feedback. Position the flat bushing flange against the Control Arm mark at a 30-degree angle from the center and direct the bushing's narrow slot towards the outside. First place the bushing into the Control Arm before applying j 23444-a lubricant to j 21474-27 threads then connect the installation tools in this order: j 21474-27, j 21474-13, j 21474-5, j 21474-4. J 21474-27, j 21474-13, j 21474-5, and j 21474-4. With j 21474-4 as the final tool, disconnect all tools before adding the lower Control Arm to its place.

Related Buick Regal Parts
 Buick Regal Axle Beam Mount
 Buick Regal Axle Pivot Bushing
 Buick Regal Ball Joint
 Buick Regal Coil Spring Insulator
 Buick Regal Control Arm
 Buick Regal Control Arm Bracket
 Buick Regal Crossmember Bushing
 Buick Regal Lateral Arm
 Buick Regal Shock Absorber
 Buick Regal Shock And Strut Mount
 Buick Regal Sway Bar Bushing
 Buick Regal Sway Bar Link