ChevyParts
My Garage
My Account
Cart
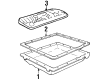
OEM Cadillac Automatic Transmission Filter
AT Filter- Select Vehicle by Model
- Select Vehicle by VIN
Select Vehicle by Model
orMake
Model
Year
Select Vehicle by VIN
For the most accurate results, select vehicle by your VIN (Vehicle Identification Number).
39 Automatic Transmission Filters found


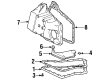
Cadillac Filter Part Number: 8681416
$38.39 MSRP: $68.57You Save: $30.18 (45%)Ships in 1-3 Business DaysProduct Specifications- Other Name: Filter, Automatic Transmission Fluid; Transmission Filter; Hydraulic Filter; Filter, Transmission Oil Suction Tube


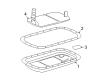
Cadillac Filter Part Number: 96041844
$38.45 MSRP: $68.66You Save: $30.21 (44%)Ships in 1-3 Business DaysProduct Specifications- Other Name: Filter Kit, Automatic Transmission Fluid; Transmission Filter; Filter, Transmission Oil Suction Tube


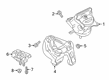
Cadillac Pan Gasket Part Number: 24274402
$23.00 MSRP: $41.08You Save: $18.08 (45%)Product Specifications- Other Name: Filter, Oil Pan Pump Suction; Transmission Filter; Valley Pan Gasket; Filter; Filter, Transmission Oil Suction Tube
- Replaced by: 24295812


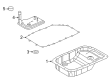
Cadillac Filter Part Number: 96042795
$105.36Ships in 1-2 Business DaysProduct Specifications- Other Name: Filter Kit, Automatic Transmission Fluid; Transmission Filter; Filter Kit, Transmission Oil Suction Tube

Cadillac Filter Part Number: 24270604
$60.96 MSRP: $108.86You Save: $47.90 (44%)Product Specifications- Other Name: Filter Assembly-Automatic Transmission Fluid; Transmission Filter; Filter, Transmission Oil Suction Tube

Cadillac Filter Part Number: 24044732
$21.71 MSRP: $38.76You Save: $17.05 (44%)Ships in 1-2 Business DaysProduct Specifications- Other Name: Filter Assembly-Automatic Transmission Fluid; Filter, Transmission Oil Suction Tube
Cadillac Filter Part Number: 24294529
$15.85 MSRP: $28.30You Save: $12.45 (44%)Ships in 1-2 Business DaysProduct Specifications- Other Name: Filter Assembly-Automatic Transmission Fluid; Filter, Transmission Oil Suction Tube; Filter, Oil Pan Pump Suction

Cadillac Filter Part Number: 24262057
$18.77 MSRP: $33.51You Save: $14.74 (44%)Ships in 1-3 Business DaysProduct Specifications- Other Name: Filter Assembly-Automatic Transmission Fluid; Transmission Filter
- Replaces: 24279578
Cadillac Filter Part Number: 24272473
$101.36 MSRP: $165.89You Save: $64.53 (39%)Product Specifications- Other Name: Seal Kit, Automatic Transmission Service; Transmission Filter
- Replaced by: 24054654


Cadillac Filter Part Number: 24236933
$38.48 MSRP: $68.71You Save: $30.23 (44%)Product Specifications- Other Name: Filter Kit, Automatic Transmission Fluid; Hydraulic Filter; Transmission Filter Kit.; Filter Kit, Transmission Oil Suction Tube; Filter Kit, Oil Pan Pump Suction; Filter Kit
- Replaces: 24238229


Cadillac Filter Part Number: 96042545
Product Specifications- Other Name: Filter Kit, Automatic Transmission Fluid; Transmission Filter Kit; Transmission Filter; Filter Kit, Transmission Oil Suction Tube


Cadillac Auto Transmission Filter Part Number: 24216035
Product Specifications- Other Name: Filter Kit, Automatic Transmission Fluid; Transmission Filter; Hydraulic Filter; Filter; Filter Kit, Transmission Oil Suction Tube
- Replaces: 8684953

Cadillac Filter Part Number: 12360651
Product Specifications- Other Name: Transmission Filter; Filter Kit, Transmission Oil Suction Tube; Filter, Transmission Oil Suction Tube; Filter Kit, Oil Pan Pump Suction
- Replaces: 12337210, 24210386
Cadillac Filter Part Number: 8662943
Product Specifications- Other Name: Filter Assembly Automatic Transmission Oil; Transmission Filter; Hydraulic Filter


Cadillac Filter Part Number: 8638960
Product Specifications- Other Name: Filter Assembly, Automatic Transmission Oil; Transmission Filter; Filter Kit, Transmission Oil Suction Tube; Filter, Transmission Oil Suction Tube; Filter, Oil Pan Pump Suction
Cadillac Filter Part Number: 8638964
Product Specifications- Other Name: Filter Kit, Automatic Transmission Oil; Transmission Filter; Filter, Oil Pan Pump Suction


Cadillac Filter Part Number: 96015432
Product Specifications- Other Name: Filter, Automatic Transmission Fluid; Transmission Filter; Filter, Transmission Oil Suction Tube

Cadillac Auto Transmission Filter Part Number: 24228950
Product Specifications- Other Name: Filter Kit, Transmission Oil Suction Tube; Transmission Filter; Hydraulic Filter; Filter; Filter, Transmission Oil Suction Tube; Filter
- Replaces: 08689918, 8689918

Cadillac Filter Part Number: 8639951
Product Specifications- Other Name: Filter Assembly, Automatic Transmission Oil; Transmission Filter; Filter Kit, Transmission Oil Suction Tube; Filter, Transmission Oil Suction Tube
Cadillac Filter Kit Part Number: 96042240
Product Specifications- Other Name: Filter Kit, Automatic Transmission Oil; Transmission Filter; Filter; Filter Kit, Transmission Oil Suction Tube
| Page 1 of 2 |Next >
1-20 of 39 Results
Cadillac Automatic Transmission Filter
Want to cut long-term maintenance and repair costs? Choose OEM Automatic Transmission Filter. Those parts deliver top durability you can trust. On our site, you'll find a huge catalog of genuine Cadillac parts. Prices are unbeatable, so you can keep more in your pocket. Every OEM Cadillac Automatic Transmission Filter includes a manufacturer's warranty. You can also get an easy return policy that keeps buying risk free. Fast delivery, get your car on the road quickly. It's simple to search, compare, and order. Stop guessing about quality or fit. Order today and save with parts that last.
Cadillac Automatic Transmission Filter Parts Questions & Experts Answers
- Q: How to Properly Maintain the Automatic Transmission Filter on Cadillac CTS?A:Repair and service of automatic transmission fluid and filter demands that you start by lifting the car along with vehicle support followed by placing a drain pan underneath the transmission fluid Drain Plug. Take out and dispose of the transmission Drain Plug which allows fluid to flow while you examine it for signs of discoloration and contamination. The service requires users to install a new transmission fluid Drain Plug followed by tightening to 20 nm (15 ft. Lbs.). To free the fluid pan proceed by loosening its bolts. A rubber mallet can be used to gently tap when needed. Take out the fluid pan together with its gasket before you thoroughly clean and examine the magnet and pan and bolts and gasket for damage or wear. A long screwdriver should be used to remove the fluid filter while you use the universal seal remover (J23129) and slide hammer adapter (J6125-1B) to take out the 2 fluid filter seals. Install two new fluid filter seals onto the transmission fluid filter neck while smuggling the edges with lightly moistened transjel lubricant (J36850) or petroleum jelly. The installation of the transmission fluid filter should be performed into the transmission case while simultaneously putting in the fluid pan and gasket unless noticeable damage exists on the sealing surface. Secure the fluid pan bolts with 11 nm of torque when possible (97 inch lbs.). After filling the transmission to its correct level lower the vehicle down then check for any oilpan gasket leakages.
- Q: How to Remove and Replace the Automatic Transmission Filter and Fluid for the 5L40-E/5L50-E on Cadillac SRX?A:The first task is to position the vehicle with a lift system before you can begin replacing or replacing automatic transmission fluid and filter components for the 5l40-e/5l50-e. Proceed by positioning a drain pan under the transmission fluid pan and gently undebug the bolts on three sides. To break the gasket seal gently strike the fluid pan with a rubber mallet while the fluid drain process begins for inspection of discoloration and contamination within the transmission fluid. The first step is to remove the fluid pan bolts before taking off the fluid pan with its gasket . The magnet along with pan needs examination as well as inspection for any signs of damage followed by evaluation of bolts and gasket. The fluid filter requires a long screwdriver for removal. Next remove the two fluid filter seals with the tools j 23129 and j 6125-1b. Two new fluid filter seals require placement onto the transmission fluid filter neck followed by application of a small j 36850 or petroleum jelly coating prior to installation. Place the transmission fluid filter into the case before using the undamaged fluid pan gasket or replacing it with new material. When installing the fluid pan with its gasket apply them together before tightening the fluid pan bolts to 11 nm (97 lb in). Check whether the transmission contains the correct amount of fluid before lowering the vehicle for a gasket leak check of the oil pan.
- Q: How to Replace the Automatic Transmission Filter and Fluid on Cadillac XLR?A:A suitable drain pan needs placement underneath the transmission fluid Drain Plug before you can begin replacing the automatic transmission fluid and filter. Vehicle elevation and support must occur first. The transmission fluid Drain Plug must be removed to allow fluid drainage during which you should inspect the draining fluid for discoloration signals and signs of contamination. Fitting a new transmission Drain Plug requires torque to 20 nm (15 ft. Lbs.) after the fluid draining process. Use a rubber mallet to lightly tap the fluid pan and proceed by removing its bolts. Start by removing the fluid pan together with its gasket before cleaning and inspecting the magnet alongside the pan bolts and gasket for any signs of damage or wear. The fluid filter should be extracted by using a long screwdriver while the 2 fluid filter seals need universal seal removel (J 23129) with slide hammer adapter (J 6125-1B) to disconnect them. Use new fluid filter seals to secure the transmission fluid filter neck besides coating them with 1 centimeter of transjel lubricant (J 36850) or petroleum jelly. The transmission fluid filter installation into the case needs the fluid pan to remain with the gasket before you tighten the fluid pan bolts to 11 nm (97 inch lbs.). The technician should fill the transmission properly before lowering the vehicle to check for any gasket leakage around the oil pan.


Related Cadillac Parts
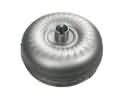 Cadillac Torque Converter
 Cadillac Automatic Transmission Input Shaft Seal
 Cadillac Automatic Transmission Seal
 Cadillac Automatic Transmission Shifter
 Cadillac Flywheel
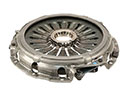 Cadillac Pressure Plate
 Cadillac Shift Cable
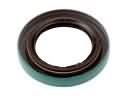 Cadillac Transfer Case Seal
 Cadillac Transmission Assembly
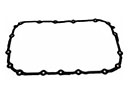 Cadillac Transmission Gasket
 Cadillac Transmission Pan
 Cadillac Valve Body