ChevyParts
My Garage
My Account
Cart
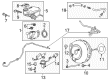
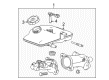
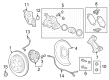
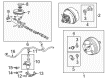
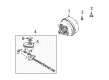
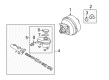
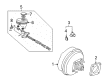
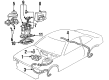
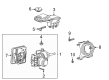
OEM Cadillac Brake Master Cylinder
- Select Vehicle by Model
- Select Vehicle by VIN
Select Vehicle by Model
orMake
Model
Year
Select Vehicle by VIN
For the most accurate results, select vehicle by your VIN (Vehicle Identification Number).
77 Brake Master Cylinders found


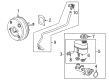
Cadillac Master Cylinder Part Number: 20925765
$78.63 MSRP: $147.66You Save: $69.03 (47%)Ships in 1-2 Business DaysProduct Specifications- Other Name: Cylinder, Brake Master Cylinder; Brake Master Cylinder
- Replaced by: 84822232

Cadillac Master Cylinder Part Number: 22892941
$242.42 MSRP: $455.24You Save: $212.82 (47%)Ships in 1-2 Business DaysProduct Specifications- Other Name: Cylinder Kit, Brake Master Cylinder; Brake Master Cylinder
- Replaced by: 84708966


Cadillac Master Cylinder Part Number: 19432944
$156.87 MSRP: $281.38You Save: $124.51 (45%)Product Specifications- Other Name: Cylinder, Brake Master Cylinder
- Replaced by: 19432746


Cadillac Master Cylinder Part Number: 25509416
$91.40 MSRP: $163.22You Save: $71.82 (44%)Ships in 1-3 Business DaysProduct Specifications- Other Name: Cylinder, Brake Master Cylinder; Brake Master Cylinder
- Replaced by: 19176498

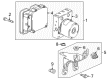
Cadillac ABS Control Unit Part Number: 84931599
$1087.56 MSRP: $1959.56You Save: $872.00 (45%)Product Specifications- Other Name: Cylinder Assembly, Brake Master (W/Power Brake Booster & Electronic Brake Booster Control Module; ABS Control Module; Cylinder, Brake Master Cylinder
- Replaced by: 85089652
- Replaces: 84829135, 84507523, 84710977


Cadillac Master Cylinder Part Number: 84073045
$100.19 MSRP: $181.34You Save: $81.15 (45%)Ships in 1-3 Business DaysProduct Specifications- Other Name: Cylinder Kit, Brake Master Cylinder; Brake Master Cylinder; Brake Booster
- Replaced by: 84678201

Cadillac Master Cylinder Part Number: 22936034
$795.03 MSRP: $1256.53You Save: $461.50 (37%)Ships in 1-3 Business DaysProduct Specifications- Other Name: Cylinder, Brake Master Cylinder; Brake Master Cylinder
- Replaces: 25980234, 22807022

Cadillac Modulator Valve Part Number: 85607995
$1004.57 MSRP: $1587.75You Save: $583.18 (37%)Ships in 1-2 Business DaysProduct Specifications- Other Name: Cylinder, Brake Master Cylinder; Master Cylinder Assembly
- Replaces: 86813801

Cadillac Master Cylinder Part Number: 22909761
$95.47 MSRP: $185.29You Save: $89.82 (49%)Product Specifications- Other Name: Cylinder, Brake Master Cylinder; Brake Master Cylinder
- Replaced by: 84614708


Cadillac Overhaul Kit Part Number: 18007935
Product Specifications- Other Name: Cylinder Kit, Brake Master Cylinder; Master Cylinder Repair Kit


Cadillac Overhaul Kit Part Number: 19209252
Product Specifications- Other Name: Cylinder, Brake Master Cylinder; Cylinder Kit, Brake Master Cylinder
- Replaces: 18048541, 18040253


Cadillac Master Cylinder Part Number: 19209197
Product Specifications- Other Name: Cylinder, Brake Master Cylinder; Brake Master Cylinder
- Replaces: 15267509


Cadillac Master Cylinder Part Number: 19209200
Product Specifications- Other Name: Cylinder, Brake Master Cylinder; Brake Master Cylinder
- Replaces: 15283583


Cadillac Master Cylinder Part Number: 19209239
Product Specifications- Other Name: Cylinder, Brake Master Cylinder; Brake Master Cylinder
- Replaces: 18047527


Cadillac Master Cylinder Part Number: 19209249
Product Specifications- Other Name: Cylinder, Brake Master Cylinder; Brake Master Cylinder
- Replaces: 18060789, 18048538, 18040252

Cadillac Master Cylinder Part Number: 19209250
Product Specifications- Other Name: Cylinder, Brake Master Cylinder; Brake Master Cylinder
- Replaces: 18043278, 18048539, 18060790, 18040236


Cadillac Master Cylinder Part Number: 19209259
Product Specifications- Other Name: Cylinder, Brake Master Cylinder; Brake Master Cylinder
- Replaces: 18060779
Cadillac Master Cylinder Part Number: 19418188
$127.54 MSRP: $228.78You Save: $101.24 (45%)Product Specifications- Other Name: Cylinder, Brake Master Cylinder; Brake Master Cylinder
- Replaces: 84163797, 25846372, 20943078
Cadillac Overhaul Kit Part Number: 18014033
Product Specifications- Other Name: Cylinder Kit, Brake Master; Master Cylinder Repair Kit

Cadillac Master Cylinder Part Number: 86804795
$964.87 MSRP: $1738.50You Save: $773.63 (45%)Product Specifications- Other Name: Cylinder, Brake Master Cylinder; Master Cylinder Assembly
- Replaces: 84933516, 85124317, 84719299, 85534582, 85000376, 84836018
| Page 1 of 4 |Next >
1-20 of 77 Results
Cadillac Brake Master Cylinder Parts Questions & Experts Answers
- Q: How to replace the brake master cylinder (JD9) or the two-mode hybrid master cylinder on Cadillac Escalade?A: Before replacing the Brake Master Cylinder (JD9) or two-mode hybrid master cylinder you must turn the ignition off and leave it there without depressing the brake pedal. Then take out the brake fluid from the reservoir and place it in authorized storage. Unplug the brake fluid sensor electrical connection and separate both ends of the Brake Master Cylinder hose assembly. Position them on the side. To avoid fluid leaks tap the brake pipe primary fitting before sealing it with covers while also sealing the master cylinder outlet port. Repeat this process by disconnecting the left supply brake pipe fitting , right supply brake pipe fitting , right front brake pipe fitting , and left front brake pipe fitting , each with corresponding covers and seals. Seize off the Brake Master Cylinder nuts and remove them before pulling out the Brake Master Cylinder along with its master cylinder seal. To install the cylinder slide the Brake Master Cylinder seal onto its adapter first before placing the assembly with a properly seated seal onto the adapter. Use new master cylinder nuts and secure them to 33 nm (24 lb ft) torque setting. Fix the assembled brake connections between left front, right front, right supply, left supply, and primary brake lines with a torque of 30 nm. Join the Brake Master Cylinder reservoir return hose quick connect back to the supply hose quick connect then attach the Brake Fluid Level Sensor electrical connector. Put fluid in the Brake Master Cylinder reservoir then remove air from the hydraulic brake system.
- Q: How to service and repair the Brake Master Cylinder on Cadillac CTS?A: The first step when fixing the Brake Master Cylinder safety depends on your knowledge of brake fluid warnings and its impact on car paint and electrical equipment. Delco supreme ii brake fluid part number 12377967 (Canadian part number 992667) provides the best protection to internal rubber seals because it must be taken from a clean sealed container. Set the Brake Master Cylinder mounting flange in the vise to safely reach the rear of the main Piston for service work. Install proper attachments on the master cylinder ports and connect them to hose pipes before removing its reservoir components. Connect transparent hoses to these fittings then position the hoses into the reservoir space. Pour the suggested brake fluid into the reservoir until the liquid reaches half-way and the hose ends remain covered by fluid. Press and release the primary Piston 25 mm (1 inch) with a round-ended tool several times while checking fluid flow from the ports; the strength needed to push the Piston increases as air exits the brake system. Perform this action until the ports discharge liquid without trapped air. Unplug the transparent hoses from the reservoir and put them back in place before disconnecting the master cylinder fittings from their ports. Once done keep the master cylinder covered by a cloth during removal.
- Q: How to replace the brake master cylinder on Cadillac XLR?A: Before starting the Brake Master Cylinder replacement process disconnect the electrical connector from the brake fluid sensor and then disconnect the brake lines from the master cylinder. Insert rubber caps on the pipe ends to prevent brake fluid loss. First you close the brake pipe ports then remove the master cylinder mounting nuts to take out the part from the vehicle. Empty every brake fluid from the master cylinder storage tank. Before adding the master cylinder to the Brake Booster you should drain brake fluid from the system while bleeding the cylinder on a workbench. Fasten the master cylinder nuts with 29 n.m torque measurements (21 lb ft). Place the brake pipe plugs away while connecting the brake pipes to the master cylinder. Fully tighten the brake pipe screws at the master cylinder to reach 24 n.m (18 lb ft). Connect the electrical unit to the brake fluid sensor and complete hydraulic brake system bleeding.


Related Cadillac Parts
 Cadillac Brake Booster
 Cadillac ABS Control Module
 Cadillac ABS Relay
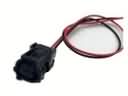 Cadillac ABS Wheel Speed Sensor Connector
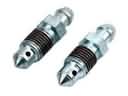 Cadillac Brake Bleeder Screw
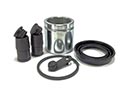 Cadillac Brake Caliper Repair Kit
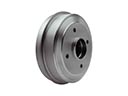 Cadillac Brake Drum
 Cadillac Brake Dust Shields
 Cadillac Brake Line
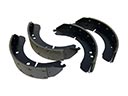 Cadillac Brake Shoe
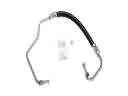 Cadillac Hydraulic Hose
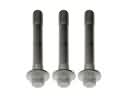 Cadillac Wheel Hub Bolt