ChevyParts
My Garage
My Account
Cart
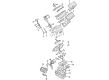
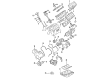
OEM Cadillac Catera Timing Cover
Engine Timing Cover- Select Vehicle by Model
- Select Vehicle by VIN
Select Vehicle by Model
orMake
Model
Year
Select Vehicle by VIN
For the most accurate results, select vehicle by your VIN (Vehicle Identification Number).
4 Timing Covers found

Cadillac Catera Timing Cover Part Number: 90530527
$71.28 MSRP: $137.24You Save: $65.96 (49%)Ships in 1-2 Business Days


Cadillac Catera Timing Cover Part Number: 90572785


Cadillac Catera Timing Cover Part Number: 90572780
Cadillac Catera Front Cover Part Number: 90573770
Cadillac Catera Timing Cover
Our website offers an extensive catalog of genuine Cadillac Catera Timing Cover at unbeatable prices. Every OEM Cadillac Catera Timing Cover comes with a manufacturer's warranty, an easy return policy, and rapid delivery service. Don't miss out on this great opportunity!
Cadillac Catera Timing Cover Parts Questions & Experts Answers
- Q: How to service and repair the timing cover on Cadillac Catera?A: The service and repair process of the Timing Cover begins by removing the intake air resonator and the intake plenum followed by lifting and supporting the vehicle. Detach the splash shield by removing its 4 mounting bolts. Then extract the splash shield from its position. Start by counterholding the generator bolt on the generator's rear side to detach the air injection crossover pipe bracket nut from the generator bolt and then separate the air injection crossover pipe bushing nut from the engine bracket on its left side. Move on to the next step by unclamping the hydrogen injection crossover pipe from its connections with rubber hoses before removing the crossover tube altogether. Bottom the car then release the hose clamp on the check valve before disconnecting hose connection and removing the air injection crossover pipe. Preserve the accessory Drive Belt tension to create necessary resistance because the Water Pump Pulley bolts and Power Steering Pump bolts should remain in place. Start by unscrewing Water Pump Pulley bolts before moving on to Power Steering Pump pulley bolts. Work on the following sequence to remove the belt: start by taking off the bolt which supports the a/c compressor hose from the air injection crossover bracket. Then remove the accessory Drive Belt. Pull the harness channel forward to expose the cover while releasing the retaining tabs from the extension and remember the harness path before extracting it from its channel. Remove first the Water Pump Pulley bolts accompanied by the Water Pump Pulley then proceed with the Power Steering Pump pulley bolts followed by the Power Steering Pump pulley. Start by uninstalling the accessory Drive Belt tensioner bolts and the tensioner along with the front timing belt cover bolts and cover. The front timing belt cover has a sealing strip at the outer edge which needs to be checked for damage before replacement. Secure the front timing belt cover through bolting and ensure proper torque reaches 8 nm (71 inch lbs.). Mount the accessory Drive Belt tensioner together with its tightening bolts at 40 nm (30 ft. Lbs.). Begin by installing the Power Steering Pump pulley with its bolts set to a medium consistency but final tightening will occur during the accessory Drive Belt installation. After Water Pump Pulley installation place its bolts loosely secured for subsequent tightening. Guide the wiring harness through the channel while installing both the wiring harness channel cover and its extension. When replacing the accessory Drive Belt, users should also put back the a/c compressor hose support strap bolt. Use 8 nm torque (71 inch lbs.) to secure it. Tighten the Water Pump Pulley bolts to 8 nm (71 inch lbs.) tighten the Power Steering Pump pulley bolts to 20 nm (15 ft. Lbs.). Reinstall the air injection crossover pipe and connect the air injection check valve hose using clamps. Lifting the vehicle allows you to connect the air injection crossover pipe to its rubber hose connections. Install the air injection crossover pipe bushing nut and tighten it at 12 nm (108 inch lbs.). Secure the air injection crossover pipe clamps while counterholding the generator bolt to install the air injection crossover pipe support bracket nut , tighten the generator bolt to 40 nm (30 ft. Lbs.). To complete the installation insert the air injection crossover pipe bracket nut, attach the splash shield and install its 4 bolts while ensuring all components are fully engaged without any damage to the parts. Place the vehicle back to its original position before reinstalling the intake plenum and intake air resonator.

Related Cadillac Catera Parts
 Cadillac Catera Oil Filter
 Cadillac Catera Cam Gear
 Cadillac Catera Camshaft
 Cadillac Catera Camshaft Seal
 Cadillac Catera Crankshaft Seal
 Cadillac Catera Engine Mount Bracket
 Cadillac Catera Exhaust Valve
 Cadillac Catera Oil Filler Cap
 Cadillac Catera Oil Pan
 Cadillac Catera Oil Pan Baffle
 Cadillac Catera Timing Chain Tensioner
 Cadillac Catera Valve Cover Grommet