ChevyParts
My Garage
My Account
Cart
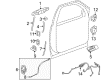
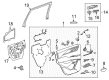
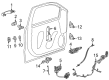
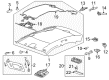
OEM Cadillac Door Handle
Inside Door Handle- Select Vehicle by Model
- Select Vehicle by VIN
Select Vehicle by Model
orMake
Model
Year
Select Vehicle by VIN
For the most accurate results, select vehicle by your VIN (Vehicle Identification Number).
497 Door Handles found


Cadillac Handle, Outside Part Number: 13577716
$169.73 MSRP: $249.28You Save: $79.55 (32%)Ships in 1-2 Business DaysProduct Specifications- Other Name: Handle Kit-Front Side Door Outside (Chrome Button) *Paint To Mat; Exterior Door Handle; Handle Kit, Door Outside Handle; Handle, Door Outside Handle
- Position: Front


Cadillac Handle Part Number: 15273470
$71.01 MSRP: $105.69You Save: $34.68 (33%)Ships in 1-2 Business DaysProduct Specifications- Other Name: Handle, End Gate Lock


Cadillac Handle, Outside, Rear Driver Side Part Number: 20806435
$40.91 MSRP: $64.03You Save: $23.12 (37%)Ships in 1-2 Business DaysProduct Specifications- Other Name: Handle Assembly-Rear Side Door Outside *Service Primer; Exterior Door Handle; Handle, Door Outside Handle
- Position: Rear Driver Side


Cadillac Handle, Inside, Jet Black, Front Passenger Side Part Number: 22766364
$33.68 MSRP: $50.13You Save: $16.45 (33%)Ships in 1-3 Business DaysProduct Specifications- Other Name: Handle Assembly-Front Side Door Inside *Jet Black; Interior Door Handle; Handle, Door Lock Inside Handle
- Position: Front Passenger Side


Cadillac Handle, Outside, Driver Side Part Number: 15930535
$6.05 MSRP: $9.00You Save: $2.95 (33%)Ships in 1-2 Business DaysProduct Specifications- Other Name: Handle, Door Outside Handle; Exterior Door Handle
- Position: Driver Side
Cadillac Handle, Inside, Brownstone, Passenger Side Part Number: 22766365
$10.68 MSRP: $15.90You Save: $5.22 (33%)Ships in 1-3 Business DaysProduct Specifications- Other Name: Handle, Door Lock Inside Handle; Interior Door Handle
- Position: Passenger Side

Cadillac Handle, Inside, Driver Side Part Number: 23194963
$26.71 MSRP: $39.76You Save: $13.05 (33%)Ships in 1-3 Business DaysProduct Specifications- Other Name: Handle, Door Lock Remote Control Inside; Interior Door Handle
- Position: Driver Side

Cadillac Handle, Outside, Front Passenger Side Part Number: 13542098
$108.16 MSRP: $160.98You Save: $52.82 (33%)Ships in 1-3 Business DaysProduct Specifications- Other Name: Handle Kit-Front Side Door Outside; Exterior Door Handle; Handle Kit, Door Outside Handle
- Position: Front Passenger Side
- Replaced by: 86532869


Cadillac Handle, Inside, Black, Driver Side Part Number: 23163901
$11.46 MSRP: $17.05You Save: $5.59 (33%)Ships in 1-3 Business DaysProduct Specifications- Other Name: Handle, Door Lock Inside Handle; Handle, Door Lock Remote Control Inside
- Position: Driver Side

Cadillac Grip Handle, Titanium, Rear Passenger Side Part Number: 20864480
$6.96 MSRP: $10.35You Save: $3.39 (33%)Ships in 1-3 Business DaysProduct Specifications- Other Name: Handle, Rear Quarter And Roof Rail Assist
- Position: Rear Passenger Side
- Replaces: 25904816

Cadillac Grip Handle Part Number: 20986869
$5.56 MSRP: $8.27You Save: $2.71 (33%)Ships in 1-3 Business DaysProduct Specifications- Other Name: Handle Assembly-Windshield Pillar Assist *Vry Left Linen; Handle, Door Inside Assist Handle
- Replaces: 15936573

Cadillac Handle, Outside, Blue, Front Passenger Side Part Number: 15205689
$42.53 MSRP: $63.30You Save: $20.77 (33%)Ships in 1-2 Business DaysProduct Specifications- Other Name: Handle Assembly-Front Side Door Outside *Blue; Exterior Door Handle
- Position: Front Passenger Side
- Replaced by: 19245506
Cadillac Handle, Inside, Driver Side Part Number: 23194961
$26.68 MSRP: $39.71You Save: $13.03 (33%)Ships in 1-3 Business DaysProduct Specifications- Other Name: Handle, Door Lock Inside Handle; Interior Door Handle; Handle, Door Lock Remote Control Inside
- Position: Driver Side
Cadillac Handle, Inside, Jet Black, Front Driver Side Part Number: 22766366
$5.58 MSRP: $8.30You Save: $2.72 (33%)Ships in 1-3 Business DaysProduct Specifications- Other Name: Handle Assembly-Front Side Door Inside *Jet Black; Interior Door Handle; Handle, Door Lock Inside Handle
- Position: Front Driver Side
Cadillac Handle, Inside, Passenger Side Part Number: 23194962
$27.47 MSRP: $40.89You Save: $13.42 (33%)Ships in 1-3 Business DaysProduct Specifications- Other Name: Handle, Door Lock Inside Handle; Interior Door Handle; Handle, Door Lock Remote Control Inside
- Position: Passenger Side
Cadillac Handle, Inside, Passenger Side Part Number: 23194964
$26.71 MSRP: $39.76You Save: $13.05 (33%)Ships in 1-3 Business DaysProduct Specifications- Other Name: Handle, Door Lock Remote Control Inside; Interior Door Handle
- Position: Passenger Side
Cadillac Handle, Outside, Rear Driver Side Part Number: 13541307
$103.41 MSRP: $153.91You Save: $50.50 (33%)Ships in 1-3 Business DaysProduct Specifications- Other Name: Handle Kit-Rear Side Door Outside; Exterior Door Handle; Handle Kit, Door Outside Handle
- Position: Rear Driver Side
- Replaced by: 86532873

Cadillac Handle, Inside, Driver Side Part Number: 84161822
$25.17 MSRP: $37.46You Save: $12.29 (33%)Ships in 1-3 Business DaysProduct Specifications- Other Name: Handle, Door Lock Remote Control Inside
- Position: Driver Side
Cadillac Handle, Outside, Rear Passenger Side Part Number: 22848472
$55.40 MSRP: $82.45You Save: $27.05 (33%)Ships in 1-2 Business DaysProduct Specifications- Other Name: Handle Assembly-Rear Side Door Outside *Service Primer; Exterior Door Handle; Handle, Door Outside Handle
- Position: Rear Passenger Side
Cadillac Handle, Inside, Driver Side Part Number: 84161811
$25.33 MSRP: $37.71You Save: $12.38 (33%)Ships in 1-3 Business DaysProduct Specifications- Other Name: Handle, Door Lock Remote Control Inside; Interior Door Handle
- Position: Driver Side
| Page 1 of 25 |Next >
1-20 of 497 Results
Cadillac Door Handle
Want to cut long-term maintenance and repair costs? Choose OEM Door Handle. Those parts deliver top durability you can trust. On our site, you'll find a huge catalog of genuine Cadillac parts. Prices are unbeatable, so you can keep more in your pocket. Every OEM Cadillac Door Handle includes a manufacturer's warranty. You can also get an easy return policy that keeps buying risk free. Fast delivery, get your car on the road quickly. It's simple to search, compare, and order. Stop guessing about quality or fit. Order today and save with parts that last.
Cadillac Door Handle Parts Questions & Experts Answers
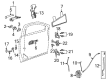
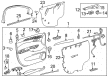
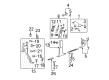
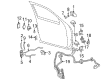
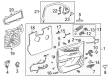
- Q: How to replace the front side inner door handle on Cadillac CTS?A:The first step to replace the front side door inside handle requires removal of the front door trim panel. To secure the inside door handle use demands removing the fastener between the handle and door trim panel. After detaching the handle from the trim panel by sliding the handle forward towards the front of the vehicle you can remove it from its position in the door handle linkage. Put the inside door handle rod through the hole in the door handle assembly then move the assembly upward until it reaches the front of the vehicle. To properly line up the components push the assembly towards the back and connect the three tabs. Screw the handle fastener onto its specified assembly while tightening it to 2 Nm (18 lb in). Reinstall the trims on the door.
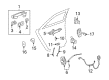
- Q: How to replace the front door handle cable on Cadillac XLR?A:The first step required to change the inside handle cable for the front side door involves setting the seat at the rear position and removing two trim plugs from under the floor-mounted door release fastener sockets. Reach behind the front seat riser cover nearest to the floor-mounted door release and take out the pushpin to create space for reaching the rear fastener of the door release. Both fasteners on the door release need removal before moving the seat to the forward position. First disconnect the battery then disassemble the door sill trim along with the b-pillar interior trim and mastic cover from the access hole meant for the door latch located in the body. Pull out the fasteners from the b-pillar mounted door latch before extracting the latch through the body access hole. You should open the electrical connector lock then detach the connector from the door latch. The cable sheath ends need releasing while the latch cover fasteners that sit at the rear must be removed so the latch covercan be taken away. Winding the cable end a quarter turn will free its engagement from the latch actuating lever. A mechanic's wire should then be threaded through the latch end of the cable to facilitate the correct placement of the new cable during installation. The cable needs to be pulled from the release handle end before passing it through the carpet opening. Insert the replacement cable end onto the mechanic's wire before pulling it all the way back through the carpet material in direction of the latch. Apply a quarter turn to the cable end onto the latch actuating lever until the cables can fit into the molded latch cover recess then install the latch cover. Tighten the screws on the latch cover fasteners to 2 n.m after you install them onto the latch. Reattach the electrical connector after making sure the connector lock fits correctly on the door latch mechanism. Connect the latch to the body access hole with its fastener holes in alignment before inserting fasteners through the cover plate to reach the b-pillar mounted door latch and tighten them to 10 n.m (89 lb in). Reconnect the power source to conduct a test of the latch operation by activating the manual front and rear functions and key fob and door touch pad and door panel electric actuators. Start by putting the new mastic cover on the latch access hole then proceed to put on the b-pillar interior trim and door sill trim . Fasten the two fasteners at the floor-mounted Door Handle release in the rearmost position with torque at 10 n.m (89 lb in). Mount both fastener trim plugs into the Door Handle release before fitting the seat riser cover against its hole in the riser while securing the pushpin.
- Q: How to replace the front inside door handle on Cadillac SRX?A:The first step to replace the front inside door handle involves removal of the front door trim panel. The fastener that connects the inside door handle to the door trim panel needs to be removed before pulling the handle forward until detachment from the linkage occurs. To install the inside door handle rod slid it through the hole in the door handle assembly while turning it upward in the direction of the vehicle front. Move the assembly toward the back position to press the three tabs while adding the door handle fastener before tightening it to 2 N.m (18 lb in). Reinstall the door trim panel as the last installation step.


Related Cadillac Parts
 Cadillac Center Console
 Cadillac Body Mount Hole Plug
 Cadillac Center Console Base
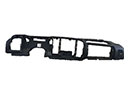 Cadillac Dash Panel Vent Portion Covers
 Cadillac Door Hinge
 Cadillac Door Moldings
 Cadillac Fuel Filler Housing
 Cadillac Occupant Detection Sensor
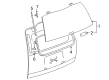
 Cadillac Tailgate Handle
 Cadillac Tailgate Lock Actuator Motor
 Cadillac Trunk Lid Lift Support
 Cadillac Window Channel