ChevyParts
My Garage
My Account
Cart
OEM Cadillac XLR Door Handle
Inside Door Handle- Select Vehicle by Model
- Select Vehicle by VIN
Select Vehicle by Model
orMake
Model
Year
Select Vehicle by VIN
For the most accurate results, select vehicle by your VIN (Vehicle Identification Number).
6 Door Handles found


Cadillac XLR Handle, Inside, Black Part Number: 88956755
$48.79 MSRP: $70.41You Save: $21.62 (31%)Cadillac XLR Handle, Inside, Black Part Number: 88956718
$57.02 MSRP: $91.40You Save: $34.38 (38%)Ships in 1-2 Business DaysCadillac XLR Handle, Inside Part Number: 89044530
Cadillac XLR Handle, Inside Part Number: 89044529

Cadillac XLR Handle, Inside Part Number: 88956754
Cadillac XLR Handle, Inside Part Number: 88956717
Cadillac XLR Door Handle
Want to cut long-term maintenance and repair costs? Choose OEM Door Handle. Those parts deliver top durability you can trust. On our site, you'll find a huge catalog of genuine Cadillac XLR parts. Prices are unbeatable, so you can keep more in your pocket. Every OEM Cadillac XLR Door Handle includes a manufacturer's warranty. You can also get an easy return policy that keeps buying risk free. Fast delivery, get your car on the road quickly. It's simple to search, compare, and order. Stop guessing about quality or fit. Order today and save with parts that last.
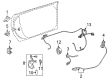
Door Handle can be classified under luxury car parts and a good example of this is the Door Handle that is expected to offer that glamorous and stylish look of the Cadillac brand while at the same time offering a reliable performance. This Door Handle was specifically made for different Cadillac XLR models that came out between 2003 and 2009; the part is essential in making sure that passengers can comfortably and safely alight from the car. In this way, similar to the exterior handle, the Door Handle impacts the usability by successfully releasing the door's hook from the latch. Since the gray driver's side DOOR HANDLE is used often, its paint is sure to chip or fade more regularly, which is why it must be maintained keenly for it to retain its purpose and looks. The Cadillac XLR is known for the contemporary furniture such as the heated and cooled leather seats, and a sophisticated integrated navigation system On the same note, Door Handle Pertaining to the Cadillac XLR plays an important role in augmenting the competency and security of the vehicle. As such, it is quite apparent that in the context of automotive parts, Door Handle is quite unique and enjoys considerable efficacy as it blends perfectly with the vehicle's stylish looks and modern technology. Thus, enhancing the Cadillac XLR's design aesthetic, the Door Handle is also solid and will help maintain the distinctive image of luxury cars and sporty performance. To sum up, the Door Handle is one extraordinary proof of Cadillac's commitment to excellence in creating products that not only improve the exhilarating experience behind the wheel but also a vehicle part that will well protect the car's passengers when an accident occurs.
Cadillac XLR Door Handle Parts and Q&A
- Q: How to replace the front side inner door handle cable on Cadillac XLR?A:Initiating the process of front side door inside handle cable replacement requires the seat to be moved into the rear position followed by the removal of both trim plugs from the door release fastener sockets located on the vehicle floor. You need to remove the pushpin from the nearest front seat riser cover to the floor-mounted door release and move this cover forward to gain access to the rear fastener of the door release. First cut both fasteners connected to the door release before moving the seat into its forward position. Begin by removing the battery power before taking off the door sill trim and extracting the b-pillar interior trim. The service begins with removing the mastic cover from the door latch access hole in the body structure and then unfastening the b-pillar mounted door latch's fasteners to finally extract the latch from the body hole. Open the electrical connector lock slide using the correct position then take off the connector from the door latch. Start by taking off the fasteners from the back side of the latch before freeing the cable sheath ends and finally taking out the latch cover. To facilitate the installation of the new cable the first stage involves rotating the cable end a quarter turn to unlatch it from the actuating lever then fasten a mechanic's wire to the end of the cable. Pull the cable out from its release handle end into the carpeting opening. You should install the replacement cable end onto the mechanic's wire before pulling it from carpet toward the latch. The cable end requires a rotation of 90 degrees to join with the latch actuating lever while the cables should be positioned into the molded latch cover recess and the cover installed. Secure the latch cover fasteners to the latch while tightening screws to 2 nm force (18 lb in torque). The electrical connector needs to be installed while placing its connector lock into the correct position on the door latch mechanism. Place the latch through the body access hole while aligning fastener holes before screwing fasteners across the cover plate to the door latch mounted on the b-pillar and tight 10 nm (89 lb in) the fasteners. The battery connection should be followed by a test of the latch functionality through manual front and rear releases as well as key fob, door touch pad and door panel electrical actuator controls. To finalize installation install new mastic cover on the latch access hole and put back the b-pillar interior trim followed by the door sill trim. The technician should position the seat at its maximum extension point before installing both fasteners to the Door Handle release and tightening them to 10 nm (89 lb in), then attach the fastener trim plugs to the Door Handle release and secure the seat riser cover by matching it with the riser hole and using a pushpin to lock it in place.

Related Cadillac XLR Parts
 Cadillac XLR Door Hinge
 Cadillac XLR Door Latch Assembly
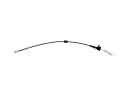 Cadillac XLR Door Latch Cable
 Cadillac XLR Door Lock
 Cadillac XLR Door Lock Actuator
 Cadillac XLR Door Seal
 Cadillac XLR Door Striker
 Cadillac XLR Lift Support
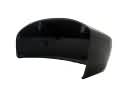 Cadillac XLR Mirror Cover
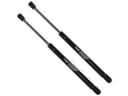 Cadillac XLR Trunk Lid Lift Support
 Cadillac XLR Washer Pump
 Cadillac XLR Windshield Wiper