ChevyParts
My Garage
My Account
Cart
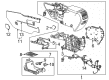
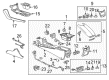
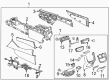
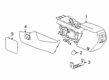
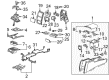
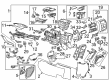
OEM Cadillac Center Console
Floor Console Assembly- Select Vehicle by Model
- Select Vehicle by VIN
Select Vehicle by Model
orMake
Model
Year
Select Vehicle by VIN
For the most accurate results, select vehicle by your VIN (Vehicle Identification Number).
539 Center Consoles found

Cadillac Console Assembly, Black Part Number: 84417021
$844.48 MSRP: $1268.24You Save: $423.76 (34%)Ships in 1-3 Business DaysProduct Specifications- Other Name: Console, Floor Console; Center Console Base; Console
- Replaces: 84383819, 84512701


Cadillac Center Console, Black Part Number: 23498092
$318.44 MSRP: $476.10You Save: $157.66 (34%)Ships in 1-3 Business DaysProduct Specifications- Other Name: Console, Floor Console; Center Console Base; Console
- Position: Front

Cadillac Console Assembly, Front Part Number: 84302078
$417.98 MSRP: $624.91You Save: $206.93 (34%)Ships in 1-3 Business DaysProduct Specifications- Other Name: Console Assembly-Front Floor *Platinum; Center Console Base; Console, Floor Console; Console
- Position: Front


Cadillac Center Console, Black Part Number: 84659004
$897.90 MSRP: $1348.47You Save: $450.57 (34%)Ships in 1-3 Business DaysProduct Specifications- Other Name: Console, Floor Console; Center Console Base; Console
Cadillac Center Console, Jet Black, Front Part Number: 42853940
$832.37 MSRP: $1250.05You Save: $417.68 (34%)Ships in 1-2 Business DaysProduct Specifications- Other Name: Console Assembly-Front Floor *Jet Black; Console, Floor Console
- Position: Front

Cadillac Console Assembly Part Number: 23384599
$936.95 MSRP: $1407.11You Save: $470.16 (34%)Ships in 1-3 Business DaysProduct Specifications- Other Name: Panel, Seat Separator Console; Center Console Base; Console, Floor Console; Console
- Position: Front
- Replaces: 23206079

Cadillac Center Console, Jet Black, Front Part Number: 42856143
$936.19 MSRP: $1405.96You Save: $469.77 (34%)Ships in 1-2 Business DaysProduct Specifications- Other Name: Console Assembly-Front Floor *Jet Black; Console, Floor Console
- Position: Front
Cadillac Center Console Part Number: 42856147
$851.11 MSRP: $1278.21You Save: $427.10 (34%)Ships in 1-2 Business DaysProduct Specifications- Other Name: Console Assembly-Front Floor *Oxford Stonee; Console, Floor Console
Cadillac Center Console, Front Part Number: 84659021
$959.52 MSRP: $1441.00You Save: $481.48 (34%)Ships in 1-3 Business DaysProduct Specifications- Other Name: Console Assembly-Front Floor *Platinum; Center Console Base; Console, Floor Console; Console
- Position: Front

Cadillac Console Base, Black, Front Part Number: 15930435
$100.10 MSRP: $651.93You Save: $551.83 (85%)Ships in 1-2 Business DaysProduct Specifications- Other Name: Console Unit-Front Floor *Ebony; Center Console Base; Console, Floor Console
- Position: Front
Cadillac Center Console, Jet Black, Front Part Number: 42856148
$851.11 MSRP: $1278.21You Save: $427.10 (34%)Ships in 1-2 Business DaysProduct Specifications- Other Name: Console Assembly-Front Floor *Jet Black; Console, Floor Console
- Position: Front
Cadillac Console Assembly, Black Part Number: 84295722
$878.22 MSRP: $1318.91You Save: $440.69 (34%)Ships in 1-3 Business DaysProduct Specifications- Other Name: Console, Floor Console; Console
- Position: Front
- Replaces: 84313205
Cadillac Center Console Part Number: 84659033
$984.04 MSRP: $1477.83You Save: $493.79 (34%)Ships in 1-3 Business DaysProduct Specifications- Other Name: Console Assembly-Front Floor *Sedona Sauvae; Center Console Base; Console, Floor Console; Console
Cadillac Center Console, Gray Part Number: 42856151
$851.11 MSRP: $1278.21You Save: $427.10 (34%)Ships in 1-2 Business DaysProduct Specifications- Other Name: Console Assembly-Front Floor *Sky Coolant Gra; Console, Floor Console
Cadillac Console Assembly, Black Part Number: 84183928
$1159.51 MSRP: $1741.35You Save: $581.84 (34%)Ships in 1-3 Business DaysProduct Specifications- Other Name: Console, Floor Console
- Position: Front
- Replaced by: 84295730
Cadillac Center Console, Titanium Part Number: 23158988
$229.68 MSRP: $343.39You Save: $113.71 (34%)Ships in 1-3 Business DaysProduct Specifications- Other Name: Console, Floor Console; Center Console Base; Console
- Position: Front
Cadillac Center Console Part Number: 23158977
$289.21 MSRP: $432.39You Save: $143.18 (34%)Ships in 1-3 Business DaysProduct Specifications- Other Name: Console, Floor Console; Center Console Base; Console
- Position: Front

Cadillac Center Console, Black Part Number: 20855856
$283.93 MSRP: $1280.04You Save: $996.11 (78%)Ships in 1-2 Business DaysProduct Specifications- Other Name: Console, Floor Console; Center Console Base; Console
- Position: Front
Cadillac Center Console, Gray Part Number: 42853956
$811.85 MSRP: $1219.24You Save: $407.39 (34%)Ships in 1-2 Business DaysProduct Specifications- Other Name: Console Assembly, Front Floor *Sky Coolant Gra
Cadillac Center Console, Front Part Number: 84659013
$959.52 MSRP: $1441.00You Save: $481.48 (34%)Ships in 1-3 Business DaysProduct Specifications- Other Name: Console Assembly-Front Floor *Platinum; Center Console Base; Console, Floor Console; Console
- Position: Front
| Page 1 of 27 |Next >
1-20 of 539 Results
Cadillac Center Console
Choose OEM Center Console, you're making the optimal decision for superior quality and perfect performance. You can feel confident because each component goes through stringent quality checks. Every part is carefully built to comply with Cadillac's factory specifications. You'll enjoy a smooth, worry-free installation that fits just right. At ChevyPartsGiant.com, you'll find it easy to get top-quality OEM Cadillac Center Console. You can shop at highly competitive prices and protect your budget. All our genuine Cadillac parts include a dependable manufacturer's warranty. You'll also appreciate our straightforward return policy and swift delivery services for extra convenience.
Cadillac Center Console Parts and Q&A
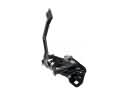
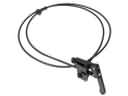
- Q: How to Replace the Front Floor Center Console on Cadillac CTS?A:To remove the front floor console, remove the shifter trim covering, along with the electrical connector from it. Next, remove the console side trim panels and remove the 6 screws that hold the console to the floor before you pull the console apart from the vehicle. For installation, place the new console on the floor and install the screws, while tightening the fasteners to 25 N.m (18 lb ft). Thereafter, reinstall console side trim panels , attach shift indicatorlamp electric connection and finally install the shifter trim cover .
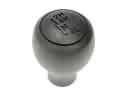
- Q: How to replace the Center Console on Cadillac XLR?A:Start with removing the battery ground cable before console replacement. Start by removing the shifter knob followed by opening the console door while you unhook the console bin's hinge cover from the rear retainer. Begin by taking off the console Cup Holder and ashtray then continue with the console trim plate removal. The front console mounted to the instrument panel carrier needs removal through unplugging these components: console nuts and bolted attachment points. To disconnect the front from under the i/p carrier raise the space at the console's rear and pull it towards the back. Disconnect the electrical connector connected to the electrical accessory plug then remove the console electrical accessory plug retainer and housing before proceeding with removal. Use the end of a flat tool to pull the lamp loose from its retainer before guiding it through the console bin opening before removing the console from the vehicle. Position the console in its vehicle space then install the console lamp by passing it through the hole in the bin before pushing it to secure the retainer. The console receives its electrical accessory plug housing by engaging the housing to its designated spot while maintaining the cover plug in position and securing the electrical accessory plug retainer onto the housing. Follow these steps when connecting the electrical connector to the accessory plug while positioning the console front end under the i/p carrier's rear portion. Fasten the console with retaining hardware and use tools to tighten the nuts to 10 n.m (89 lb in). After the reinstallation of console trim plate and Cup Holder, return the ashtray and fasten the console bin hinge cover by pressing down to activate its retaining clips. When finished, close the console door and check for proper fit and then reinstall the shifter knob. Reconnect the battery ground cable as the last step.