ChevyParts
My Garage
My Account
Cart
OEM Cadillac Hood Cable
Hood Release Cable- Select Vehicle by Model
- Select Vehicle by VIN
Select Vehicle by Model
orMake
Model
Year
Select Vehicle by VIN
For the most accurate results, select vehicle by your VIN (Vehicle Identification Number).
44 Hood Cables found


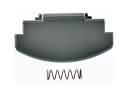
Cadillac Handle Part Number: 25712639
$34.60 MSRP: $51.49You Save: $16.89 (33%)Ships in 1-3 Business DaysProduct Specifications- Other Name: Handle, Hood Latch

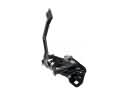
Cadillac Release Cable Part Number: 84565984
$30.27 MSRP: $45.06You Save: $14.79 (33%)Ships in 1-3 Business DaysProduct Specifications- Other Name: Cable, Hood Latch; Hood Release Cable
- Replaced by: 85053516

Cadillac Release Cable Part Number: 22770129
$44.77 MSRP: $66.63You Save: $21.86 (33%)Ships in 1-3 Business DaysProduct Specifications- Other Name: Cable, Hood Latch; Hood Release Cable
- Replaced by: 23434316

Cadillac Release Cable Part Number: 86819932
$24.36 MSRP: $38.12You Save: $13.76 (37%)Ships in 1-3 Business DaysProduct Specifications- Other Name: Cable, Hood Latch
- Replaced by: 87860608

Cadillac Release Cable Part Number: 84649120
$34.99 MSRP: $52.08You Save: $17.09 (33%)Ships in 1-3 Business DaysProduct Specifications- Other Name: Cable, Hood Latch
- Replaces: 23357389, 84095113

Cadillac Release Cable Part Number: 84163909
$13.97 MSRP: $20.79You Save: $6.82 (33%)Ships in 1-3 Business DaysProduct Specifications- Other Name: Cable, Hood Latch; Hood Release Cable
- Replaced by: 42839574


Cadillac Release Cable Part Number: 20940092
$56.40 MSRP: $83.95You Save: $27.55 (33%)Product Specifications- Other Name: Cable, Hood Latch; Hood Release Cable
- Replaces: 15291413


Cadillac Release Cable Part Number: 20470537
Product Specifications- Other Name: Cable, Hood Latch; Hood Release Cable


Cadillac Release Cable Part Number: 25664724
Product Specifications- Other Name: Cable, Hood Latch; Hood Release Cable


Cadillac Release Cable Part Number: 14074298
Product Specifications- Other Name: Cable, Hood Latch; Hood Release Cable


Cadillac Release Cable Part Number: 25678362
Product Specifications- Other Name: Cable, Hood Latch; Hood Release Cable
- Replaces: 25672124, 25654570


Cadillac Release Cable Part Number: 1628539
Product Specifications- Other Name: Cable Assembly Hood Primary Latch Release; Hood Release Cable; Cable, Hood Latch


Cadillac Release Cable Part Number: 25540156
Product Specifications- Other Name: Handle, Hood Latch; Hood Release Cable

Cadillac Release Handle Part Number: 90191287
Product Specifications- Other Name: Handle, Hood Latch; Handle
Cadillac Release Cable Part Number: 3530293
Product Specifications- Other Name: Cable Assembly; Hood Release Cable; Cable, Hood Latch

Cadillac Release Cable Part Number: 23229659
Product Specifications- Other Name: Cable, Hood Latch; Hood Release Cable
- Replaces: 20888777

Cadillac Release Cable Part Number: 25745994
Product Specifications- Other Name: Cable, Hood Primary Latch Release; Hood Release Cable; Cable, Hood Latch

Cadillac Cable Part Number: 25554689
Product Specifications- Other Name: Cable Assembly-Hood Secondary Latch Release; Hood Release Cable; Cable, Hood Latch

Cadillac Release Cable Part Number: 1633848
Product Specifications- Other Name: Cable Assembly; Hood Release Cable; Cable, Hood Latch
Cadillac Release Cable Part Number: 20429338
Product Specifications- Other Name: Cable, Hood Latch; Hood Release Cable; Control, Hood Latch
| Page 1 of 3 |Next >
1-20 of 44 Results
Cadillac Hood Cable
Want to cut long-term maintenance and repair costs? Choose OEM Hood Cable. Those parts deliver top durability you can trust. On our site, you'll find a huge catalog of genuine Cadillac parts. Prices are unbeatable, so you can keep more in your pocket. Every OEM Cadillac Hood Cable includes a manufacturer's warranty. You can also get an easy return policy that keeps buying risk free. Fast delivery, get your car on the road quickly. It's simple to search, compare, and order. Stop guessing about quality or fit. Order today and save with parts that last.
Cadillac Hood Cable Parts Questions & Experts Answers
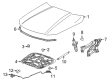
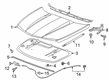
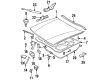
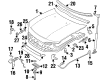
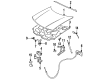
- Q: How to replace the Hood Cable for the Primary Latch Release on Cadillac CTS?A:The first step to replace the Hood Cable starts by lifting the hood then taking off the Hood Latch. The hood release cable must be detached from the Hood Latch and you should add a string to help guide its placement through the engine compartment. Move on to the next step which involves the removal of three fasteners that fasten the handle to the vehicle body and cable release removal from this handle. The first step involves removing the grommet from the wheel opening and you must take out the Hood Cable. During installation the string must be carried through the ends of the new Hood Cable before both components enter the passenger area where the string will be taken away. Cover the wheel opening with the grommet before installing the Hood Cable to match with the hood release handle. The handle needs three fasteners to secure onto the vehicle body while they should be tightened to 2 nm (18 lb in). After guiding both the Hood Cable and string through the engine compartment remove the string then install the Hood Latch while connecting its cable. Finally, close the hood.
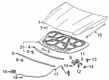
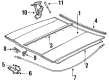
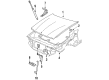
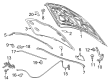
- Q: How to replace the Hood Cable on Cadillac SRX?A:Start by opening the hood then taking out the Hood Latch before beginning the hood primary latch release cable installation. You should first disconnect the Hood Cable from the Hood Latch then secure the cable with string for easy handling through the engine compartment. Begin by disassembling the hood release handle fasteners to detach the Hood Cable from the handle mechanism. First clear the grommet from the wheel opening before moving the Hood Cable off the vehicle body. To install the new Hood Cable simply move the string to its ends before guiding both items into the car interior then removing the string. Insert the grommet into the wheel opening while hooking the Hood Cable to the hood release handle. Secure the handle to the vehicle by installing three fasteners while leaving them at 2 n.m (18 lb in). Follow these steps to install the Hood Latch: pull the string which releases the Hood Cable through the engine compartment then discard the string to connect the cable to the Hood Latch. Finally, close the hood.
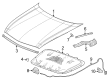
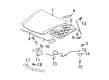
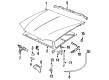
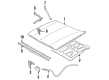
- Q: How to replace the Hood Cable on Cadillac XLR?A:Begin repair of the hood primary latch release cable by opening the hood and taking out the front section of the air cleaner assembly. Begin by removing all related panels and components then disconnect the Hood Cable from the Hood Latch. You must open the retaining clips of the Hood Cable while you remove vehicle-mounting screws which secure the hood release handle in position. The Hood Cable grommet needs removal from the dash panel's front opening and the Hood Cable needs to be extracted from the vehicle body. New Hood Cable installation requires its placement in the vehicle followed by Hood Cable grommet placement on the dashboard panel's front. Follow the fastener notice while performing this step. Secure the hood release handle to the vehicle using screws that should achieve a torque setting of 2 n.m (18 lb in). Connect the Hood Cable through the clips to its destination at the Hood Latch. Install all related panels followed by components while reattaching the air cleaner front piece before completing the hood assembly.