ChevyParts
My Garage
My Account
Cart
OEM Cadillac Emblem
Badge- Select Vehicle by Model
- Select Vehicle by VIN
Select Vehicle by Model
orMake
Model
Year
Select Vehicle by VIN
For the most accurate results, select vehicle by your VIN (Vehicle Identification Number).
256 Emblems found


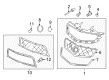
Cadillac Emblem, Front Part Number: 15263149
$27.71 MSRP: $41.24You Save: $13.53 (33%)Ships in 1-2 Business DaysProduct Specifications- Other Name: Emblem, Radiator Grille And Front End Ornamentation
- Position: Front


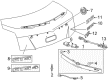
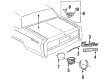
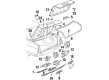
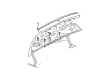
Cadillac Emblem, Rear Part Number: 23236084
$62.33 MSRP: $92.77You Save: $30.44 (33%)Ships in 1-2 Business DaysProduct Specifications- Other Name: Emblem, Rear Compartment Lid, Rear End Panel And Tailgate; Emblem,Rear End Panel And Tailgate
- Position: Rear
- Replaces: 23187764


Cadillac Emblem, Rear Part Number: 15263152
$64.21 MSRP: $95.57You Save: $31.36 (33%)Ships in 1-2 Business DaysProduct Specifications- Other Name: Emblem, Rear Compartment Lid, Rear End Panel And Tailgate; Emblem,Rear End Panel And Tailgate
- Position: Rear


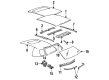
Cadillac Emblem Part Number: 3540652
$33.06 MSRP: $66.01You Save: $32.95 (50%)Ships in 1-2 Business DaysProduct Specifications- Other Name: Emblem Assembly-Roof Side; Emblem, Roof Panel

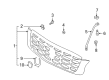
Cadillac Emblem, Front Part Number: 25719535
$6.96 MSRP: $10.35You Save: $3.39 (33%)Ships in 1-3 Business DaysProduct Specifications- Other Name: Emblem, Radiator Grille And Front End Ornamentation
- Position: Front


Cadillac Emblem, Front Part Number: 25719533
Product Specifications- Other Name: Emblem, Radiator Grille And Front End Ornamentation
- Position: Front


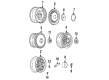
Cadillac Emblem Part Number: 1625676
Product Specifications- Other Name: Wheel Center Cap; Emblem, Wheel Cover Appearance


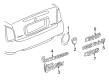
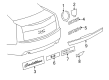
Cadillac Emblem, Rear Part Number: 25722726
$55.60 MSRP: $82.75You Save: $27.15 (33%)Product Specifications- Other Name: Emblem, Rear End Panel And Tailgate; Emblem,Rear End Panel And Tailgate
- Position: Rear

Cadillac Emblem, Passenger Side Part Number: 20675590
Product Specifications- Other Name: Emblem, Roof Panel
- Position: Passenger Side

Cadillac Nameplate, Rear Part Number: 20685301
Product Specifications- Other Name: Plate Assembly-N; Plate,Rear End Panel And Tailgate
- Position: Rear

Cadillac Nameplate, Rear Part Number: 25688258
Product Specifications- Other Name: Plate, Rear End Panel And Tailgate; Plate,Rear End Panel And Tailgate
- Position: Rear
Cadillac Nameplate Part Number: 9695825
Product Specifications- Other Name: Plate, Rear Quarter Name; Plate Assembly, Rear Quarter Panel (D - Body); Chrome Rear Quarter Panel Upper (C - Body)
- Position: Rear


Cadillac Emblem Part Number: 17101635
Product Specifications- Other Name: Emblem-Engine; Emblem, Engine Fuel Intake Manifold

Cadillac Emblem Part Number: 25722751
Product Specifications- Other Name: Emblem, Tail Lamp
- Replaces: 25642897

Cadillac Nameplate, Rear Part Number: 3544700
Product Specifications- Other Name: Emblem Assembly-Rear Compartment Lid; Plate,Rear End Panel And Tailgate
- Position: Rear

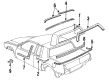
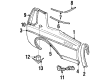
Cadillac Nameplate, White Part Number: 20729601
Product Specifications- Other Name: Plate Assembly-Name Quarter "Brougham D Elegance" *White; Plate, Rear Quarter Panel

Cadillac Nameplate, Front Rear Part Number: 20209817
Product Specifications- Other Name: Plate, (Chrome) Rear Quarter Panel Front Of Wheel Opening (E-Body); Plate, Roof Panel Emblem Or Plate; Plate, Rear Quarter Panel
- Position: Front Rear

Cadillac Nameplate, White Part Number: 20209802
Product Specifications- Other Name: Plate Assembly-*White; Plate, (Chrome) Rear Quarter Panel Wheel Opening (E - Body); Plate, Rear Quarter Panel


Cadillac Emblem, Rear Part Number: 20360536
Product Specifications- Other Name: Emblem, Rear Compartment Lid, Rear End Panel And Tailgate; Emblem, Roof Panel
- Position: Rear

Cadillac Emblem Part Number: 25722716
Product Specifications- Other Name: Emblem, Hood Panel Ornamentation
| Page 1 of 13 |Next >
1-20 of 256 Results
Cadillac Emblem
Want to cut long-term maintenance and repair costs? Choose OEM Emblem. Those parts deliver top durability you can trust. On our site, you'll find a huge catalog of genuine Cadillac parts. Prices are unbeatable, so you can keep more in your pocket. Every OEM Cadillac Emblem includes a manufacturer's warranty. You can also get an easy return policy that keeps buying risk free. Fast delivery, get your car on the road quickly. It's simple to search, compare, and order. Stop guessing about quality or fit. Order today and save with parts that last.
Cadillac Emblem Parts Questions & Experts Answers
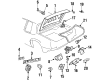
- Q: How to replace the rear compartment lid emblem/nameplate (w/o B57) on Cadillac CTS?A:Collect a Heat Gun model J 25070 before starting this job. Use tape to shield both the emblem and nameplate area before working. Heat the emblem/nameplate using a Heat Gun on a circular path for 30 seconds while holding it 152 mm away from the surface. Unfasten the emblem/nameplate with a small plastic tool while keeping the tool away from paint. Choose a 3M(TM) Scotch Brite molding adhesive remover disk number 07502 for steel sheets or soak a lint-free cloth in Varnish Makers and Painters (VMP) naphtha or an isopropyl alcohol and water mix for plastic sheeting. Prepare the installation location by covering it with tape set 24 mm (0.94 in) from the upper edge and 209 mm (8.23 in) from the left edge of the rear compartment door. Use the Heat Gun (J 25070) at 27-41°C (80-105°F) to heat the installation area when basic temperature settings do not give sufficient bond. While heating the emblem/nameplate with the blow torch keep its temperature between 29-32°C (85-90°F). Place the emblem/nameplate into position according to the marks and apply gentle pressure to press its adhesive onto the surface. Press regularly along the emblem/nameplate before viewing if it sticks well while rolling extra material by hand and discarding the tape step.
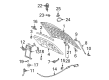
- Q: How to replace the door emblem/nameplate on Cadillac Escalade?A:Before starting this job you need to place tape on the emblem area to shield it and keep it aligned. A heat gun at 152mm from the emblem should gently heat the surface in a circular motion during 30 seconds. Use the plastic flat-blade tool to take out the emblem/nameplate from its door surface before cleansing away all adhesive traces from both door panel and emblem surfaces using 3M(TM) scotch brite molding adhesive remover disk or an equivalent product. Wipe the door surface clean with VMP naptha from varnish makers and painters. Location markings need replacement tape and heat gun warming to 70°F (21°C) on the door surface. Place the nameplate over the surface first then take off the protective layer from its front and place the nameplate gently on the door panel. Hold the emblem/nameplate in position to make sure it sticks well and then look for bonding before finally taking off tape from the edges of the door.
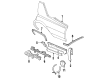
- Q: How to replace the front fender emblem and nameplate on Cadillac XLR?A:Before replacing front fender emblems or nameplates on XLR models use tape to protect mounting areas then mark alignment points with additional tape. A J 25070 (Heat Gun) should be used to heat the emblem/nameplate in circular patterns for 30 seconds while positioned 152 mm (6 in) away from the surface. You need to use a plastic flat-blade tool to carefully take out the emblem/nameplate. You should begin by cleaning the area with a lint-free cloth alongside Varnish Makers and Painters (VMP) naphtha or a mixture of isopropyl alcohol and water in a 50/50 ratio before starting installation. In unmarked locations apply tape then measure according to these specifications: Dimension (a) sets fender edge to nameplate at 108 mm (4.25 in) and Dimension (b) determines bottom fender distance to nameplate at 305 mm (12 in). There are two measurements to follow: Dimension (a) represents 108 mm (4.25 in) from the fender's trailing edge to the product's edge and Dimension (b) shows 305 mm (12 in) from the fender base to the product's location. Use J 25070 (Heat Gun) to preheat the mounting surface to 27-41°C (80-105°F) then position the emblem/nameplate to a temperature of 29-32°C (85-90°F). Deadly handle the adhesive backing instead carefully peel off the protective liner attached to the emblem/nameplate's back side. Approach the mounting surface with the emblem/nameplate then apply equal pressure to its surface until it bonds uniformly. The last step encompasses removing tape from the surface area.


Related Cadillac Parts
 Cadillac Window Motor
 Cadillac Body Mount Hole Plug
 Cadillac Bumper Reflector
 Cadillac Door Check
 Cadillac Door Latch Assembly
 Cadillac Door Seal
 Cadillac Hood Cable
 Cadillac Occupant Detection Sensor
 Cadillac Tailgate Lock Actuator Motor
 Cadillac Trunk Lid Lift Support
 Cadillac Window Crank Handles
 Cadillac Wiper Blade