ChevyParts
My Garage
My Account
Cart
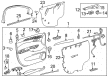
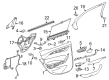
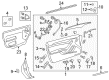
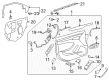
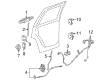
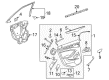
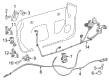
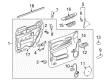
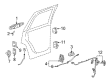
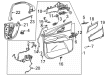
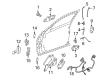
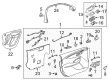
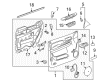
OEM Cadillac Door Latch Assembly
Door Latch- Select Vehicle by Model
- Select Vehicle by VIN
Select Vehicle by Model
orMake
Model
Year
Select Vehicle by VIN
For the most accurate results, select vehicle by your VIN (Vehicle Identification Number).
261 Door Latch Assemblys found


Cadillac Lock Actuator, Front Passenger Side Part Number: 13579491
$165.66 MSRP: $247.67You Save: $82.01 (34%)Ships in 1-3 Business DaysProduct Specifications- Other Name: Lock, Front Side Door; Door Lock Actuator Motor; Door Latch Assembly; Door Lock Actuator; Door Lock; Lock; Latch; Latch, Front Side Door
- Position: Front Passenger Side
- Replaces: 13503752


Cadillac Lock Actuator, Rear Passenger Side Part Number: 22862238
$152.75 MSRP: $224.34You Save: $71.59 (32%)Ships in 1-2 Business DaysProduct Specifications- Other Name: Lock, Rear Side Door; Door Lock Actuator Motor; Door Lock; Lock Assembly; Latch, Rear Side Door
- Position: Rear Passenger Side
- Replaces: 25843164, 20825340, 25992282, 20922247, 22791036


Cadillac Lock Actuator, Front Driver Side Part Number: 23190383
$198.44 MSRP: $288.91You Save: $90.47 (32%)Ships in 1-2 Business DaysProduct Specifications- Other Name: Latch Assembly-Front Side Door (Left-Hand); Door Lock Actuator Motor; Door Lock Actuator; Door Lock; Lock Assembly; Latch, Front Side Door
- Position: Front Driver Side
- Replaces: 22922943, 22791011, 25876536, 19210210, 20922217, 25831217


Cadillac Lock Actuator, Front Driver Side Part Number: 22862244
$185.94 MSRP: $277.99You Save: $92.05 (34%)Ships in 1-3 Business DaysProduct Specifications- Other Name: Lock, Front Side Door; Door Lock Actuator Motor; Door Lock Actuator; Door Lock; Lock Assembly
- Position: Front Driver Side
- Replaces: 20922215, 25876534, 20786539, 22791029


Cadillac Lock Actuator, Front Passenger Side Part Number: 22862245
$195.23 MSRP: $291.88You Save: $96.65 (34%)Ships in 1-3 Business DaysProduct Specifications- Other Name: Lock, Front Side Door; Door Lock Actuator Motor; Door Lock Actuator; Door Lock; Lock Assembly
- Position: Front Passenger Side
- Replaces: 22791030, 20922216, 20786540


Cadillac Lock Actuator, Rear Driver Side Part Number: 22862034
$185.94 MSRP: $277.99You Save: $92.05 (34%)Ships in 1-2 Business DaysProduct Specifications- Other Name: Latch Assembly-Rear Side Door; Door Lock Actuator Motor; Door Lock; Lock Assembly; Latch, Door Lock
- Position: Rear Driver Side
- Replaces: 22785477


Cadillac Lock Actuator, Rear Driver Side Part Number: 22862242
$160.40 MSRP: $235.58You Save: $75.18 (32%)Ships in 1-2 Business DaysProduct Specifications- Other Name: Lock, Rear Side Door; Door Lock Actuator Motor; Door Lock; Lock Assembly; Latch, Rear Side Door
- Position: Rear Driver Side
- Replaces: 20825339, 22791035, 25992281, 20922246, 25843163


Cadillac Lock Assembly, Front Driver Side Part Number: 20995846
$171.84 MSRP: $250.18You Save: $78.34 (32%)Ships in 1-2 Business DaysProduct Specifications- Other Name: Lock-Front Side Door (W/O Handle); Door Latch Assembly; Door Lock; Lock, Front Side Door
- Position: Front Driver Side


Cadillac Lock Actuator, Front Driver Side Part Number: 22862024
$171.84 MSRP: $250.18You Save: $78.34 (32%)Ships in 1-3 Business DaysProduct Specifications- Other Name: Lock, Front Side Door; Door Lock Actuator Motor; Door Lock Actuator; Door Lock; Lock Assembly; Lock, Door Lock
- Position: Front Driver Side
- Replaces: 22785467, 22741769, 25955016


Cadillac Lock Actuator, Rear Driver Side Part Number: 25876389
$161.56 MSRP: $237.28You Save: $75.72 (32%)Ships in 1-2 Business DaysProduct Specifications- Other Name: Latch Assembly-Rear Side Door; Door Lock Actuator Motor; Door Lock; Lock Assembly; Latch, Door Lock
- Position: Rear Driver Side
- Replaces: 20783857, 25945736, 25873488

Cadillac Lock Actuator, Rear Passenger Side Part Number: 13551768
$209.95 MSRP: $313.90You Save: $103.95 (34%)Ships in 1-2 Business DaysProduct Specifications- Other Name: Latch Assembly-Rear Side Door; Lock Assembly; Latch, Door Lock
- Position: Rear Passenger Side
- Replaced by: 13558548

Cadillac Lock Actuator, Rear Part Number: 13542875
$201.55 MSRP: $301.33You Save: $99.78 (34%)Ships in 1-3 Business DaysProduct Specifications- Other Name: Latch Assembly-Rear Side Door; Door Lock Actuator Motor; Latch, Door Lock
- Position: Rear
- Replaced by: 13544233

Cadillac Lock, Front Driver Side Part Number: 25843196
$123.90 MSRP: $185.24You Save: $61.34 (34%)Ships in 1-3 Business DaysProduct Specifications- Other Name: Lock, Front Side Door; Door Lock
- Position: Front Driver Side
- Replaces: 10373665, 12451631, 15900164, 10352115, 15253273, 25759054, 25773440, 15817041, 25766249

Cadillac Lock Actuator, Front Driver Side Part Number: 13546488
$117.30 MSRP: $172.28You Save: $54.98 (32%)Ships in 1-3 Business DaysProduct Specifications- Other Name: Latch Assembly-Front Side Door; Latch Assembly; Lock Assembly; Lock; Latch; Latch, Front Side Door; Latch, Door Lock
- Position: Front Driver Side
- Replaces: 13590484, 13597036, 13598357, 13507155, 13587914, 13533616, 13592285, 13528332, 13592289, 13528310
Cadillac Lock Actuator, Front Part Number: 13541718
$113.46 MSRP: $169.63You Save: $56.17 (34%)Ships in 1-3 Business DaysProduct Specifications- Other Name: Latch Assembly-Front Side Door; Door Lock Actuator Motor; Door Latch Assembly; Door Lock Actuator; Latch, Door Lock
- Position: Front
- Replaced by: 13542865
Cadillac Lock Actuator, Front Part Number: 13542864
$208.33 MSRP: $311.46You Save: $103.13 (34%)Ships in 1-3 Business DaysProduct Specifications- Other Name: Latch Assembly-Front Side Door; Door Lock Actuator Motor; Door Latch Assembly; Door Lock Actuator; Latch, Door Lock
- Position: Front
- Replaced by: 13558540

Cadillac Lock Actuator, Front Passenger Side Part Number: 20783845
$148.40 MSRP: $221.86You Save: $73.46 (34%)Ships in 1-3 Business DaysProduct Specifications- Other Name: Lock, Front Side Door; Door Lock Actuator Motor; Door Lock Actuator; Door Lock; Lock Assembly; Lock, Door Lock
- Position: Front Passenger Side
- Replaces: 22741764, 25945747

Cadillac Lock Actuator, Rear Passenger Side Part Number: 13542867
$203.50 MSRP: $304.24You Save: $100.74 (34%)Ships in 1-3 Business DaysProduct Specifications- Other Name: Latch Assembly-Rear Side Door; Door Lock; Lock Assembly; Latch, Door Lock
- Position: Rear Passenger Side
- Replaced by: 13558543
- Replaces: 13539407, 13541720

Cadillac Lock Actuator, Front Driver Side Part Number: 13540971
$100.80 MSRP: $150.00You Save: $49.20 (33%)Ships in 1-3 Business DaysProduct Specifications- Other Name: Latch Assembly-Front Side Door; Door Lock; Lock Assembly; Latch, Door Lock
- Position: Front Driver Side

Cadillac Lock Actuator Part Number: 13541137
$106.32 MSRP: $154.80You Save: $48.48 (32%)Ships in 1-3 Business DaysProduct Specifications- Other Name: Latch Assembly-Lift Gate; Tailgate Lock Actuator; Door Lock Actuator; Trunk Latch.; Lock; Latch
- Replaced by: 13552742
| Page 1 of 14 |Next >
1-20 of 261 Results
Cadillac Door Latch Assembly Parts Questions & Experts Answers
- Q: How to replace the front side Door Latch Assembly on Cadillac CTS?A: The first step for front side door latch replacement requires positioning your window at full up. The beginning of repairs starts with removing the door trim panel together with the water deflector. Follow these steps to disconnect the lock cylinder rod from the door latch when equipped and unscrew the outside Door Handle rod from the door latch by removing the clip. The rod guide holds two components: the lock knob rod needs removing along with the inside handle rod. Climb through the door entry after removing its screws then pull the door latch from its mounting position while keeping the inside Door Handle rod and lock rod connected. Apply a flat small tool beneath the electrical connector lock to unlock it before disconnecting the connector. First fit both the inside Door Handle rod and lock rod onto the door latch before installing the electrical connector. After inserting the door latch into the door you should install the lock cylinder rod onto the door latch and tighten its screws to 10 nm (89 lb in) torque. When installing place the outside Door Handle rod into the latch clip until it closes on the clip. The lock knob rod should be directed into the rod guide before joining the inside handle rod with the rod guide . Execute a door function check of all door handles alongside lock cylinder and door latch before rehanging the water deflector and door trim panel.
- Q: How to replace the front Door Latch Assembly on Cadillac DeVille?A: The first step to replace the front door latch involves placing the window for full upward movement before removing the door trim panel. The next step requires both door module removal and water deflector removal. To remove the inside handle assembly begin by prying the front with care toward the back and then pulling it outward before sliding it toward the front to release. Starting from the clip guide remove the handle rod then the lock rod after which you disconnect the outside door handle rod by removing it from the door latch retainer clip through the opening in the inner panel. The driver door requires disconnecting its inside lock rod together with its outside lock rod at the door latch. The fasteners must be removed together with the door latch assembly from the door before disconnecting both electrical connectors and inside handle rod from the door latch. To install the door latch assembly you must first attach the inside handle rod to the door latch followed by connecting electrical connectors to the door latch. Then insert the door latch assembly through the access hole in the inner panel. Fasten the door latch with 10 N.m (89 lb in) tension using all the provided fasteners. The outside lock rod should connect to the door latch for the driver door followed by the inside lock rod being linked to the door latch. To install the outside door handle rod select its retainer clip on the door latch assembly then tighten the clip. Set the back part of the inside handle assembly into the opening of the inner panel while pressing the front side until it gets fully engaged. Secure the handle rod along with the lock rod into the clip guide . Testing the door handles and lock functions should occur prior to installing the water deflector. Before finishing the install procedure you must place the water deflector together with the door module and the door trim panel.
- Q: How to replace the front side Door Latch Assembly on Cadillac SRX?A: Replacement of the front side door latch begins with a window raise to full up position followed by removal of the door trim panel. The first task includes removing the water deflector before disconnecting the door latch rod from the lock cylinder when present. After opening the clip of the outside Door Handle rod you must disconnect it from the door latch and proceed to remove the lock knob rod from its rod guide and inside handle rod from its rod guide. Take out the door latch by removing its screws while keeping both inner Door Handle rod and lock rod connected to it. A flat-blade tool can raise the electrical connector lock for disconnecting the electrical connector followed by removing the handle rod along with the lock rod from the door latch. Install the inside Door Handle rod and lock rod to the door latch first. Then attach the electrical connector followed by installing the door latch within the door section. Follow this step by attaching the door latch screws then tighten them to 10 n.m (89 lb in). Finally fit the outside Door Handle rod within the latch clip before closing the clip. Place the rod guide together with lock knob rod while also inserting the inside handle rod inside the rod guide. After checking the door functions of handles and lock cylinder and latch the assembly ends with installing the water deflector and door trim panel.


Related Cadillac Parts
 Cadillac Cup Holder
 Cadillac Door Lock
 Cadillac Body Mount Hole Plug
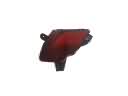 Cadillac Bumper Reflector
 Cadillac Car Speakers
 Cadillac Door Hinge
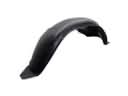 Cadillac Fender Splash Shield
 Cadillac Lift Support
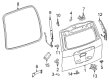
 Cadillac Liftgate Hinge
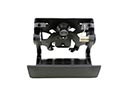 Cadillac Tailgate Handle
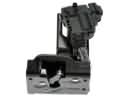 Cadillac Tailgate Lock Actuator Motor
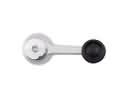 Cadillac Window Crank Handles