ChevyParts
My Garage
My Account
Cart
OEM Cadillac CTS Door Latch Assembly
Door Latch- Select Vehicle by Model
- Select Vehicle by VIN
Select Vehicle by Model
orMake
Model
Year
Select Vehicle by VIN
For the most accurate results, select vehicle by your VIN (Vehicle Identification Number).
37 Door Latch Assemblys found


Cadillac CTS Lock Actuator, Front Passenger Side Part Number: 23190368
$198.44 MSRP: $288.91You Save: $90.47 (32%)Ships in 1-2 Business Days


Cadillac CTS Lock Actuator, Rear Driver Side Part Number: 22862239
$130.70 MSRP: $193.67You Save: $62.97 (33%)Ships in 1-2 Business Days
Cadillac CTS Lock Actuator, Front Passenger Side Part Number: 13546500
$117.71 MSRP: $198.76You Save: $81.05 (41%)Ships in 1-3 Business Days
Cadillac CTS Lock Actuator, Rear Passenger Side Part Number: 13528274
$114.45 MSRP: $168.10You Save: $53.65 (32%)Ships in 1-2 Business Days
Cadillac CTS Lock Actuator, Front Passenger Side Part Number: 22922932
$134.63 MSRP: $201.27You Save: $66.64 (34%)Ships in 1-3 Business DaysCadillac CTS Lock Actuator, Front Passenger Side Part Number: 20922241
$22.84 MSRP: $33.99You Save: $11.15 (33%)Ships in 1-3 Business Days
Cadillac CTS Lock Actuator, Front Part Number: 13592278
$112.33 MSRP: $167.93You Save: $55.60 (34%)Ships in 1-3 Business Days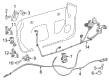
Cadillac CTS Lock Assembly, Front Passenger Side Part Number: 22922940
$23.34 MSRP: $34.74You Save: $11.40 (33%)Ships in 1-3 Business Days
Cadillac CTS Lock, Front Passenger Side Part Number: 25843197
$115.12 MSRP: $166.15You Save: $51.03 (31%)
Cadillac CTS Lock Actuator, Front Driver Side Part Number: 22922937
$112.29 MSRP: $167.88You Save: $55.59 (34%)
Cadillac CTS Lock Actuator, Front Driver Side Part Number: 22922931


Cadillac CTS Lock Assembly, Rear Passenger Side Part Number: 22862240

Cadillac CTS Lock Assembly, Front Driver Side Part Number: 22922933
$133.86 MSRP: $200.12You Save: $66.26 (34%)

Cadillac CTS Lock Actuator, Rear Passenger Side Part Number: 22741954


Cadillac CTS Lock Actuator, Front Driver Side Part Number: 23190384
Cadillac CTS Lock Assembly, Front Driver Side Part Number: 20922242
$113.98 MSRP: $170.40You Save: $56.42 (34%)Cadillac CTS Lock Assembly, Passenger Side Part Number: 22922934

Cadillac CTS Lock Actuator, Front Passenger Side Part Number: 13592280
$116.83 MSRP: $174.67You Save: $57.84 (34%)

Cadillac CTS Lock, Rear Passenger Side Part Number: 25843160
Cadillac CTS Lock, Rear Driver Side Part Number: 25843159
| Page 1 of 2 |Next >
1-20 of 37 Results
Cadillac CTS Door Latch Assembly
Want to cut long-term maintenance and repair costs? Choose OEM Door Latch Assembly. Those parts deliver top durability you can trust. On our site, you'll find a huge catalog of genuine Cadillac CTS parts. Prices are unbeatable, so you can keep more in your pocket. Every OEM Cadillac CTS Door Latch Assembly includes a manufacturer's warranty. You can also get an easy return policy that keeps buying risk free. Fast delivery, get your car on the road quickly. It's simple to search, compare, and order. Stop guessing about quality or fit. Order today and save with parts that last.
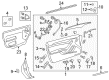
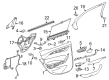
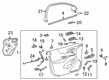
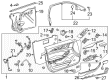
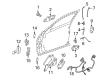
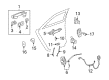
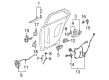
The Door Latch Assembly in Cadillac CTS cars is aimed at safely locking the doors and at the same time effectively locking out any unauthorized access to the car's interior. This assembly can work with several features that can be either mechanical or electrical such as locking individual or all the doors at once. This car model has over the years used various types of Door Latch Assembly and all are crafted to be strong and easy to operate. Some of the signs you may need a new Door Latch Assembly are Mechanism, Which touches the outer door handles not working, when they stick or when there is a problem with the door lock button. Al totaled, the Cadillac CTS Door Latch Assembly is vital when it comes to the secure and proper operations of the car doors.
Cadillac CTS Door Latch Assembly Parts Questions & Experts Answers
- Q: How to Service and Repair a Door Latch Assembly on Cadillac CTS?A:The replacement of a front side door latch begins with positioning the window entirely up then removing the door trim panel and water deflector. When equipped with a door latch and lock cylinder rod the technician must first remove the rod from the latch followed by opening the clip to disconnect the outside Door Handle rod from the door latch. The first step is to extract both rod guide components by removing the lock knob rod from the rod guide and taking away the inside handle rod from the rod guide. Start by detaching the door latch screws before removing the door component along with its inside Door Handle rod and lock rod. You should disconnect the electrical connector by unlocking its connector with a small flat bladed tool then remove both rods from the door latch. Connect the inside Door Handle rod and lock rod to the door latch as your first step and secure the electrical connector after that. Place the door latch within the door opening while connecting the locking rod to the latch portion before tightening the screws to 10 n.m (89 lb in). Insert the outside Door Handle rod into the latch clip while closing the clip. Read the instructions on the rod guide to install the lock knob rod next while also inserting the inside handle rod into the rod guide. Check the operation of the door handles and lock cylinder and door latch before placing back the water deflector and door trim panel.

Related Cadillac CTS Parts
 Cadillac CTS Door Lock
 Cadillac CTS Door Lock Actuator
 Cadillac CTS Door Hinge
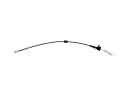 Cadillac CTS Door Latch Cable
 Cadillac CTS Door Seal
 Cadillac CTS Door Striker
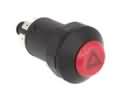 Cadillac CTS Hazard Warning Switch
 Cadillac CTS Lift Support
 Cadillac CTS Liftgate Hinge
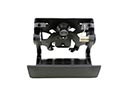 Cadillac CTS Tailgate Handle
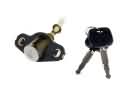 Cadillac CTS Trunk Lock Cylinder
 Cadillac CTS Window Motor