ChevyParts
My Garage
My Account
Cart
OEM Cadillac SRX Door Latch Assembly
Door Latch- Select Vehicle by Model
- Select Vehicle by VIN
Select Vehicle by Model
orMake
Model
Year
Select Vehicle by VIN
For the most accurate results, select vehicle by your VIN (Vehicle Identification Number).
31 Door Latch Assemblys found


Cadillac SRX Lock Actuator, Front Driver Side Part Number: 13579522
$133.83 MSRP: $194.84You Save: $61.01 (32%)Ships in 1-2 Business Days


Cadillac SRX Lock Actuator Part Number: 13584872
$170.34 MSRP: $248.00You Save: $77.66 (32%)Ships in 1-2 Business Days

Cadillac SRX Lock Actuator, Front Driver Side Part Number: 13579497
$151.17 MSRP: $220.09You Save: $68.92 (32%)Ships in 1-2 Business Days


Cadillac SRX Lock Actuator, Front Passenger Side Part Number: 13579523
$132.83 MSRP: $195.09You Save: $62.26 (32%)Ships in 1-2 Business Days


Cadillac SRX Lock Actuator, Rear Driver Side Part Number: 13579551
$137.91 MSRP: $202.56You Save: $64.65 (32%)Ships in 1-3 Business Days


Cadillac SRX Lock Actuator, Rear Passenger Side Part Number: 13579552
$185.56 MSRP: $272.54You Save: $86.98 (32%)Ships in 1-3 Business Days
Cadillac SRX Lock Actuator, Driver Side Part Number: 13503743
$51.36 MSRP: $76.45You Save: $25.09 (33%)Ships in 1-3 Business Days
Cadillac SRX Lock, Front Passenger Side Part Number: 25843197
$115.12 MSRP: $166.15You Save: $51.03 (31%)
Cadillac SRX Lock Actuator, Rear Passenger Side Part Number: 13579540
$137.16 MSRP: $205.06You Save: $67.90 (34%)Ships in 1-3 Business DaysCadillac SRX Lock Actuator, Front Driver Side Part Number: 13579496
$120.43 MSRP: $180.05You Save: $59.62 (34%)Ships in 1-3 Business Days


Cadillac SRX Lock, Front Driver Side Part Number: 25876524

Cadillac SRX Lock, Front Passenger Side Part Number: 25876525


Cadillac SRX Lock, Rear Driver Side Part Number: 25876520


Cadillac SRX Latch, Rear Part Number: 15243667
Cadillac SRX Lock Actuator, Rear Passenger Side Part Number: 13579542
Cadillac SRX Latch, Front Driver Side Part Number: 13579520
Cadillac SRX Latch, Front Passenger Side Part Number: 13579489
Cadillac SRX Lock, Rear Passenger Side Part Number: 25843160
Cadillac SRX Lock Actuator, Rear Driver Side Part Number: 13579539
Cadillac SRX Lock, Rear Driver Side Part Number: 25843159
| Page 1 of 2 |Next >
1-20 of 31 Results
Cadillac SRX Door Latch Assembly
Want to cut long-term maintenance and repair costs? Choose OEM Door Latch Assembly. Those parts deliver top durability you can trust. On our site, you'll find a huge catalog of genuine Cadillac SRX parts. Prices are unbeatable, so you can keep more in your pocket. Every OEM Cadillac SRX Door Latch Assembly includes a manufacturer's warranty. You can also get an easy return policy that keeps buying risk free. Fast delivery, get your car on the road quickly. It's simple to search, compare, and order. Stop guessing about quality or fit. Order today and save with parts that last.
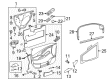
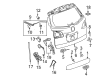
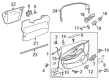
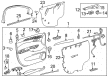
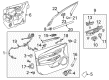
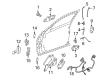
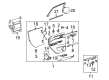
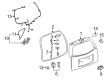
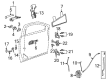
Door Latch Assembly is one of the parts that crucial that gives reflection of the brand Cadillac focus on reliability and high performance. This Door Latch Assembly is for the Cadillac SRX vehicles, helps to lock the doors and improve security of automobiles. The Door Latch Assembly fits into second generation, as well as first generation of SRX models, and coming with both an automation and manual lock, it affords the individual lock of the door or engages the central locking system for all the doors. This flexibility does not only enhance productivity but at the same time guarantees the Cadillac SRX usability and safety. The Door Latch Assembly is designed to be rather sturdy, however, over time it may be vulnerable to various problems which will necessitate its replacement based on the frequently reported problems of outer door handles failure or sticking. For a car such as the Cadillac SRX, the Door Latch Assembly cannot be underestimated because it is one of the security features that are incorporated in the car. On the aspect of durability, Door Latch Assembly is specifically conspicuous in the automobile market because of its flexibility to fit advanced technologies and inducement issues in the Cadillac SRX brand. The CUE integration seems seamless with the Cadillac SRX's sleek structure; this coupled with a excellent ride balance and a bold appearance, makes the Cadillac SRX with a high-quality Door Latch Assembly, one of the most preferred compact SUVs in the market.
Cadillac SRX Door Latch Assembly Parts Questions & Experts Answers
- Q: How to Service and Repair the Door Latch Assembly on Cadillac SRX?A:The procedure to replace the front side door latch begins by lifting the window to its highest point followed by removing the door trim panel along with the water deflector. When equipped with the lock cylinder rod detach it from the door latch and open the clip to separate the outside door handle rod from the door latch. The next step involves pulling the lock knob rod through the rod guide followed by the inside handle rod from a similar rod guide. You must remove the door latch screws before separating the door latch from its position in the door while maintaining both the inside door handle rod and lock rod connection. A flat-bladed small tool should be used to raise and disconnect the electrical connector lock while removing the door latch handle rod and lock rod. Installation begins with mounting the door latch and its accompanying inside door handle rod and lock rod. The electrical connector should follow this step. Insert the door latch into the door while connecting its lock cylinder rod and tighten screws to 10 N.m (89 lb in). Put the outside door handle rod into the latch clip before closing the clip. You need to position the lock knob rod within the rod guide while the inside handle rod should go into the rod guide too. The check of door handles, lock cylinder and door latch operation should be completed before reinstalling water deflector and door trim panel.

Related Cadillac SRX Parts
 Cadillac SRX Door Armrest
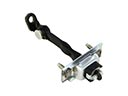 Cadillac SRX Door Check
 Cadillac SRX Door Handle
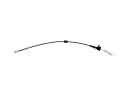 Cadillac SRX Door Latch Cable
 Cadillac SRX Door Lock
 Cadillac SRX Door Lock Cylinder
 Cadillac SRX Door Moldings
 Cadillac SRX Door Seal
 Cadillac SRX Lift Support
 Cadillac SRX Liftgate Hinge
 Cadillac SRX Tailgate Lock
 Cadillac SRX Weather Strip