ChevyParts
My Garage
My Account
Cart
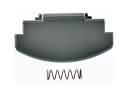
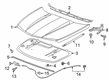
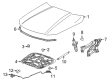
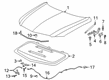
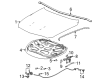
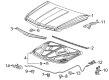
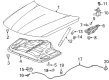
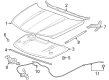
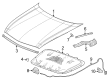
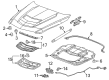
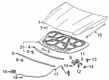
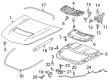
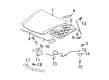
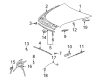
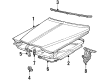
OEM Cadillac Hood Latch
Engine Hood Latch- Select Vehicle by Model
- Select Vehicle by VIN
Select Vehicle by Model
orMake
Model
Year
Select Vehicle by VIN
For the most accurate results, select vehicle by your VIN (Vehicle Identification Number).
53 Hood Latches found

Cadillac Lock Part Number: 84711414
$66.82 MSRP: $99.45You Save: $32.63 (33%)Product Specifications- Other Name: Latch Assembly-Hood Primary & Secondary; Hood Latch; Latch, Hood Latch
- Replaces: 84337735

Cadillac Lock Part Number: 19420356
$6.68 MSRP: $9.94You Save: $3.26 (33%)Ships in 1-3 Business DaysProduct Specifications- Other Name: Latch Assembly, Hood Primary & Secondary; Hood Latch; Latch, Hood Latch
- Replaces: 20810956, 20951349

Cadillac Lock Part Number: 84890225
$56.38 MSRP: $83.92You Save: $27.54 (33%)Product Specifications- Other Name: Latch Assembly-Hood Primary & Secondary; Hood Latch; Latch; Latch, Hood Latch
- Replaced by: 85572118

Cadillac Latch Part Number: 25771540
$108.62 MSRP: $161.67You Save: $53.05 (33%)Ships in 1-3 Business DaysProduct Specifications- Other Name: Latch Assembly-Hood Primary & Secondary; Hood Latch; Latch, Hood Latch
- Replaces: 25660330

Cadillac Lock Part Number: 84855768
$52.71 MSRP: $78.45You Save: $25.74 (33%)Ships in 1-3 Business DaysProduct Specifications- Other Name: Latch Assembly-Hood Primary & Secondary; Latch; Latch, Hood Latch
- Replaces: 84644516


Cadillac Latch Assembly Part Number: 25869079
$42.75 MSRP: $63.63You Save: $20.88 (33%)Ships in 1-3 Business DaysProduct Specifications- Other Name: Latch Assembly-Hood Primary & Secondary; Hood Latch; Lock; Latch, Hood Latch
- Replaces: 15291415

Cadillac Lock Part Number: 84826360
$66.82 MSRP: $99.45You Save: $32.63 (33%)Ships in 1-3 Business DaysProduct Specifications- Other Name: Latch Assembly-Hood Primary & Secondary; Hood Latch; Latch; Latch, Hood Latch
- Replaces: 84540264

Cadillac Latch Assembly Part Number: 84690209
$67.12 MSRP: $99.90You Save: $32.78 (33%)Ships in 1-3 Business DaysProduct Specifications- Other Name: Latch Assembly-Hood Primary & Secondary; Hood Latch; Lock Assembly; Lock
- Replaced by: 85574828

Cadillac Lock Part Number: 13539022
$66.82 MSRP: $99.45You Save: $32.63 (33%)Product Specifications- Other Name: Latch Assembly-Hood Primary & Secondary; Hood Latch; Latch; Latch, Hood Latch
- Replaces: 13516934, 13533737

Cadillac Lock Part Number: 84927339
$38.19 MSRP: $56.84You Save: $18.65 (33%)Ships in 1-2 Business DaysProduct Specifications- Other Name: Latch Assembly-Hood Primary & Secondary; Latch, Hood Latch

Cadillac Lock Part Number: 13550824
$47.13 MSRP: $70.15You Save: $23.02 (33%)Product Specifications- Other Name: Latch Assembly-Hood Primary & Secondary; Latch, Hood Latch

Cadillac Lock Part Number: 22944771
$10.52 MSRP: $15.65You Save: $5.13 (33%)Ships in 1-3 Business DaysProduct Specifications- Other Name: Latch Assembly-Hood Primary & Secondary; Hood Latch; Latch; Latch, Hood Latch

Cadillac Lock Part Number: 13512013
$53.22 MSRP: $79.22You Save: $26.00 (33%)Ships in 1-3 Business DaysProduct Specifications- Other Name: Latch Assembly-Hood Primary & Secondary; Hood Latch; Latch, Hood Latch
- Replaces: 22829815
Cadillac Lock Part Number: 84711635
$53.22 MSRP: $79.22You Save: $26.00 (33%)Ships in 1-3 Business DaysProduct Specifications- Other Name: Latch Assembly-Hood Primary & Secondary; Hood Latch; Latch, Hood Latch
- Replaces: 84335622, 84303217

Cadillac Lock Part Number: 84145128
$36.49 MSRP: $54.31You Save: $17.82 (33%)Ships in 1-3 Business DaysProduct Specifications- Other Name: Latch Assembly-Hood Primary & Secondary; Latch; Latch, Hood Latch
- Replaces: 84053839, 22940238

Cadillac Lock Part Number: 22985608
$53.22 MSRP: $79.22You Save: $26.00 (33%)Product Specifications- Other Name: Latch Assembly-Hood Primary & Secondary; Hood Latch; Latch; Latch, Hood Latch


Cadillac Lock Part Number: 20761109
Product Specifications- Other Name: Latch Assembly-Hood Primary & Secondary; Hood Latch; Latch, Hood Latch
- Replaces: 25850932


Cadillac Lock Part Number: 25664742
Product Specifications- Other Name: Latch, Hood Primary & Secondary; Hood Latch; Latch, Hood Latch


Cadillac Lock Part Number: 25693521
Product Specifications- Other Name: Latch Assembly-Hood Primary & Secondary; Hood Latch; Latch
- Replaces: 25664682

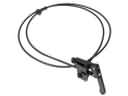
Cadillac Safety Catch Part Number: 1610270
Product Specifications- Other Name: Latch Assembly-Hood Secondary; Hood Latch; Latch, Hood Upper Latch
| Page 1 of 3 |Next >
1-20 of 53 Results
Cadillac Hood Latch Parts Questions & Experts Answers
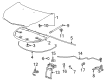
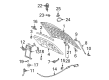
- Q: How to replace the hood latch on Cadillac CTS?A: To accomplish a Hood Latch replacement start by taking out the bolts which attach the Hood Latch to the vehicle before detaching the hood release cable from the Hood Latch and removing the Hood Latch from the vehicle. The installation process begins when you link the hood release cable to the Hood Latch before putting the Hood Latch into its proper vehicle location. Secure the Hood Latch by means of bolts then tighten the bolts to 9 n.m (80 lb in). The last step involves hood primary latch adjustment.
- Q: How to replace the hood latch on Cadillac SRX?A: The Hood Latch replacement starts by unbolting it from the vehicle before disconnecting the hood release cable from the Hood Latch and the remote start electrical connector if present. First position the new Hood Latch while connecting its hood release cable into the vehicle then put it into its proper placement. Leverage the bolts to install the Hood Latch while tightening them to 9 n.m (80 lb in). To finish the replacement, reattach the remote start electrical connector when present and modify the position of the hood primary latch.
- Q: How to replace the hood primary and secondary hood latch on Cadillac XLR?A: Begin the primary and secondary latch replacement process by opening the hood then unscrewing and extracting the section in front of the air cleaner assembly. The first step includes separating the hood release cable from the Hood Latch while also disconnecting the secondary Hood Latch cable. The first step is to detach the Hood Latch from the latch support by removing the attaching bolts . Secure the Hood Latch to the latch support by attaching it with bolts which need tightening to 9 n.m (80 lb in). Attach both hood release cable and secondary latch cable to the latch component. Lower the hood with care to evaluate the latch precision while performing any required realignments. Reinstall the front part of the air cleaner assembly while finishing the hood closure.