ChevyParts
My Garage
My Account
Cart
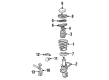
OEM Cadillac Eldorado Coil Springs
Strut Spring- Select Vehicle by Model
- Select Vehicle by VIN
Select Vehicle by Model
orMake
Model
Year
Select Vehicle by VIN
For the most accurate results, select vehicle by your VIN (Vehicle Identification Number).
8 Coil Springs found


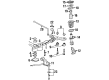
Cadillac Eldorado Coil Spring, Front Part Number: 22197295


Cadillac Eldorado Coil Spring, Rear Part Number: 22076935

Cadillac Eldorado Coil Spring, Rear Part Number: 485714

Cadillac Eldorado Coil Spring Part Number: 1623485
Cadillac Eldorado Coil Spring, Rear Part Number: 25725867
Cadillac Eldorado Spring, Rear Part Number: 25725866

Cadillac Eldorado Spring, Front Part Number: 1640994
Cadillac Eldorado Leaf Spring Part Number: 1631142
Cadillac Eldorado Coil Springs
Want to cut long-term maintenance and repair costs? Choose OEM Coil Springs. Those parts deliver top durability you can trust. On our site, you'll find a huge catalog of genuine Cadillac Eldorado parts. Prices are unbeatable, so you can keep more in your pocket. Every OEM Cadillac Eldorado Coil Springs includes a manufacturer's warranty. You can also get an easy return policy that keeps buying risk free. Fast delivery, get your car on the road quickly. It's simple to search, compare, and order. Stop guessing about quality or fit. Order today and save with parts that last.
Coil Springs Cadillac Eldorado Coil Springs are key suspension parts that bear the vehicle's weight and maintain width through bearing the weight that comes with variation caused by the roads. This spring comes in different kinds such as; The Linear rate springs, progressive springs and the dual rate springs.Where each of them has its own special characteristics with regards to handling of the car and riding experience or comfort of the car. This type of spring can be switched to variable rate or cargo coils and is vital in lift and lowering kits for cars. Self-leveling coilovers and also height adjustable springs let you have more varieties as you do not have to get another lowering kit each time you want to alter your desired height. On average, the Cadillac Eldorado Coil Springs are crucial therefore should be in their premier condition for proper suspension and comfort of the car.
Cadillac Eldorado Coil Springs Parts and Q&A
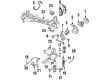
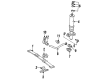
- Q: How to Remove and Install Coil Springs on Cadillac Eldorado?A:Start by elevating the vehicle and supporting it before you take off the wheel and tire for coil spring removal. Set up a suitable jack to support the outboard end of the lower Control Arm before working on it. Before beginning the process start by taking out the stabilizer shaft link lower mounting bolt along with the Shock Absorber lower mounting bolt and automatic level control sensor link from the lower Control Arm. Lower the Control Arm with the jack at a slow pace until spring pressure escapes before using a downward force to take out the spring. Install the spring (without insulators) by placing it on a flat surface to achieve proper orientation before it stands straight on its lower end. After installing the coil spring position an under-jack torque device near the lower Control Arm's outboard end. Position the knuckle onto the Control Arm and fasten the nut by tightening it to 102 nm (75 ft. Lbs.). Install the lower Shock Absorber damping bolt followed by tightening the nut to 102 nm (75 ft. Lbs.). Finally, install the stabilizer shaft link lower damping bolt. Switch on the ignition before wheel drop then wait 45 seconds to let the alc system run its arc while the shock absorbers fill with residual pressure. Lower the vehicle while the suspension reaches its designed trim height and tighten the lower Control Arm inner nuts to 108 nm (80 ft. Lbs.) and the stabilizer link lower attachment to 52 nm (38 ft. Lbs.). Install the wheel and tire before torquing the wheel nuts to reach 190 nm (140 ft. Lbs.).
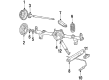
- Q: How to service and repair the front coil springs and shock absorber on Cadillac Eldorado?A:In order to service and repair suspension struts you need these essential tools: a Holding Fixture (J3289-20) and Strut Compressor (J34013-B) with an Alignment Rod (J34013-38) along with a Damper Rod Clamp (J34013-20). The service requires four main tools: Holding Fixture (J3289-20), Strut Compressor (J34013-B), Alignment Rod (J34013-38), and Damper Rod Clamp (J34013-20). Must handle the front suspension coil spring gently to stop coating damage because damaged coating makes the spring more prone to breakage. Position the strut inside the Strut Compressor (J34013-B) then torque the nuts until they align with the compressor while maintaining the locking pins in position through the strut. Use the forcing screw on the compressor to slightly depress the spring. A socket should maintain the strut shaft position while you use a 24 mm wrench with a 24 mm strut shaft nut to achieve removal. Loosen the compressor screw with an Alignment Rod (J34013-38) while removing the strut and spring from their assembly. When installing the strut place it into the Strut Compressor (J34013-B) while securing the Damper Rod Clamp (J34013-20) around the strut shaft and direct the flat side of the upper spring seat to face outward. Reinstall the bearing in its original direction if you removed it. Lift the assembly into position then insert the spring and tighten the upper locking pin. Use the Alignment Rod (J34013-38) in the strut guide to spin the compressor screw clockwise until the strut shaft shows its threads. Install the washer and nut while following fastener precautions then dispense the Damper Rod Clamp (J34013-20) before tightening the strut mount nut to 75 Nm (55 ft. lbs.) with the strut shaft held by the socket. After completing the strut compressor operation remove the strut.


Related Cadillac Eldorado Parts
 Cadillac Eldorado Axle Pivot Bushing
 Cadillac Eldorado Coil Spring Insulator
 Cadillac Eldorado Control Arm Bolt
 Cadillac Eldorado Control Arm Bushing
 Cadillac Eldorado Lateral Arm
 Cadillac Eldorado Lateral Link
 Cadillac Eldorado Ride Height Sensor
 Cadillac Eldorado Sway Bar Bracket
 Cadillac Eldorado Trailing Arm
 Cadillac Eldorado Wheel Bearing
 Cadillac Eldorado Wheel Hub
 Cadillac Eldorado Wheel Seal