ChevyParts
My Garage
My Account
Cart
OEM Cadillac Eldorado Shock Absorber
Suspension Shock Absorber- Select Vehicle by Model
- Select Vehicle by VIN
Select Vehicle by Model
orMake
Model
Year
Select Vehicle by VIN
For the most accurate results, select vehicle by your VIN (Vehicle Identification Number).
34 Shock Absorbers found


Cadillac Eldorado Shock Absorber, Rear Part Number: 19258496
$197.17 MSRP: $386.03You Save: $188.86 (49%)Ships in 1-2 Business Days
Cadillac Eldorado Strut Part Number: 22047944
$76.72 MSRP: $136.99You Save: $60.27 (44%)Ships in 1-3 Business DaysCadillac Eldorado Shock Absorber Part Number: 22064565
$215.77 MSRP: $405.21You Save: $189.44 (47%)Ships in 1-2 Business Days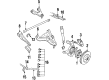
Cadillac Eldorado Shock Absorber, Front Part Number: 22065203
$44.77 MSRP: $79.94You Save: $35.17 (44%)Ships in 1-3 Business Days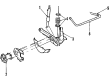
Cadillac Eldorado Shock Absorber, Rear Part Number: 22003326
$148.32 MSRP: $266.04You Save: $117.72 (45%)Ships in 1-3 Business Days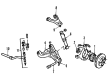
Cadillac Eldorado Shock Absorber, Front Part Number: 4993587
$44.77 MSRP: $79.94You Save: $35.17 (44%)Ships in 1-3 Business Days
Cadillac Eldorado Shock Absorber, Front Driver Side Part Number: 22064537
$173.26 MSRP: $323.30You Save: $150.04 (47%)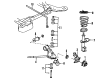
Cadillac Eldorado Macpherson Strut Part Number: 22189452
$173.26 MSRP: $323.30You Save: $150.04 (47%)Cadillac Eldorado Strut, Front Driver Side Part Number: 22400524

Cadillac Eldorado Shock Absorber, Rear Part Number: 22012064
Cadillac Eldorado Shock Absorber, Rear Part Number: 22012063
Cadillac Eldorado Strut Part Number: 22047945
Cadillac Eldorado Strut, Front Part Number: 22400389
Cadillac Eldorado Strut, Front Passenger Side Part Number: 22400528
Cadillac Eldorado Strut, Front Driver Side Part Number: 22400527
Cadillac Eldorado Strut, Driver Side Part Number: 22400522
Cadillac Eldorado Strut, Front Passenger Side Part Number: 22400525

Cadillac Eldorado Shock Absorber, Rear Part Number: 22400526
Cadillac Eldorado Macpherson Strut Part Number: 88945822
$67.69 MSRP: $120.87You Save: $53.18 (44%)Cadillac Eldorado Shock Absorber Part Number: 22064596
| Page 1 of 2 |Next >
1-20 of 34 Results
Cadillac Eldorado Shock Absorber
Want to cut long-term maintenance and repair costs? Choose OEM Shock Absorber. Those parts deliver top durability you can trust. On our site, you'll find a huge catalog of genuine Cadillac Eldorado parts. Prices are unbeatable, so you can keep more in your pocket. Every OEM Cadillac Eldorado Shock Absorber includes a manufacturer's warranty. You can also get an easy return policy that keeps buying risk free. Fast delivery, get your car on the road quickly. It's simple to search, compare, and order. Stop guessing about quality or fit. Order today and save with parts that last.
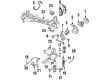
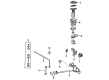
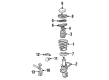
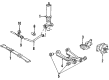
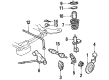
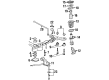
The position of the Shock Absorber of Cadillac Eldorado vehicles is critical to the suspension systems alongside the struts that it is correlated to. These components being able to reduce bouncing and also to flick off impulses trying to improve ride and handling characteristics. Through the time there are two general types of shock absorbers used in Cadillac Eldorado vehicles; twin-tube and mono-tube, although both of them are designed in a way that they employ hydraulical fluid flow in order to perform different driving conditions. Other subsequent advancements include Position Sensitive Damping (PSD) and Acceleration Sensitive Damping (ASD), that fine-tune the shock absorber's characteristics for certain driving conditions and Electrorheological (active) or Magnetorheological (active) dampers that enable semi-active or adaptive suspension systems perhaps the premier of both worlds.
Cadillac Eldorado Shock Absorber Parts and Q&A
- Q: How to service and repair the front shock absorber and steering knuckle on Cadillac Eldorado?A:The repair process for suspension strut begins by drawing marks on the inboard strut surface with an accurate tool following the upper knuckle radius. Make a scribe mark along the lower curve of the strut on the knuckle before adding a scribe mark across the strut/knuckle interface. Make sure to align the scribed marks between components when reintegrating parts.
- Q: How to replace the front shock absorber assembly on Cadillac Eldorado?A:To remove the strut assembly, first remove the nuts that fasten the strut assembly at the top end to the body. Lift the vehicle and hold the frame with jack stands. First and foremost, the tire and wheel assembly must be removed. Take care not to over-exert the innie tri-pot joints close to drive axles where this might cause unterminating inner component separation and joint failure. Additionally, do not scratch or crack the spring coating of the front suspension coil spring to prevent the coil spring to fail quickly. Remove the road sensing suspension position sensor form the lower Control Arm, if installed. Scribe the knuckle and strut and then remove the stabilizer link from the strut and the brake line bracket. For strut 4.6l disconnect the strut electrical connector. Unplug the wheel speed sensor wiring harness and the anti-lock brake sensor connector. Remove the strut-to-knuckle bolts and support the knuckle on wire prior to removing the strut. In installation, align the scribe marks and install the strut, and the strut-to-knuckle bolts, as well as the strut electrical connectors. Replace the a.b.s sensor, stabilizer link, brake line bracket, and the road sensing suspension with the position sensor to the lower control arms. Secure the nuts installing the top of the strut on the body and following a fastener torque specification: the wheel nuts should be tightened using 140 nm (100 ft. Lbs.), stabilizer link nuts using 55 nm (41 ft. Lbs.), strut assembly-to-body nuts using 21 nm (15 ft. Lbs.), and Steering Knuckle-to-strut nuts using 190 nm (140 ft. Lbs.). Finally, lower the vehicle.


Related Cadillac Eldorado Parts
 Cadillac Eldorado Axle Pivot Bushing
 Cadillac Eldorado Axle Support Bushings
 Cadillac Eldorado Brake Caliper Bracket
 Cadillac Eldorado Coil Springs
 Cadillac Eldorado Control Arm
 Cadillac Eldorado Control Arm Bolt
 Cadillac Eldorado Control Arm Bushing
 Cadillac Eldorado Lateral Arm
 Cadillac Eldorado Trailing Arm
 Cadillac Eldorado Trailing Arm Bushing
 Cadillac Eldorado Wheel Bearing
 Cadillac Eldorado Wheel Hub