ChevyParts
My Garage
My Account
Cart
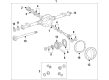
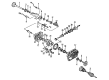
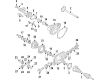
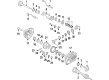
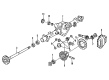
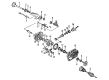
OEM Cadillac Escalade EXT Axle Shaft
Car Axle Shaft- Select Vehicle by Model
- Select Vehicle by VIN
Select Vehicle by Model
orMake
Model
Year
Select Vehicle by VIN
For the most accurate results, select vehicle by your VIN (Vehicle Identification Number).
33 Axle Shafts found


Cadillac Escalade EXT Pinion Shaft, Front Passenger Side Part Number: 19121909
$144.68 MSRP: $353.04You Save: $208.36 (60%)Ships in 1-2 Business Days

Cadillac Escalade EXT Output Shaft, Front Passenger Side Part Number: 19121908
$216.81 MSRP: $357.16You Save: $140.35 (40%)Ships in 1-2 Business Days


Cadillac Escalade EXT Axle Shaft, Rear Part Number: 22874951
$503.01 MSRP: $863.89You Save: $360.88 (42%)Ships in 1-3 Business Days

Cadillac Escalade EXT Companion Flange Part Number: 88967027
$74.62 MSRP: $118.46You Save: $43.84 (38%)

Cadillac Escalade EXT Axle Shaft, Rear Part Number: 22943112
$310.37 MSRP: $533.02You Save: $222.65 (42%)


Cadillac Escalade EXT Axle Shaft Assembly, Front Part Number: 26069244
$400.71 MSRP: $650.33You Save: $249.62 (39%)Ships in 1-2 Business Days
Cadillac Escalade EXT Axle Assembly, Front Part Number: 84842044
$323.06 MSRP: $508.32You Save: $185.26 (37%)

Cadillac Escalade EXT Output Shaft, Front Passenger Side Part Number: 15801499
$368.21 MSRP: $493.91You Save: $125.70 (26%)Ships in 1-2 Business DaysCadillac Escalade EXT Axle Shaft Assembly, Front Part Number: 85126785
$211.47 MSRP: $584.72You Save: $373.25 (64%)Cadillac Escalade EXT Inner Shaft, Front Part Number: 26033975
$14.51 MSRP: $36.98You Save: $22.47 (61%)Ships in 1-2 Business Days


Cadillac Escalade EXT Output Shaft, Front Passenger Side Part Number: 22761721
$195.44 MSRP: $307.50You Save: $112.06 (37%)


Cadillac Escalade EXT Axle Shafts, Rear Part Number: 12471488


Cadillac Escalade EXT Axle Shaft, Rear Part Number: 26042829


| Page 1 of 2 |Next >
1-20 of 33 Results
Cadillac Escalade EXT Axle Shaft
Want to cut long-term maintenance and repair costs? Choose OEM Axle Shaft. Those parts deliver top durability you can trust. On our site, you'll find a huge catalog of genuine Cadillac Escalade EXT parts. Prices are unbeatable, so you can keep more in your pocket. Every OEM Cadillac Escalade EXT Axle Shaft includes a manufacturer's warranty. You can also get an easy return policy that keeps buying risk free. Fast delivery, get your car on the road quickly. It's simple to search, compare, and order. Stop guessing about quality or fit. Order today and save with parts that last.
Cadillac Escalade EXT Axle Shaft Parts Questions & Experts Answers
- Q: How to replace the wheel axle shaft on Cadillac Escalade EXT?A:One must begin drive shaft replacement by lifting the vehicle followed by tire wheel removal. Drive axle center caps can be removed when they are available. To prevent turn movement of the drive axle wheel drive shaft insert a drift or a large screwdriver through the brake caliper into a brake rotor vane. The hub install requires new hardware and removal of its nut along with washer while respecting the need to avoid using these components again. The axle remover tool (J 45859) enables users to press the wheel drive shaft away from the hub after which they must remove the six bolts retaining the wheel drive shaft inboard flange to the output shaft flange. First remove the drift from the rotor before you separate the stabilizer shaft link from the lower Control Arm and put shop towels around both wheel drive shaft boots to defend them against damage. Push the wheel drive shaft from the lower Control Arm opening. The installation requires cleaning the Steering Knuckle along with wheel drive shaft threads and splines until they are free from dirt and spray and contamination. Place the wheel drive shaft splined shank into the knuckle hub before installing the washer together with the new hub nut onto the wheel drive shaft but do not tighten it at this stage. Install the inboard flange of the wheel drive shaft onto the output shaft flange with its dedicated bolts followed by a large screwdriver insertion into the wheel caliper in a brake vane to stop wheel drive shaft rotation. Fasten the inboard flange bolts to 79 nm (58 ft. Lbs.) strength while the hub nut receives a torque of 240 nm (177 ft. Lbs.). After removing the drift from the rotor, check if drive axle center cap is available then install it while you reattach stabilizer shaft link and complete the process by installing wheel and tire assembly before lowering the vehicle.

Related Cadillac Escalade EXT Parts
 Cadillac Escalade EXT 4WD Actuator
 Cadillac Escalade EXT CV Boot
 Cadillac Escalade EXT CV Joint
 Cadillac Escalade EXT Differential
 Cadillac Escalade EXT Differential Bearing
 Cadillac Escalade EXT Differential Cover
 Cadillac Escalade EXT Drive Shaft
 Cadillac Escalade EXT Driveshaft Yokes
 Cadillac Escalade EXT Pinion Bearing
 Cadillac Escalade EXT Pinion Washer
 Cadillac Escalade EXT Slip Yoke
 Cadillac Escalade EXT Universal Joint