ChevyParts
My Garage
My Account
Cart
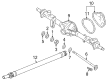
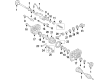
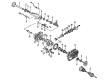
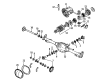
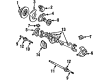
OEM Cadillac Escalade EXT Pinion Bearing
Transmission Pinion Bearing- Select Vehicle by Model
- Select Vehicle by VIN
Select Vehicle by Model
orMake
Model
Year
Select Vehicle by VIN
For the most accurate results, select vehicle by your VIN (Vehicle Identification Number).
14 Pinion Bearings found


Cadillac Escalade EXT Wheel Bearing Part Number: 9436881
$80.31 MSRP: $145.36You Save: $65.05 (45%)Ships in 1-3 Business Days


Cadillac Escalade EXT Pinion Bearings Part Number: 9413427
$56.84 MSRP: $109.76You Save: $52.92 (49%)Ships in 1-2 Business Days

Cadillac Escalade EXT Side Bearings Part Number: 88943839
$48.83 MSRP: $144.56You Save: $95.73 (67%)Ships in 1-2 Business Days
Cadillac Escalade EXT Pinion Bearings, Inner Part Number: 457108
$56.11 MSRP: $154.36You Save: $98.25 (64%)Ships in 1-2 Business Days


Cadillac Escalade EXT Pinion Bearings Part Number: 454021
$161.60 MSRP: $292.48You Save: $130.88 (45%)Ships in 1-2 Business Days


Cadillac Escalade EXT Pinion Seal, Outer Part Number: 25824252
$50.05 MSRP: $97.14You Save: $47.09 (49%)Ships in 1-2 Business Days

Cadillac Escalade EXT Pinion Bearings, Inner Part Number: 25824251
$91.87 MSRP: $179.86You Save: $87.99 (49%)Ships in 1-2 Business Days
Cadillac Escalade EXT Side Bearings Part Number: 25824250
$73.65 MSRP: $142.94You Save: $69.29 (49%)Ships in 1-2 Business Days


Cadillac Escalade EXT Pinion Bearings Part Number: 23243839
$72.64 MSRP: $142.22You Save: $69.58 (49%)Ships in 1-2 Business Days
Cadillac Escalade EXT Side Bearings Part Number: 11505123
$57.30 MSRP: $169.58You Save: $112.28 (67%)Ships in 1-2 Business DaysCadillac Escalade EXT Pinion Bearings Part Number: 9417781
$43.86 MSRP: $103.28You Save: $59.42 (58%)Ships in 1-2 Business Days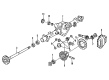
Cadillac Escalade EXT Pinion Bearings Part Number: 9414917
$70.11 MSRP: $133.08You Save: $62.97 (48%)Ships in 1-2 Business Days
Cadillac Escalade EXT Pinion Bearings Part Number: 9413168
$93.86 MSRP: $167.61You Save: $73.75 (44%)Ships in 1-2 Business Days
Cadillac Escalade EXT Pinion Bearings, Outer Part Number: 15534483
$53.12 MSRP: $94.85You Save: $41.73 (44%)Ships in 1-2 Business Days
Cadillac Escalade EXT Pinion Bearing
Want to cut long-term maintenance and repair costs? Choose OEM Pinion Bearing. Those parts deliver top durability you can trust. On our site, you'll find a huge catalog of genuine Cadillac Escalade EXT parts. Prices are unbeatable, so you can keep more in your pocket. Every OEM Cadillac Escalade EXT Pinion Bearing includes a manufacturer's warranty. You can also get an easy return policy that keeps buying risk free. Fast delivery, get your car on the road quickly. It's simple to search, compare, and order. Stop guessing about quality or fit. Order today and save with parts that last.
Cadillac Escalade EXT Pinion Bearing Parts Questions & Experts Answers
- Q: How to replace the drive pinion bearings on a 10.5-inch axle on Cadillac Escalade EXT?A:The drive Pinion Bearing replacement task for a 10.5-inch axle requires Differential side bearing installer (J 22761), flange and pulley holding tool (J 8614-01), Pinion Bearing installer (J 37624), pinion cone and side bearing installer (J 24433), split plate bearing puller (J 22912-01), rear axle pinion oil seal installer (J 44414), rear Pinion Bearing installer (J 8608), and universal driver handle - 3/4 in - 10 (J 8092) as tools. Start by elevating the vehicle to access the Differential assembly accompanied by the pinion gear bearing retainer and yoke before extracting the oil seal along with both pinion bearings and the pinion with collapsible spacer. A hydraulic press working with the split plate bearing puller (J 22912-01) will help remove the inner Pinion Bearing and both bearing cups need extraction with a hammer using a brass drift. The installation of the pinion gear starts with the pinion gear pilot bearing installed by a Differential side bearing installer (J 22761) after which the inner Pinion Bearing cup requires installation by using the Pinion Bearing installer (J 37624) with universal driver handle - 3/4 in - 10 (J 8092) then follow it with the outer Pinion Bearing cup using a rear Pinion Bearing installer (J 8608) with universal driver handle - 3/4 in - 10 (J 8092). Proceed with inner Pinion Bearing press operation using the pinion cone and side bearing installer (J 24433). Then install a new collapsible spacer followed by lubricating the pinion bearings before inserting the outer Pinion Bearing into its retainer. The rear axle pinion oil seal installer (J 44414) installs a new pinion oil seal after which the Pinion Bearing retainer receives the pinion with sealant application (GM P/N 12346004 or Canadian P/N 10953480) to the pinion yoke splines before alignment and installation. Apply torque to the pinion nut using while holding both the flange and pulley holding tool (J 8614-01) until the pinion end play reaches the desired limitation while performing constant pinion rotation during tightening. When the flange and pulley holding tool (J 8614-01) is removed, install either the original shim or a 0.41 mm high (0.016 inch) shim when the original shim is not available before attaching the pinion gear bearing retainer to the axle housing while tightening the retainer bolts to 88 nm (65 ft. Lbs.). The rotating torque measurement of the pinion should range from 1.0 to 2.3 nm and 1.7 to 3.4 nm (10 to 20 inch lbs and 15 to 30 inch lbs) depending on whether you work with used or new bearings. Use the flange and pulley holding tool (J 8614-01) to tighten the pinion nut while checking torque values until reaching proper specifications. When you achieve the predefined torque you must repeatedly rotate the pinion spindle to allow bearing proper seating followed by torque check and optional adjustments. The procedure ends by re-installing the Differential assembly while making preload adjustments on the side bearings and determining and installing the appropriate drive pinion shim thickness before setting backlash and filling the axle with lubricant before lowering the vehicle.

Related Cadillac Escalade EXT Parts
 Cadillac Escalade EXT 4WD Actuator
 Cadillac Escalade EXT CV Boot
 Cadillac Escalade EXT CV Joint
 Cadillac Escalade EXT Differential
 Cadillac Escalade EXT Differential Bearing
 Cadillac Escalade EXT Differential Cover
 Cadillac Escalade EXT Differential Seal
 Cadillac Escalade EXT Drive Shaft
 Cadillac Escalade EXT Driveshaft Yokes
 Cadillac Escalade EXT Pinion Washer
 Cadillac Escalade EXT Slip Yoke
 Cadillac Escalade EXT Universal Joint