ChevyParts
My Garage
My Account
Cart
OEM Cadillac Escalade EXT Fuel Injector
Gas Injector- Select Vehicle by Model
- Select Vehicle by VIN
Select Vehicle by Model
orMake
Model
Year
Select Vehicle by VIN
For the most accurate results, select vehicle by your VIN (Vehicle Identification Number).
8 Fuel Injectors found


Cadillac Escalade EXT Injector Part Number: 12609749
$73.20 MSRP: $148.68You Save: $75.48 (51%)Ships in 1-2 Business Days

Cadillac Escalade EXT Injector Part Number: 12580426
$107.23 MSRP: $217.78You Save: $110.55 (51%)Ships in 1-2 Business Days
Cadillac Escalade EXT Injector Part Number: 19421333
$106.16 MSRP: $215.60You Save: $109.44 (51%)
Cadillac Escalade EXT Injector Part Number: 97780474
$486.29 MSRP: $963.93You Save: $477.64 (50%)Ships in 1-3 Business Days
Cadillac Escalade EXT Injector Part Number: 97780144
$422.63 MSRP: $837.17You Save: $414.54 (50%)
Cadillac Escalade EXT Injector Part Number: 97729095
$274.91 MSRP: $543.11You Save: $268.20 (50%)Ships in 1-3 Business Days
Cadillac Escalade EXT Injector Part Number: 17113698
$112.36 MSRP: $228.20You Save: $115.84 (51%)
Cadillac Escalade EXT Fuel Rail Part Number: 52371460
Cadillac Escalade EXT Fuel Injector
Want to cut long-term maintenance and repair costs? Choose OEM Fuel Injector. Those parts deliver top durability you can trust. On our site, you'll find a huge catalog of genuine Cadillac Escalade EXT parts. Prices are unbeatable, so you can keep more in your pocket. Every OEM Cadillac Escalade EXT Fuel Injector includes a manufacturer's warranty. You can also get an easy return policy that keeps buying risk free. Fast delivery, get your car on the road quickly. It's simple to search, compare, and order. Stop guessing about quality or fit. Order today and save with parts that last.
Cadillac Escalade EXT Fuel Injector Parts Questions & Experts Answers
- Q: How to replace the fuel injector on Cadillac Escalade EXT?A:You should start Fuel Injector replacement by first detaching the air cleaner outlet duct along with relaxing fuel system pressure. Rephrase the engine wiring harness connectors from evap purge solenoid to generator to MAP Sensor to Ignition Coil to fuel injectors while marking all connectors for reassembly order. The right Cylinder Head requires the removal of engine wiring harness clips and negative Battery Cable while both the chassis fuel feed pipe and the evap tube need to be disconnected. The procedure begins by separating the evap canister purge solenoid retainer before removing Fuel Rail bolts to avoid damaging injector electrical connectors along with spray tips during the Fuel Rail lift process. You should clean the Fuel Rail using a spray type engine cleaner before lubricating new Fuel Injector O-Ring seals with clean engine oil so you can install them onto the injectors while putting them in the Fuel Rail. Install the Fuel Rail onto the Intake Manifold then push down firmly until it seating is complete. Screw Fuel Rail bolts with a torque setting of 10 n.m (89 lb in) before reuniting the evap tube with chassis fuel feed pipe. Put back in position the pcv hose then gather and fasten the engine wiring harness. After securing the proper seating and attachment of battery negative cable and engine harness connectors you should proceed with connecting them. Turn the ignition on after tightening the engine wiring harness bracket nut to 5 n.m (44 lb in) to inspect any leaking points after the ignition cycles. Put back the air cleaner outlet duct as the last step.

Related Cadillac Escalade EXT Parts
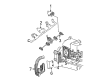
 Cadillac Escalade EXT Air Filter Box
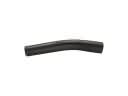 Cadillac Escalade EXT Fuel Filler Hose
 Cadillac Escalade EXT Fuel Injection Pump
 Cadillac Escalade EXT Fuel Injector O-Ring
 Cadillac Escalade EXT Fuel Pressure Regulator
 Cadillac Escalade EXT Fuel Pressure Sensor
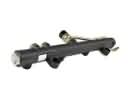 Cadillac Escalade EXT Fuel Rail
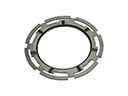 Cadillac Escalade EXT Fuel Tank Lock Ring
 Cadillac Escalade EXT Fuel Tank Strap
 Cadillac Escalade EXT Gas Cap
 Cadillac Escalade EXT Idle Control Valve
 Cadillac Escalade EXT Throttle Body