ChevyParts
My Garage
My Account
Cart
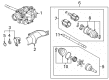
OEM Cadillac STS CV Boot
Axle Boot- Select Vehicle by Model
- Select Vehicle by VIN
Select Vehicle by Model
orMake
Model
Year
Select Vehicle by VIN
For the most accurate results, select vehicle by your VIN (Vehicle Identification Number).
6 CV Boots found

Cadillac STS Outer CV Joint Boot Part Number: 88957226
$57.16 MSRP: $97.30You Save: $40.14 (42%)
Cadillac STS Inner CV Joint Boot Part Number: 88957225
$63.99 MSRP: $95.95You Save: $31.96 (34%)Ships in 1-2 Business Days


Cadillac STS Outer Boot Part Number: 88957228

Cadillac STS Outer Boot Part Number: 88957230

Cadillac STS Inner Boot Part Number: 88957229

Cadillac STS Inner Boot Part Number: 88957227
Cadillac STS CV Boot
Want to cut long-term maintenance and repair costs? Choose OEM CV Boot. Those parts deliver top durability you can trust. On our site, you'll find a huge catalog of genuine Cadillac STS parts. Prices are unbeatable, so you can keep more in your pocket. Every OEM Cadillac STS CV Boot includes a manufacturer's warranty. You can also get an easy return policy that keeps buying risk free. Fast delivery, get your car on the road quickly. It's simple to search, compare, and order. Stop guessing about quality or fit. Order today and save with parts that last.
Basically, this CV Boot is crucial in the performance and dependability of the Cadillac STS series. Primarily, the CV Boot is formulated to protect constant velocity or CV joints which is an extremely vital element that enables direct power transfer from the transaxle to the wheels of the Cadillac STS. But for this flexible rubber or plastic part, it is able to retain the lubricant needed while at the same time protect the CV joints from the detrimental effects of dirt and debris. The Cadillac STS has varied CV joints; for instance, the fixed and plunging that are uniquely designed to support given circumstances on the road. The CV boot should be inspected on a regular basis because, if damaged, it will lead to joint failure on the vehicle reducing efficiency and safety. The Cadillac STS is one of the Cadillac's models which were called luxury sports sedans and appeared in 1988; CV Boot has remained a part of the car since its genesis and is critical to its function. Supports a variety of STS models because Cadillac drivers need to always count on the CV Boot quality no matter the generation it belongs to. Thus, the CV Boot has unique characteristics of high durability and resistance to adverse influences exerted by various conditions. Finally, the CV Boot contributes to the overall performance of the vehicle by increasing fuel efficiency and safety of the car while supporting Cadillac brand's appreciation of high quality and performance among the other producers of the luxury sedans.
Cadillac STS CV Boot Parts Questions & Experts Answers
- Q: How to replace the Rear Wheel Drive Shaft Outer CV Boot on Cadillac STS?A:You should remove the rear wheel drive shaft from the vehicle to replace the front rear wheel drive shaft outer joint boot. For the Axle Shaft, wrap the shop towel and clamp the wheel drive shaft vertically into the bench vise while ensuring that retaining clamps are released and replaced with new ones. Using the side cutter, pull out and remove the retaining clamps from the outer boot before the boot is detached from the CV Joint housing and grease is gotten rid of along the CV Joint inner race, cage, and balls. To do get rid of the outer CV Joint from the Axle Shaft, hold the outer joint housing horizontally, put a wood block between the seal and the joint and use a hammer to force the CV Joint off the wheel drive shaft. A brass drift and hammer should be used if it resists. Remove the Axle Shaft retaining ring and take the boot off the Axle Shaft. Then cover the joint outer race splined shaft with a shop towel and fix the outer race vertically in a bench vise. Tap the wheel drive shaft joints inner cage gently by using a brass drif and hammer until it reveals the first ball lying which can be extracted, perhaps by a small screwdriver. Repeat this process until all balls are gone and you make sure that you remove all old grease and contaminants from the inner race, outer race, cage, ball, and exposed end of the Axle Shaft, then you air dry each part. Be sure to replace the wheel drive shaft in the case of defective inner parts. For assembly, orient the cage with larger radius corners up and slide the inner race with its 90-degree angle aligned with the cage. Turn the inner race at an angle where its grooved face is pointing upwards and then making sure it is properly snapped into the cage. Match the inner race ball tracks to the cage windows and then wrap a shop towel around the joint outer race splined shaft and secure the outer race vertically to a bench vice. Place the cage and inner race at 90 degrees to the outer race ensuring that inner race ring groove is down and align the cage windows with the outer race ball tracks so that you can put the balls in. Press down the cage to expose the opposites cage window for ball installation tapping gently with a brass drift and hammer to ensure that there is no gap between is between ball and inner race ball track. Repeat this until all balls are located, and then place about 60 percent of grease from the service kit in the outer joint with its versing on the tracks of the ball, the balls themselves, the cage, the internal race, and the remainder in the bottom of the outer race. After removing the outer joint from vise, cover the Axle Shaft with a shop towel, and fix the wheel drive shaft in a horizontal bench vise. Put in a new small seal retaining clamp onto the Axle Shaft, then place the seal on it and install a new retaining ring. Set the outer joint horizontally, mesh the inner race splines onto the Axle Shaft splines, and use a flat-bladed tool to snap home the Axle Shaft retaining ring while pressing the outer joint onto the Axle Shaft until it is all the way home. Hammer the outer joint onto the shaft, fill in the remaining grease from the service kit into the seal and align the small seal retaining clamp into the boot groove. Make sure the boot is the proper shape and no damage is present and crimp the small seal retaining clamp with j 42572 until there is a 1 mm gap and seat the large seal retaining clamp onto the seal and joint outer race so that there is no deformation of the seal. Crimp the large seal retaining clamp with j 42572 to 1mm gap, hold for no less than 2 seconds. Lastly, rotate the wheel drive shaft several times before re-installing it to test the outside joint for smooth operation.


