ChevyParts
My Garage
My Account
Cart
OEM Chevrolet Avalanche 1500 Window Motor
Window Lift Motor- Select Vehicle by Model
- Select Vehicle by VIN
Select Vehicle by Model
orMake
Model
Year
Select Vehicle by VIN
For the most accurate results, select vehicle by your VIN (Vehicle Identification Number).
5 Window Motors found


Chevrolet Avalanche 1500 Window Motor, Front Driver Side Part Number: 19179943
$50.15 MSRP: $97.34You Save: $47.19 (49%)Ships in 1-2 Business Days
Chevrolet Avalanche 1500 Window Motor, Front Passenger Side Part Number: 19179942
$50.15 MSRP: $97.34You Save: $47.19 (49%)Ships in 1-2 Business Days

Chevrolet Avalanche 1500 Window Motor Part Number: 89044536

Chevrolet Avalanche 1500 Window Motor
Want to cut long-term maintenance and repair costs? Choose OEM Window Motor. Those parts deliver top durability you can trust. On our site, you'll find a huge catalog of genuine Chevrolet Avalanche 1500 parts. Prices are unbeatable, so you can keep more in your pocket. Every OEM Chevrolet Avalanche 1500 Window Motor includes a manufacturer's warranty. You can also get an easy return policy that keeps buying risk free. Fast delivery, get your car on the road quickly. It's simple to search, compare, and order. Stop guessing about quality or fit. Order today and save with parts that last.
Chevrolet Avalanche 1500 Window Motor Parts and Q&A
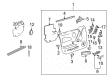
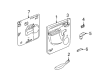
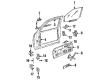
- Q: How to replace the rear door window motor on Chevrolet Avalanche 1500?A:Rear Window Regulator motor replacement requires you to raise the window first. When the motor becomes non-operational you must remove the window to gain access to the screws. The first action requires practitioners to remove the door trim panel and water deflector and door speaker followed by window support. Starting with motor wiring harness disconnection users need to remove three bolts (3 bolts) located on the regulator's front side. Wiggle the motor carefully while separating it from the housing until both components fully disconnect without allowing the housing's internal gear to escape thus preventing damage. Separate the motor unit from the Window Regulator mechanism. After placing the new motor onto the cable housing its securement with 3 bolts (3 bolts) requires 5 n.m pressure (44 lb in torque). After reinstalling the window you must connect the wiring harness to the Window Regulator motor. After securing the wires to the switch for window testing you can reinstall the speaker along with the water deflector and door trim panel.

Related Chevrolet Avalanche 1500 Parts
 Chevrolet Avalanche 1500 Door Armrest
 Chevrolet Avalanche 1500 Door Latch Assembly
 Chevrolet Avalanche 1500 Door Lock
 Chevrolet Avalanche 1500 Door Lock Actuator
 Chevrolet Avalanche 1500 Door Lock Cylinder
 Chevrolet Avalanche 1500 Door Seal
 Chevrolet Avalanche 1500 Door Striker
 Chevrolet Avalanche 1500 Tailgate Lock
 Chevrolet Avalanche 1500 Trunk Latch
 Chevrolet Avalanche 1500 Weather Strip
 Chevrolet Avalanche 1500 Window Regulator
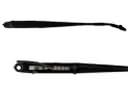 Chevrolet Avalanche 1500 Wiper Arm