ChevyParts
My Garage
My Account
Cart
OEM Chevrolet Avalanche 2500 Oil Pan
Oil Drain Pan- Select Vehicle by Model
- Select Vehicle by VIN
Select Vehicle by Model
orMake
Model
Year
Select Vehicle by VIN
For the most accurate results, select vehicle by your VIN (Vehicle Identification Number).
2 Oil Pans found

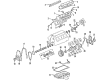
Chevrolet Avalanche 2500 Oil Pan Part Number: 12579273
$313.43 MSRP: $538.29You Save: $224.86 (42%)Ships in 1-2 Business Days
Chevrolet Avalanche 2500 Oil Pan Part Number: 12574833
Chevrolet Avalanche 2500 Oil Pan
Want to cut long-term maintenance and repair costs? Choose OEM Oil Pan. Those parts deliver top durability you can trust. On our site, you'll find a huge catalog of genuine Chevrolet Avalanche 2500 parts. Prices are unbeatable, so you can keep more in your pocket. Every OEM Chevrolet Avalanche 2500 Oil Pan includes a manufacturer's warranty. You can also get an easy return policy that keeps buying risk free. Fast delivery, get your car on the road quickly. It's simple to search, compare, and order. Stop guessing about quality or fit. Order today and save with parts that last.
Chevrolet Avalanche 2500 Oil Pan Parts Questions & Experts Answers
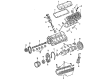
- Q: How to replace the oil pan on Chevrolet Avalanche 2500?A:Start the Oil Pan replacement process by making sure the crankshaft balancer does not raise the engine because this could cause damage. Start by removing the front Differential for four wheel drive (4WD) vehicles then proceed with Starter motor removal. Start by removing both the skid plate bolts and skid plate component. The Oil Pan replacement begins by removing the crossbar bolts and the crossbar on two wheel drive (2WD) models. For 4wd models, do the same. First drain the engine oil before you remove the oil level indicator and disconnect the oil level sensor electrical connector. The oil level sensor operation requires separation of the engine harness from the Oil Pan then removing the sensor. Disconnect the battery cable channel bolt then relocate the channel before you start removing the Oil Pan bolts. It is possible to use the same Oil Pan Gasket if it shows no signs of damage. You should apply gm 2346286 (Canadian P/N 10953472) sealant to four contact points on the sides of both front and rear crankshaft bearing caps. Install a new Oil Pan Gasket into the groove before putting in the Oil Pan and its attachment bolts. Start by torquing the bolts to 10 nm (89 inch lbs.) then finish by tightening them to 25 nm (18 ft. Lbs.). Fasten the battery cable channel using the bolt that requires 9 nm (80 inch lbs.) torque. Connect the oil level sensor to the Oil Pan and fasten it with 20 nm (15 ft. Lbs.) torque before installing the harness clip and restoring the oil level sensor electrical connection. Reinstall the oil level indicator and add oil to the engine while installing the crossbar and its bolts with a torque setting of 100 nm (74 ft. Lbs.). Repeat this procedure for adding the second crossbar installation only if required. Reinstall the Oil Pan skid plate before installing its bolts at 20 nm (15 ft. Lbs.) which should be followed by reinstallation of the Starter motor and the front Differential (if vehicle has 4WD).

Related Chevrolet Avalanche 2500 Parts
 Chevrolet Avalanche 2500 Camshaft
 Chevrolet Avalanche 2500 Coolant Filter
 Chevrolet Avalanche 2500 Crankshaft
 Chevrolet Avalanche 2500 Crankshaft Seal
 Chevrolet Avalanche 2500 Fuel Filter
 Chevrolet Avalanche 2500 Head Gasket
 Chevrolet Avalanche 2500 Lash Adjuster
 Chevrolet Avalanche 2500 Motor And Transmission Mount
 Chevrolet Avalanche 2500 Oil Pan Baffle
 Chevrolet Avalanche 2500 Piston
 Chevrolet Avalanche 2500 Pushrod
 Chevrolet Avalanche 2500 Timing Chain